
Following on from my 'Custom Workbench Build #1' Article, I thought I would share how I went about building two hobby benches.
The idea is to set up a good workspace for RC projects. I have created one standing bench for soldering and building and the other a seated bench which is also for building, but mainly for updating software on my flight computers. I also had another objective. I wanted to build something that could be adapted in the future if I lose interest in RC (I also like motorbikes and have had plenty over the years - I may want to rebuild an engine on one of the benches down the road). I have never welded in my life! I knew if I wanted something sturdy that will last a long time, it would have to be made with steel. However, I also wanted something with a little class, unlike me! This project has been incredibly rewarding. It’s nice to finally be able to walk into my garage and have ample bench space and light to work on my RC projects!
Materials
The following materials were purchased from various stores and suppliers:
| Item | Amount | Price |
|---|---|---|
| Steel (40mm Box Tubing @ 3mm) | 10 meters | $110.00 |
| Steel (50mm Box Tubing @ 3mm) | 10 meters | $140.00 |
| 60mm Flat Steel (hinge support) | 1 meter | $12.00 |
| Aluminium Channel (shelf) | 3 meters | $16.00 |
| Castor Wheels | 4 | $25.00 |
| Folding Leg Hinges | 4 | $25.00 |
| 50mm Stainless Wood Screws | 30 | $40.00 |
| 1800mm X 700mm Timber Benchtop (Purchased heavily discounted) | 2 | $60.00 |
| 100 X 100 Australian Hardwood Timber Legs (secondhand and restored) | 4 meters | $20.00 |
| MDF Timber for shelf | 2 meters | $16.00 |
| Power Outlet | 1 | $30.00 |
| L.E.D Light | 1 | $25.00 |
| Welding Wire | 1kg | $35.00 |
| Grinding Discs | 5 | $25.00 |
| Clear-Coat Paint | 2 | $30.00 |
| Timber Oil | 1 Liter | $20.00 |
| Total | $629.00 |
Don’t have a heart attack! Remember, this is about creating something that will last a very long time! Spending $629.00 on two benches works out very cheap. Especially considering that I expect to get at least 25 years out of them!
Tools
I used the following tools for this project:
- Power Drill
- Hammer
- Punch
- Basic MIG welder
- Wire wheel (for drill)
- Flexovit Multi purpose Flexi strip
- Various drill bits
- Magnetic welding clamps X 4
- Square
How I Built the Benches
As I mentioned, I have never welded before. I knew I had a challenge on my hands but I was also excited! I have been told many times that being able to weld will come in handy one day. Now, I’m thinking up ways I can make things incorporating welding! Here’s how I learned to weld:
- Books
It’s been many years since I have been to the library - since high school in fact! There are so many options at the local library for content. I opted for the old fashioned way of borrowing books. These are the books that really helped me understand the basics.
- Videos
This video by far taught me the most. I’m incredibly grateful for this video Robert “Smitty” Smith and UCI for such a great video! https://www.youtube.com/watch?v=lzBGZaS1apw
- Practice, Practice, Practice!
You can read and watch as many videos as you'd like, but there is nothing like the real thing! Getting a feel for welding can only be done by doing it. I found that there’s more than one type of weld - there’s many! Not only that, throw in the complexity of the welder settings, the type of metal you’re welding (thickness and composition), and which piece of metal you should concentrate the heat on. However, don’t let this deter you! It actually sounds more complicated than it really is. Some common sense will certainly go a long way. Next comes time - within an hour, I could perform 4 essential ways to weld two pieces of metal together! I suggest for the first few welds that you perform a practice run of how you’re going to join two pieces together. That way, you know what works and what doesn’t. It also ensures you don’t mess up on the actual job - rather, you cut two small pieces of material to prevent wastage. After that, it’s pretty simple if you’re sticking with the same thickness of metal.  I have to be honest! You can clearly see where I started the project and finished up! This is reflective in the quality of the weld. By the end, my welds were really neat and strong. Let’s hope I can maintain that level of workmanship! Producing a square bench can be the next challenge. Having clamps on hand and a level working space makes a big difference. In addition, having a square on hand is a must to ensure the work is square. The biggest help I had was magnetic clamps (pictured below). They keep the job square while you weld.
Timber
Australian hardwood is relatively cheap. It has nice deep red colors and is relatively strong. I was able to add an additional depth of colors by applying 2 stroke motor oil! Yes, that’s right, 2 stroke motor oil! The oil was for my motorbike and was mixed with petrol. I simply poured the mixture (25:1) over the timber while it was sitting in the upright position and left it for two weeks.  After the timber had enough time to allow the oil to penetrate and drain off, I simply wiped it with a rag soaked in mentholated spirits and coated the legs with decking oil. The result was amazing! You can see a more defined timber grain and level of detail.
Let there be light… and ample power!
One thing that I believe you can never have enough of is light! Most projects have a level of complexity requiring light to ensure a high degree of accuracy. I sourced the L.E.D light from a local store here in Australia called Aldi. Light is thrown across the entire bench making life much easier. The power board was sourced from a local store called JayCar. Admittedly overpriced, the power board is very handy as it allows me to control the power to each tool or appliance.
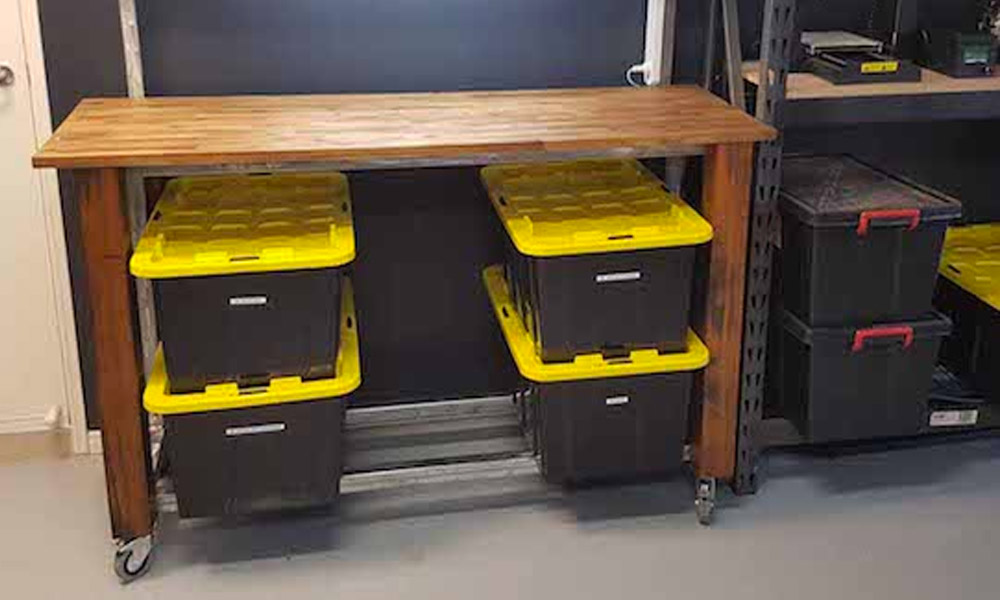
Removable Shelf
I wanted something where I could increase the workbench area without being restricted. However, I also wanted the convenience of being able to have quick access to the most common tools I use. To make a removable shelf, I simply created the shelf using 40mm box tubing while creating brackets to hold the shelf with 50mm box tubing. On the bottom of the 50mm brackets, I welded a 50mm plate sourced at my local Bunnings store for $0.75 apiece.
Conclusion
This is not a difficult project - it just requires time and some basic common sense. Anyone can do this, including you! By simply breaking down the project into small chunks, I was able to produce some really nice benches. Since finishing the benches, I have been able to complete two projects where I found myself with more than enough bench space. I love that I can start a project, pause it, and return to it whenever I want to know that I don’t have to clutter up the dining or coffee table! Written by Thomas
Hear it First: Join our Mailing List
Sign up to receive new product updates, exclusive discounts, news, and more!