Lieferant werden Blog Neue Artikel
Registrieren

Gesamtpreis

0,00 €

Warenkorb 0 Warenkorb 0 Loading...

Kingduino LCD-Tastatur-Schild

Generating Links

Kingduino LCD-Tastatur-Schild

Preis:

Now save speichern 0,00 € 0,00 €

1,92 €
Bereits gekauft Discontinued Product

Please continue searching for a similar product.
SKU:
009000008
Kostenloser Versand? Klicke hier um mehr zu lernen!

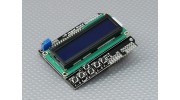
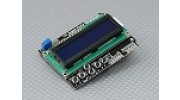
Dieser LCD-Tastatur-Schild (männlichen Pin-Anschluss) für Arduino besteht aus einem 16x2 blauen LCD-Display und 6 momentane Drucktasten, von links nach rechts, SELECT, links, oben, unten, rechts und RESET. Der Schirm kann direkt auf einem Arduino Duemilanove Board gesteckt werden, Löten machen oder fly-Verdrahtung zum Anschluss überflüssig. Pins 5, 6, 7, 8 und 9 werden als Schnittstelle zu der LCD verwendet.

Eigenschaften:
• Einfache 16x2 blau LCD-Bildschirm zu lesen
• Einstellbarer Kontrast
• Verbund Design und leicht zu erweitern
• Mit geänderter LCD4Bit Schnittstelle

Modifizierte LCD4Bit Schnittstelle:
Um 12 den SPI-Port für die zukünftige Verwendung, die Digital-IO-Pins DB7-10 und PIN11 & Stift in der ursprünglichen LCD4Bit Bibliothek zur Wahrung wurden DB4-7 und Pin 8 & Pin 9 bzw. bewegt.

Tastenfeld:
Die Tastatur besteht aus 5 Tasten - SELECT, links, oben, unten und rechts sowie eine Reset-Taste. Um den digitalen IO Pin Ressource speichern, wird die Tastatur-Schnittstelle verwendet nur einen ADC-Kanal. Der Schlüsselwert wird über einen 5-stufigen Widerstandsspannungsteiler lesen. Wenn eine Taste gedrückt wird, liest der ADC den Spannungswert durch den Spannungsteiler; dann wird der Spannungswert an den Spannungsschwellenwert in einem Array gespeichert Vergleich zu ermitteln, welche Taste gedrückt wurde.

Specs:
Betriebsspannung: 5 V DC
Maße: 80 x 58 x 22mm
Gewicht: 52 g

* Hinweis: Dies ist kein Original Arduino Markenprodukt.

Video hochladen

Registrieren Sie sich bitte, um Videos hochzuladen anmelden oder Registrieren

Themen
Sortieren nach
Neueste Themen
* Nickname:

* Deine Antwort:


Geben Sie den im Bild gezeigten Text in das Feld unten ein
*Verifizierungs-Schlüssel:
Abbrechen
Senden
Poste ein neues Thema
* Nickname:

* Dein Thema:


Geben Sie den im Bild gezeigten Text in das Feld unten ein
*Verifizierungs-Schlüssel:
Beitragsthema

Registrieren Sie sich bitte, um Bewertungen zu schreiben anmelden oder registrieren

Andraz | Verifizierter Käufer

  • Overall
  • Quality
  • Value

Certified Buyer Rated

Dec 03, 2013

The pin out for this dispay shield is as folows (display-arduino): D4-4, D5-5, D6-6, D7-7, RS-8, E-9.

Buttons have a nice click to them and are all (except reset) readable from pin A0 (schematic for how they are conected would be nice HK)

When pluged in to an arduino it interferes a bit with the power jack but not a whole lot, the board itself sticks about 1cm over the left edge of arduino.

I've tested this with arduino due which is 3,3V, the display works prfectly, the same cant be said for the buttons as they are powerd from 5V, some hardware hackong will be required.

Other than that it feels like a decent quality product, the soldering is ok, I'd like to see more solder in a couple of places, but over all good for the price.

| Verifizierter Käufer

  • Overall
  • Quality
  • Value

Certified Buyer Rated

Sep 18, 2013

Excelente producto con buena calidad

flash242424 | Verifizierter Käufer

  • Overall
  • Quality
  • Value

Certified Buyer Rated

Jul 20, 2013

The Arduino LCD screen is a backlit LCD screen with headers. You can draw text, images, and shapes to the screen with the LCD library. There is an onboard micro-SD card slot on the back of the screen that can, among other things, store bitmap images for the screen to display.

Peter | Verifizierter Käufer

  • Overall
  • Quality
  • Value

Customer Rated

May 11, 2013

Works well, is very easy to use... just plug in shield, and you're good to go! Hobbykings documentation could have been a bit better though.

Use LiquidCrystal lcd(8, 9, 4,5, 6, 7); in order to control the LCD, IO pin 10 to control the backlight (recommend you use pinMode(10,INPUT) to turn on, and pinMode(10,OUTPUT) to turn it off).

Only uses one analog pin (A0) for the five control buttons - you just need to work out the different voltages that you'll read when you press each button - which will vary slightly depending if powering Arduino from external power or USB. 6th button is linked to reset line.

Minkey | Verifizierter Käufer

  • Overall
  • Quality
  • Value

Customer Rated

Jan 20, 2013

This is a cool little shield. Good price. I personally haven't found much use for it, but it was cool when I first got it up and running. I did a more in depth review at the address below.

aeronauticsroboticsandhotglue * blogspot * com/

Toton | Verifizierter Käufer

  • Overall
  • Quality
  • Value

Certified Buyer Rated

Jan 04, 2013

Very good component, the example software is downloadable in the files section. Very easy to use good contrast very cheap if compared with performances

SadSack | Verifizierter Käufer

  • Overall
  • Quality
  • Value

Certified Buyer Rated

Nov 10, 2012

For the money you can't buy this and make it yourself. I'd put this on your must have list.

OlliW BLHeliBox over on Helifreaks

| Verifizierter Käufer

  • Overall
  • Quality
  • Value

Certified Buyer Rated

Oct 20, 2012

Very good product , compatible with arduino LCD library

No_Hazmats | Verifizierter Käufer

  • Overall
  • Quality
  • Value

Customer Rated

Oct 08, 2012

Mine works as advertised. If you do a google search on 'LCD keypad shield', the top returns are the pages for this device from therobotshop_dot_com. There are schematics and excellent code examples.

I have a couple of possible uses for mine - hopefully I can port the code from the 3DRobotics ground station. I also tested it with a 4 x 20 display that I have and it works too.

Very nice device at an extremely good price.

GustPilot | Verifizierter Käufer

  • Overall
  • Quality
  • Value

Certified Buyer Rated

Sep 07, 2012

nice LCD pad shield, like other users have brought out, if you think it is broken, it aint, just change the contrast

  1. 1
  2. 2
Kundendateien
dimmer_for_backlight_by_pushing_select_b Download [1]
LiquidCrystal_Adjust_Contrast Download [0]
LCD and button usage sample code Download [1]
LCD and button test code Download [11]
Datei hochladen

Registrieren Sie sich, um Dateien hochzuladen.
Bitte anmelden oder registrieren um jetzt Hobbyisten zu helfen!