Written by Painless360
Introduction
In the previous articles, we’ve covered what iNav is and what it can do for a fixed wing pilot. We’ve also covered how to wire everything up and flashed the software onto the flight controller and set that up ready for the first flight too.
Adding iNavflight to your fixed-wing model can provide you with excellent stabilization and cheap and effective OSD setup but it can also provide GPS flight modes and allow you to even fly missions autonomously.
Using a $20 flight controller and a $20 GPS unit we can create a ‘smart’ model that will rival some of the systems costing 10 times as much.
All of this detail is covered in the iNavflight documentation. I’d always recommend having a look at it as the software and firmware I’m about to talk about is constantly being updated and improved so things may change a little from when this article was written (version used at the time of writing is iNav V1.7).
So, let’s look at how we can finally get to the field and fly the newly upgraded model and test all of the modes, including GPS safely...
Almost there
iNav is being developed and changed all the time so it’s always worth making a coffee or two and reading through the latest online manual. You can find it here – https://github.com/iNavFlight/inav/wiki there are guides for building both multirotors and fixed wings so the one I’d recommend checking the latest in is here - https://github.com/iNavFlight/inav/wiki/Fixed-wing-guide
We’ll need to check that the settings are OK for the model you’re flying (this is where having flown the model before can come in handy but isn’t essential. Check that the PIFF flight controller is set up well for the first flight (don’t worry, that’s nowhere as tricky as it sounds) and then go to the field and check for simple stabilization and then test out the GPS modes.
Checking that the settings in the software will work for your model
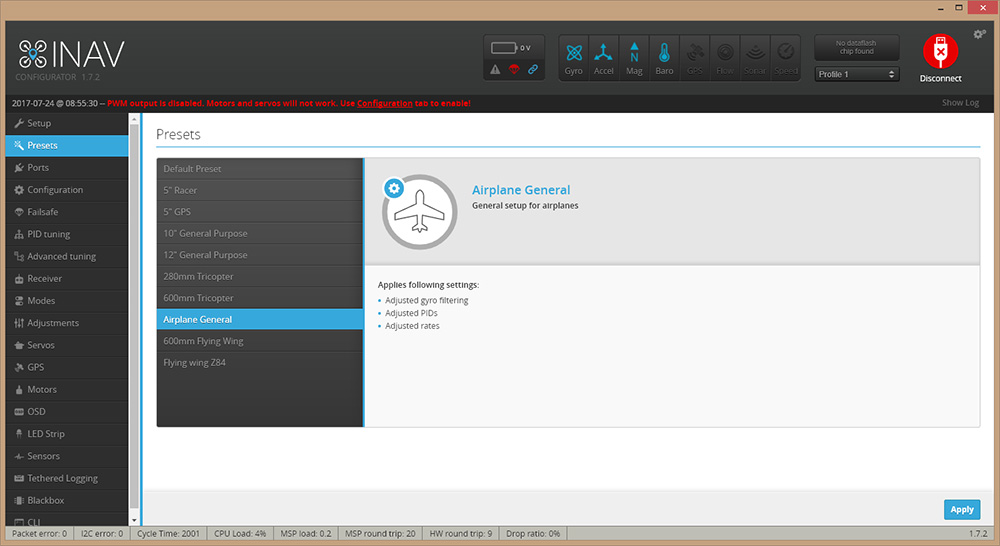
As of iNav 1.6, it now allows you to pick the type of model you are using from a list of configuration and then this sets up the settings needed in the software for the model type you have. It isn’t an exhaustive list so if you choose the one that is closest that will work.
The settings can all be accessed and changed using the CLI part of the iNav GUI on the computer. Check that the settings are all making sense and use the manual (link above) if you’re not sure.

Here is a list of the fixed wing settings you can change (any settings that start with ‘nav_fw’ is for a fixed wing model (see https://github.com/iNavFlight/inav/blob/master/docs/Cli.md for a full list of the settings available)...
- set nav_fw_cruise_thr = 1400
- set nav_fw_min_thr = 1200
- set nav_fw_max_thr = 1700
- set nav_fw_bank_angle = 30
- set nav_fw_climb_angle = 20
- set nav_fw_dive_angle = 15
- set nav_fw_pitch2thr = 10
- set nav_fw_roll2pitch = 75
- set nav_fw_loiter_radius = 5000
Setting up your PIFF controller
Now you’ve setup how the flight controller will fly the model, using these settings we can now also setup the PIFF controller too.
The PIFF controller is what the flight controller software uses to make sure the model is flying the way you need it to. If you ask for the wing to move up or down then the flight controller is ‘feeling’ how it’s moving and if it’s not moving enough, or too much or even moving when it shouldn’t be then the PIFF loop is used to address all of those problems.
You may have read about PID loops. But basically, PID loops are used a lot in multirotors and if you install iNav into a multirotor then it will use a PID loop too. More sophisticated flight controllers use a PIFF loop for fixed-wing models, as it is a far better way to handle and you get relatively slow movement and reaction from servos and control surfaces pushing against the air to move the orientation of a model.
PIS stands for Proportional (a direct reaction to the movement you need to see), Integral (there to take care of persistent deviation of a control surface over time), and Derivative that is there to affect the speed of the reaction (it’s actually a little bit different but that’s a decent enough analogy for this article).
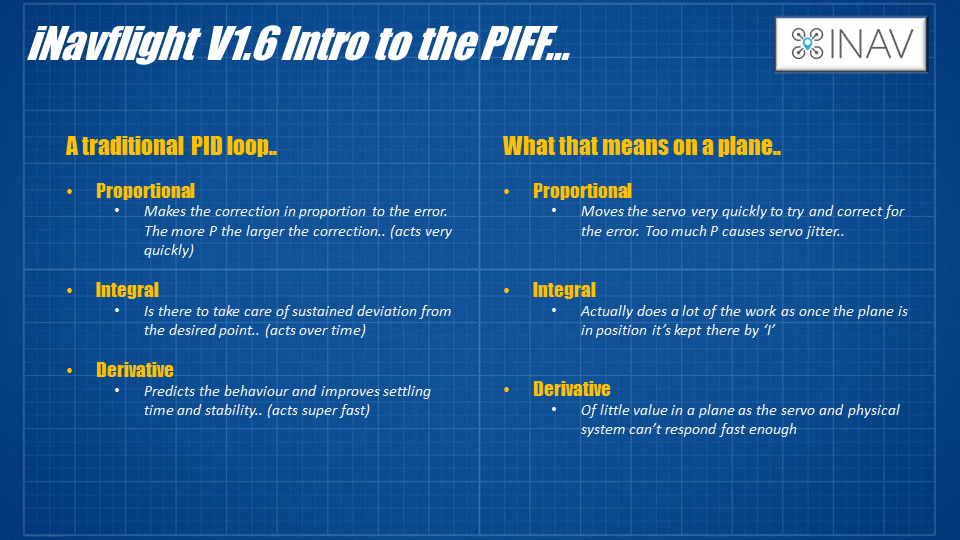
Derivative is no use at all in a plane so a lot of flight controllers that only have PID control will recommend that you disable it.
Feed forward flies the ‘plane more like a pilot would in real life sending the actual control input to the control surface. If you’ve flown the plane already then you can set up the PIFF loop easily.
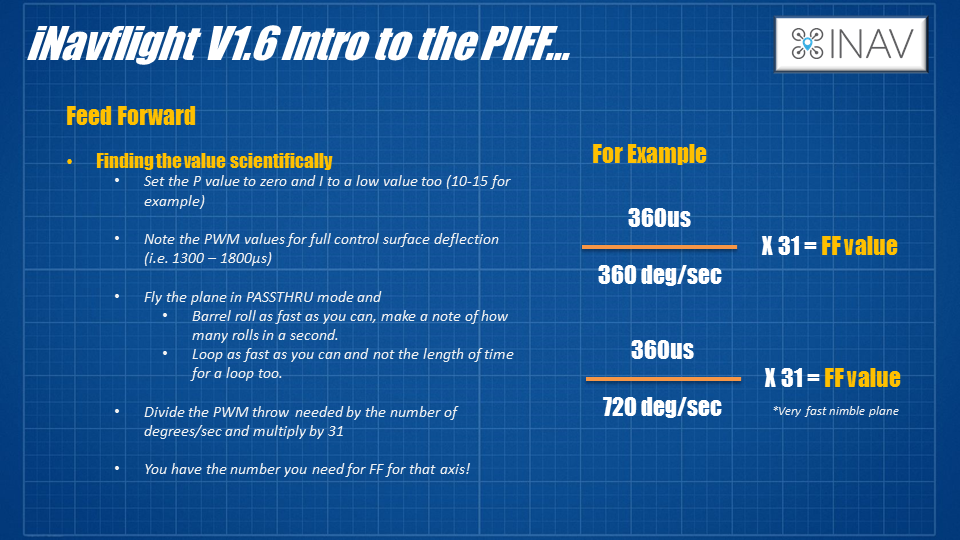
Set the P and I values very low for the test flight, around 10-15 is good. If you’ve flown the plane then you’ll know how quickly it will barrel roll. If not then you can guess how a very fast plane will roll a few times in a second, a less nimble plane might roll once a second, and on a sluggish model may take longer! Also knowing the length of time for a loop with the elevator at maximum deflection is handy too.
Knowing that you can figure the FF value you need. We know the maximum deflection of the control surface and can see what that is in PWM values for that servo. I.e. if the maximum aileron throw is at 1860 microseconds then the deflection is 1860-1500(middle value) = 360, if we then devise that by the number of degrees the plane rolls in a second then multiply by 31 we get the FF number.
If you want to guess then for an average plane the value will be about 31, for an agile sport plane or wing then it might be 15...
You can also watch a video that covers this in more detail if needed - watch here
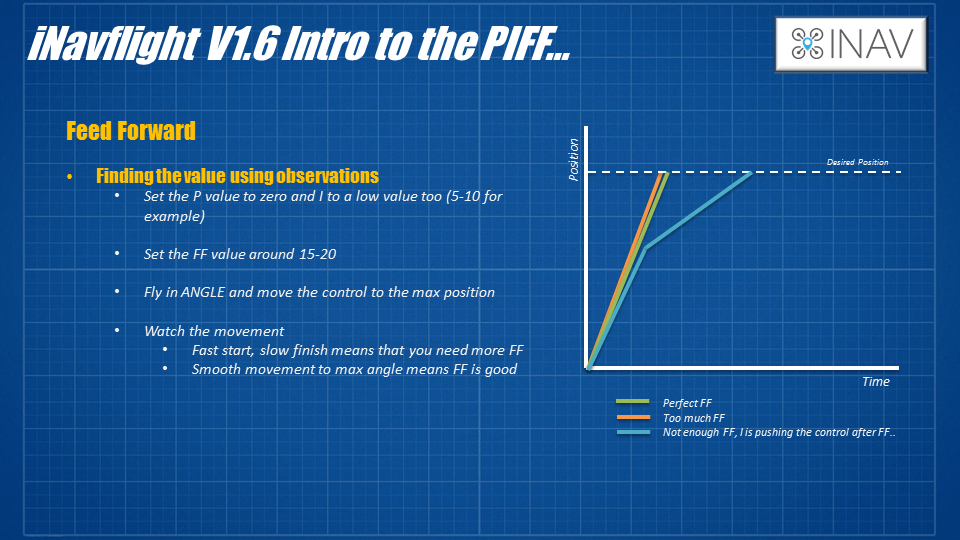
You can check if the PIFF setting isn’t right when you test fly the model. It’s safer to err on the side of having too much Feed Forward than too little. Too little will see the control surface initially move quickly then slowly move into the position you want.
I’d consider a value of around 15-20 for the initial flight...
Final checks before the maiden flight and testing!
Congratulations on making it this far. You’ve stuck with a ton of theory, lots of slides and pictures, and quite a bit of explanation too.
Now you’re finally ready to have a crack at flying your new creation. Well done! Here are the final steps to make sure you’re ready to fly.
- Make sure that you have the following modes set on the model – PassThru (so you can take back full control if something is very wrong), Angle mode (this is what the first tests will be using) and GPS HOLD or RTH mode so you can test that bit too.
- It’s also handy to have AIRMODE turned on too as this will make sure that the control surfaces are being fully managed and controlled by the flight controller and iNav even when the motor is off. This is handy for testing it’s all working before launching and means that it all still works when you’re gliding with the motor off too.
- Make sure that you have the failsafe setup for RTH so that in the event of a problem then the model will fly back to you. We shouldn’t need it for the first flight but you never know...
- I’d make sure that the compass is disabled too. It’s not used in a plane model as the heading is calculated from the moment to moment changes in GPS position. Having it on can cause more problems.
Last Step, a Test Flight!
Ok, flying time. Fit the prop and make sure that the outputs are enabled in the configuration tab (top right).

Now for final checks:
- Make sure that the 3d model in the configurator moves correctly when moving the airplane by hand. And that the aircraft is showing leveled when you are holding the aircraft level too.
- Do the High Five test in Passthrough mode; verify everything is moving as expected.
- Enable Angle / Horizon mode and verify the control surfaces moves correctly when moving aircraft by hand and by sticks on TX, the movement will not be huge but you’ll feel it if you rest your hand on the control surface and tilt the plane. For the ailerons they should push up against your fingers as you lift that wing.
Start your engines! Remember to arm the board before trying the motor...
The aim of this sequence of testing is to test each part of the system. The first two steps are there to trim the model for safe and level flight and then test the GPS system. Following these steps will make sure you are in the air safely.
- Fly the model in PASSTHRU mode and trim on the radio as normal (optional)
- Land, adjust control surfaces to match trimmed positions (optional)
- Remove all radio trims
- Fly again and switch to ANGLE or HORIZON mode and check for level flight
- Trim any problems out with board orientation in GUI the ‘board alignment’ settings in the ‘Configuration’ tab in the GUI to correct it.
- Fly again and test NAV ALTHOLD mode
- Then test NAV POSHOLD and NAV ALTHOLD modes together (wait for that GPS Lock before arming and take off!) Finally, try out NAV RTH mode and check failsafe
- Explore the other cool modes – NAV_LAUNCH!
A few last things about the setup on a fixed-wing
Now you should be flying and having the plane auto-level, manage external influences like wing far better, and also doing some cool things like GPS modes. Before we close out this time there are a few other things to think about if you’re building a model like this.
Consider using a separate BEC for servos to prevent the FC from restarting due to problems with the 5V supply due to the servos. They are cheap and adding a 5v 3Amp BEC can make a lot of difference in the event of a servo stall or frozen control surface.
Try and use digital servos to analog ones. Digital servos are much faster and more precise, making the control a lot more accurate and better for the flight controller. It’s not essential, as I use a lot of analog servos here but think about it for the new build.
When you put the model into angle mode and try to move the control surfaces they move only slightly. This confuses a lot of new builders that are trying out a fixed-wing model on the bench. This is normal and expected. The reason is that you are not controlling the servo/control surface directly with your radio when in anything but PassThru mode, the flight controller starts the movement and is expecting to ‘feel’ the movement of the model in response. As that movement of the model doesn’t come then the control surface only moves slightly. Don’t worry if you see this, it's normal, and the plane will fly great.
Summary
Now you’re flying you’ve accessed a whole new world of cheap, controller fixed-wing models. Although I’ve used the example of a wing so far in the series you can add this to any style of fixed-wing model.
Remember to always take a look at the documentation I’ve mentioned, as the features and settings in the iNavflight software is improving and changing all the time. One example is the AutoTune mode that allows you to fly aggressively with flicks and sharp movements of the control surfaces and the flight controller will dial in great settings for your model. This is a nice thing to try when you’ve had the first test flights go well and you’ve trimmed your model and it’s flying nicely.
Happy flying!
Hear it First: Join our Mailing List
Sign up to receive new product updates, exclusive discounts, news, and more!