Choosing your first RC radio can get rather confusing if you are a complete beginner. The array of technical jargon such as Mode 1 or Mode 2, TX protocols, trimming, mixing, and many more are enough to throw even the most enthusiastic newbie into the backseat.
In today's blog, we will go through everything you need to know before buying your first RC Radio.
What Exactly is an RC Radio?
When people talk about RC radios, they are normally referring to the hand-held remote which allows for directional inputs. However, it is important to note that there are two components to RC radios: the transmitter (TX), and the receiver (RX).
The transmitter is the handheld device that emits radio waves to your model, while the receiver (as the name suggests) is the device you plug into your model that receives the signals from the transmitter. When purchasing a radio, be sure to buy both a transmitter and receiver of the same frequency and protocol; otherwise, you will end up with an inoperable model.
Pistol Grip (Wheel) Radio Vs Stick Radio
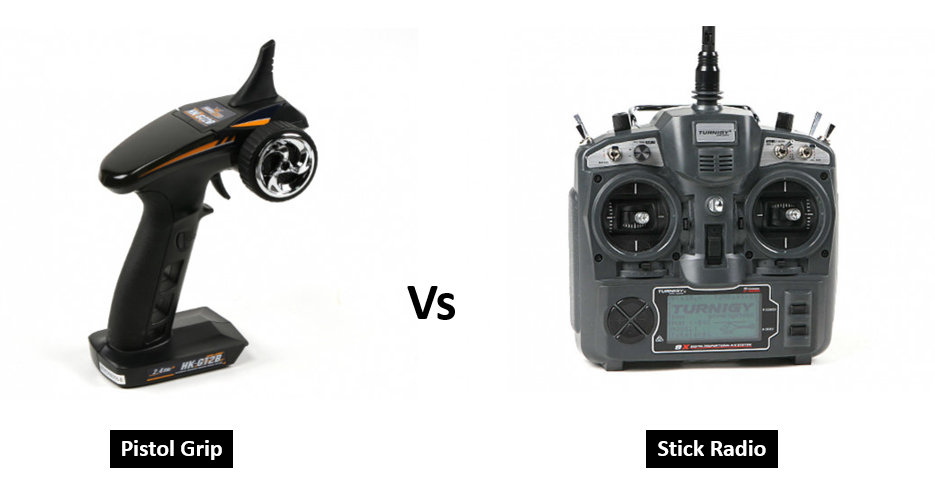
There are primarily two types of radios available on the market: the pistol grip radio (AKA wheel radio), and the stick radio. Pistol grip radios are mostly for surface vehicles such as RC cars, buggies, and trucks. Stick radios, on the other hand, cater to all models including RC planes, cars, boats, and drones.
The pistol grip is the preferred choice when it comes to surface vehicles as the steering mechanism closely resembles that of a real car and handling is made much easier. The "pistol" pedal also gives users better throttle control and responses which are crucial for executing small and precise maneuvers on the racetrack.
For RC aircraft, it is much more intuitive to use a stick radio as movement through the air consists of three dimensions: the pitch axis, the yaw axis, and the roll axis. Each "stick" on a stick radio can move up, down, left, and right making traveling through the three axes possible. For example, the right-hand stick can control the throttle up or down and the rudder left or right while the left-hand stick can control the elevator up or down and the aileron left or right - this is otherwise unavailable on a pistol grip radio.
RC Mode 1 or Mode 2?
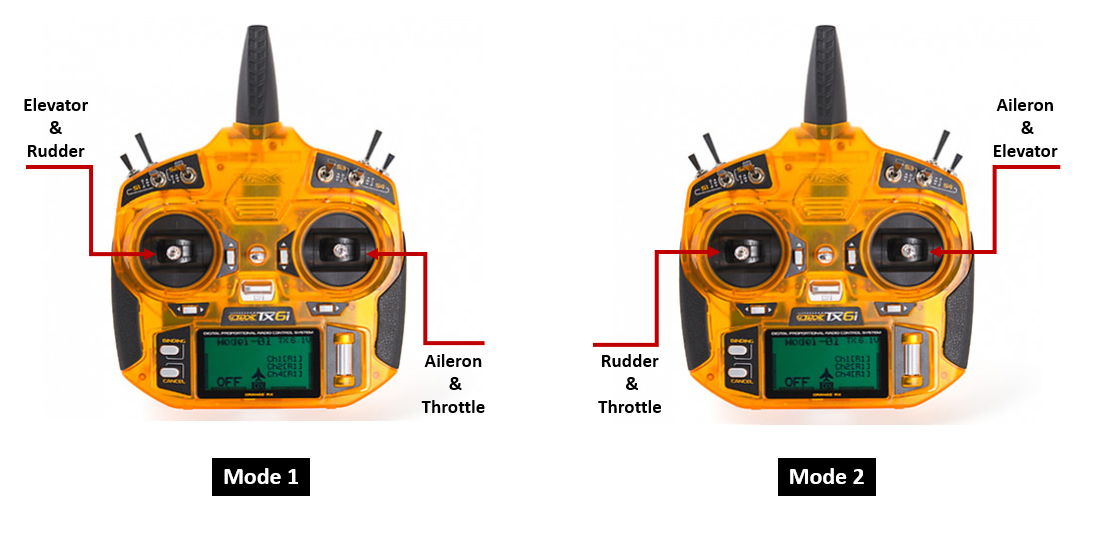
Mode 1 or Mode 2 are only applicable for stick radios and refer to the control stick configuration of your transmitter. Mode 1 will have the rudder and elevator controlled by the left stick while the right stick controls the throttle and ailerons.
Mode 2 will have the ailerons and elevator controlled by the right stick while the left stick controls the rudder and throttle. There is no right or wrong and is really a matter of personal preference. Generally, US hobbyists will fly on Mode 2 while EU, AU, and Asian hobbyists fly on Mode 1.
Number of Channels
Channels (CH) refer to the number of controllable functions on the RC model you control. For example, a 4CH transmitter will allow you to control four functions of your model; a 6CH transmitter will allow you to control up to six functions. Generally speaking, most RC cars only require two channels while most RC planes can fly on four. If you are not on a tight budget, start with a 6CH transmitter which is enough for most, if not all beginner models and will adequately serve you for a couple of years before you advance to more complex models.
Radio Frequency and Protocols
Most modern RC radios work on the 2.4GHz (Gigahertz) frequency. In layman's terms, the frequency can be viewed as the medium or channel by which the radio signals are sent. Back in the day, most RC signals were sent via the 27, 35, and 40 MHz frequency, which suffered from bandwidth (number of simultaneous users) and interference problems. In the 2.4GHz spectrum, bandwidth, interference, and range are greatly enhanced, allowing modern hobbyists to enjoy flying or racing with minimal technical deficiencies. While choosing an RC radio, just make sure that it is operating on the 2.4GHz frequency.
RC protocols can be viewed as the operating system your Tx/Rx is working on. Just like how iPhones operate on iOS and Windows on Windows OS, there are different protocols for different Radio brands. When buying a transmitter and receiver, make sure to buy ones that are compatible and "speaks the same language".
The most widely used protocols include DSM (DSMC/ DSM2), ACCST, AFHDS (AFHDS2), SBUS, IBUS, FASST, PWM, PPM, and CPPM. Again, there isn't a right or wrong choice when it comes to protocols, just buy a transmitter you like with all the functions you need and then find a compatible receiver to go with it.
Basic Radio Features and Functions for Beginners
Trainer Port
Trainer Port allows another user - your instructor or buddy - to simultaneously control your model and is a failproof way to get started.
Model Memory
Model Memory allows you to save and load the settings for the different models you own. This is extremely useful and will save you a lot of time as your collection starts to grow - and it will!
Trim and Sub-Trim
Trim and Sub-Trim effectively do the same thing: to electronically align your channels so that the control surfaces or steering of your model are geometrically aligned (centered). The emphasis is "electronically" as this assumes that mechanically, all else is in harmony.
For example, when you first build out your model airplane, you have made sure that servo linkages and the servo horns are in perfect 90 degrees, however, the rudder inherently deflects upwards. Here, you can use the sub-trim function to program the rudder into a neutral position or "trimmed to zero".
When you actually fly your plane in level flight (no directional inputs), you may find some unwanted tendencies even after sub-trimming. This is where the "Trim" function comes into play and you can offset any tendencies during flight right from your transmitter.
End-Point Adjustment (Adjustable Travel Volume)
End-Point-Adjustment (EPA) allows you to set the servo "throw" - or how far the servo moves - when input is detected. By default, servo throw is at 100%; with EPA, you can limit the servo's movement by a certain percentage. This is useful for example if you want to limit the deflection of a certain control surface on your model aircraft.
Dual Rate
Dual Rate allows you to set up a secondary option to limit the servo's movement by a certain percentage. For example, you may be using your default setup when flying your warbird at cruise speed, however, when you hit higher airspeeds, you can turn on the Dual Rate function to further restrict the control surfaces as less deflection is needed. Once you return to cruise, you can turn the Dual Rate function off to restore the default setting.
Radio Mixing
Mixing effectively allows you to control more than one channel at a time. Based on the input of the "Master" channel, a "Slave" channel is also affected which ultimately reduces the number of manual corrections needed. For example, an Aileron/ Rudder mixing would add rudder control when the aileron is inputted from your transmitter.
Conclusion
Now that you know the basics of RC Radios, you can confidently choose a Tx/Rx that suits your needs. Check out our Radios page here and start hunting for the perfect radio now. If you are still unsure where to start, you can check out the OrangeRx Tx6i which is a 6-CH Transmitter available in both Mode 1 and Mode 2. The OrangeRx Tx6i is an entry-level radio which has all the functions and features mentioned in this article and has served beginners all the way up to the more advanced hobbyists without fail.
---
Hear it First: Join our Mailing List
Sign up to receive new product updates, exclusive discounts, news, and more!