Introduction
Over the last few years, the use of FPV in the hobby has increased dramatically with many fixed-wing pilots trying it out for the first time and becoming hooked. Flying ‘first-person view’ allows us to experience a completely different way to fly and, while not for all, truly gives that feeling of freedom when flying.
The main parts of the hobby driving the innovation and improvements in FPV technology have been from the multirotor pilots with ‘drone’ racing becoming a more common area of the hobby and a sport in its own right. The fact that this technology has been perfected in the multirotor side of the hobby shouldn’t let us fixed-wing pilots be put off. Recent improvements in camera technology have made them better than ever for use on ‘plane style models.
Modern FPV cameras provide stunning views of the world and now can cope with very tricky lighting conditions that used to cause cameras to under and overexpose the image. Not now, we can fly towards the sun and still have all of the ground detail perfectly exposed so we can see the field and local landmarks to navigate (supported by our FPV spotter of course).
The challenge now is how to choose the right FPV camera. There are literally hundreds to choose from, all with various specifications and differences. The leading manufactures like RunCam and Foxeer have dozens to choose from but I’ll use the modern RunCam line-up in this article to illustrate the points but cameras with almost identical specifications are available from others too.
So, let’s look at what is new in the latest crop and what to look for when buying your next/first FPV camera...
So what’s new then?
 Alongside any listing of a modern FPV camera is a huge chart of specifications. If you’re new to this then it can read like Chinese washing machine instructions. There are just a few that you need to consider to get you closer to the perfect camera for what you’re looking for.
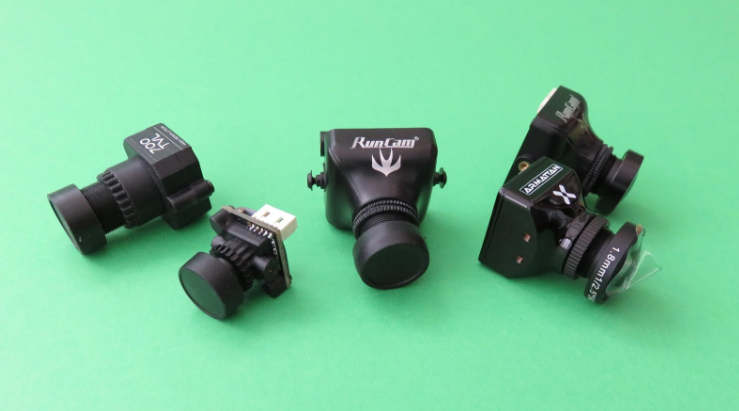
New Standard Sizes
Only a handful of years ago, the camera came in one size (commonly) referred to as the HS1177 camera size. The HS1177 camera set the standard that many cameras still use. A typical modern camera in this form factor is the RunCam Eagle 2 Pro, around 26mm wide and weighing 15g.
In addition to this traditional size, there have emerged two smaller form factors – the micro and nano sizes. Micro cameras are 19 x 19mm and typically weight less than 9g. Nano cameras are really small and are usually around 14 x 14mm and weigh less than 3.5g.
It used to be that by choosing these smaller form factors you sacrificed performance and features but not now. The latest crop of these smaller cameras has the same, if not better features. If you want to add FPV to a model, there is a camera for it now.
Wide Voltage Ranges Supported
If the last time you looked at FPV cameras you always say that the choice for the voltage to run them at was either 5v or 12v then you’ll be pleased to hear that we have a lot more choice too. Most modern cameras run off anything from 5 to 36v so you don’t need any fancy voltage regulators, you can just power than from an existing voltage supply.
CMOS vs. CCD
One of the reasons for the different voltages back in the early days of FPV was the different technologies inside the camera. CCD was more expensive and usually ran on a higher power but gave better images and didn’t suffer from the same ‘jello’ effect as CMOS on models with vibration.
Many pilots still consider CMOS inferior but the advances in CMOS technology and camera firmware now mean that you’ll be hard-pressed to find CCD in many of the latest cameras. CMOS based cameras are now the backbone of the FPV cameras for almost all the manufacturers and their performance is as good, if not a little better, than those older CCD based devices. CMOS is no longer the poor man’s choice.
Improved WDR
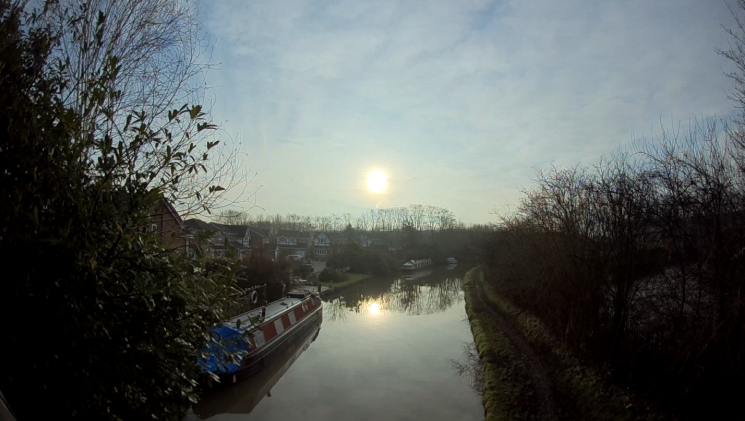 Wide dynamic range is all about how well the camera copes with wide-ranging exposures in an image. Cheaper cameras tend to have very poor dynamic range and the effect of this is that if the camera faces a bright sky, then the ground is hopelessly underexposed. Similarly, if the ground is exposed then the sky is ‘blown out’ and you can’t see the clouds or other models in the air.
I used to feel this effect the most flying on a bright overcast day where the sky was still bright from the sun above the clouds but the ground wasn’t in direct sunlight. The ground was always very dark making navigation tricky.
Modern models with WDR cope very well with tricky lighting conditions like these and the image ‘looks’ like you’d see with the naked eye with all parts of the image being exposed well. RunCam and Foxeer cameras use advanced forms of WDR that can be turned on and off to further enhance the exposure of and image.
WDR is essential for fixed-wing pilots as we have more chance of flying towards the sunshine at height and need to keep a clear view of the ground detail too.
Variety of FPV and Lens Options
The lens quality in all but the most expensive cameras used to be questionable but a large amount of small lightweight quality lenses means that the price for them has dropped. Some of the modern cameras also allow you to select the lens you want when you order them. Many of is older FPV pilots bought replacement GoPro lenses for our HS1177 cameras to improve the view but that kind of mash-up isn’t needed now. The main change with the lens selections is the changes to the field of view.
Every pilot finds a FOV that they like to fly with (mine is around 130-140 degrees for example), have to narrow a field of view and you lose a lot of the limited situations awareness and view from the flight, too large (>160 degrees) you start to lose the detail at the centre of the image. Sometimes the vendor doesn’t list the FOV with the lenses but 2.1mm is usually around 160 degrees with a 2.3mm lens being around the 140-45 degree mark.
Improved Low Light Capability
Just over a year ago, we saw the first selection of ‘low light’ cameras. These are not infra-red cameras or even capable of working with just starlight but coped with street lighting and bright moonlight nights very well indeed. Cameras like the Night Eagle and Owl cameras from RunCam could cope in the light as low as 0.001Lux (a measurement of how sensitive it is), but usually displayed the image in monochrome to cope.
Most of the modern cameras have light sensitivity ranges from 0.1Lux (very poor low light handling) to that 0.001Lux rating but still provide clear, colour images in the daytime and then flick into that low light/mono image when the light falls too low. In practice, I find that cameras with this higher level of light sensitively need to be flying in almost darkness before they give in and flick into mono mode.
The upshot of this lower sensitivity is that even if the lighting isn’t great, or the weather takes a turn for the worse while you’re flying you’ll still get a great image from the camera.
Aspect Ratio Support
Early cameras were all 4:3 aspect ratio, the same radio as TV used to be before we all moved to 16:9. The aspect ratio you wanted used to be something you chose when you bought a camera. I like 16:9 aspect ratios for those FPV goggles and screens that share the aspect ratio too. It just looks more natural and the ‘widescreen’ image makes the flight feel more immersive, especially for us fixed-wing pilots.
Many of the very latest cameras let you choose the aspect ratio from the inbuilt menu system so depending on what goggles or screen you’re using you can pick the mode that suits you best. For me when flying at any decent altitude in a ‘plane it’s got to be 16:9. For lower to the ground with multirotors, 4:3 provides a better view ‘down the field’ when cranked over for speed.
vBat Built in to many
Being able to monitor the flight battery when flying is very handy. Some of my friends who only fly multirotors forget that fixed-wing models can glide and soar so you don’t need the prop running all the time to fly! Some flights might mean you get one amount of time on a LIPO pack, another flight where you cut the throttle and use the thermals and wind to stay aloft may give you a lot more time in the air.
You can use telemetry on the radio but if you’re flying FPV then being able to monitor that in the view itself is great. Lots of cameras now include an extra wire you connect to the positive battery terminal and then it can show the battery voltage in the corner as you fly.
OSDs for settings (and Betaflight)
 All of these extra settings are managed and configured through an on-screen display/menu built into the cameras. Those cameras that have it come supplied with a little joystick that is used to access the options and set up the camera the way you want.
You can set the exposure, colour saturation, PAL and NTSC settings, WDR settings, how it handles the colour in low light, the pilot name (so you can display that too in the image), vBat settings and timers too.
The first time you start to play in the OSD it can be a little overwhelming but the defaults on most cameras will work well most of the time. I find that some cameras have their ‘sharpen’ and ‘saturation’ settings too high so the image looks noisy and artificial. You need to fly the camera in the lighting conditions you use the most to fine-tune the settings to how you like it.
If you’re using a modern flight controller running something like Betaflight you can now also connect that OSD wire to the flight controller yourself and access and run the cameras internal OSD from the sticks on your radio without needing that extra little joystick. Handy if you want to tweak a setting at the field.
Mirror and flip options
Last option I’ll mention is the ability to flip and mirror the image. I didn’t get why pilots asked me about this when I reviewed cameras until I had a tricky build and the camera would only fit in the model one way - upside down! If you have a tricky build then getting a camera that supports these features can make an impossible mounting situation workable.
Latency
Latency is how long the image takes to appear. Higher numbers are bad, lower is better. Sadly there isn’t a standard for how latency is measured so many vendors don’t publish the numbers on their websites and specifications. The time it takes for an image to go through the lens of the camera to when it appears on your FPV screen is subject to a lot of things, including how fast the camera works to get the image to the FPV transmitted on the model. In the testing, I do here, the ‘glass to glass’ measurement is about 50-60ms that makes you feel very connected to the model as you fly. Some action cameras that also provide an FPV feed are usually over 100ms slower so are not ideal for fast-moving models as they can cause you to feel very disconnected from the model due to that lag. While I’m on the subject of Action cameras...
Action Cameras as FPV
Lots of modern action cameras from GoPro through RunCam, Foxeer, Mobius and GitUp provide the ability to ‘see’ the image from the camera ‘live’. As just mentioned, while this can be handy, the lag on these video feeds is only useful on those models that respond slowly to stick input. If you’re using some form of flight controller with auto level or stabilisation then using an Action Camera as a primary FPV camera becomes less of an issue. My advice is to use a dedicated camera for FPV and use the action camera to record the flight in 1080p or 4K video.
What to choose?
If you visit any re-sellers or manufacturers website the choice is overwhelming. But if you run through this list of latest features above and decide on the ones that you want and need then you can quickly find the camera that will fit the bill.
When I’m choosing a camera I consider lighting, aspect ratio, size/weight and features I’m after and go from there. I’m a fan of the RunCam Eagle family of cameras and the Monster cameras from Foxeer. They just seem to work. I like cameras with low light handing, WDR, a FOV of about 140 degrees and an OSD to change the way the camera works if I don’t like the default settings.
FPV cameras, like most of the things in the radio control hobby, are very subjective things. Ask a dozen pilots at an event what camera they like to use for FPV and you’ll get at least half a dozen different cameras. But if the last time you looked through an FPV camera was over a year ago, you’ll be surprised at how much they’ve improved...
Written by Painless360
Hear it First: Join our Mailing List
Sign up to receive new product updates, exclusive discounts, news, and more!