Become a Supplier Blog New Items
Register

Total Price

$0.00

Cart 0 Cart 0 Loading...

MINI MWC Flight Control Board and DSM2 Compatible Receiver ACC/GYRO/BARO/MAG

Generating Links

MINI MWC Flight Control Board and DSM2 Compatible Receiver ACC/GYRO/BARO/MAG

Price:

Now save save $0.00 $0.00

$35.98
Already Purchased Discontinued Product

Please continue searching for a similar product.
SKU:
9154000006-0
want FREE shipping? Click here to find out more!

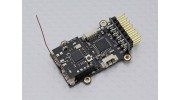
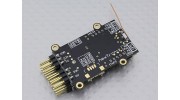
The New Mini MWC flight control board is milestone in the progress and ingenuity of the MWC platform. Combining the power of the ATMEGA328p with an Accelerometer, Gyro, Barometer and Digital compass with an on-board 7 channel DSM2 compatible receiver (with an onboard bind button!). All packaged on a quality double copper PCB with Gold coated connections and footprint not much bigger than a large coin! The world of Mini Multi-rotors just caught up to their bigger brother's.

The MWC platform offers a laundry list of functions and feature like; Auto stabilize , altitude hold, Simple mode and much more, and with the available GPS option even loiter in a set position and return to home options! You can even opt to attach an optional OLED screen for easy programing and feedback!

Features:
• 7CH DSM2 Compatible Receiver (PPM SUM)
• Self-voltage checking
• FTD1 protection
• ATMEGA328P Microcontroller
• MPU6050 Accelerometer and Gyro
• BMP085 Digital Barometric Sensor
• HMC5883L Digital Manometer/Compass
• C8051F330 MCU
• CYRF69103 Radio
• Dual IIC Ports
• UART
• GPS Port (GPS not included)
• OLED Screen Port (OLED not included)

The following functions can be realized through the MINI MWC flight control board:
-Auto stabilization
-Stabilize the altitude
-Fixed heading course
-Hovering at an identified position (needs 12C-GPS converter board and supports by GPS)
-Return flight automatically (needs 12C-GPS converter board and supports by GPS)
-And more

MINI MWC flight board supported modes:
-GIMBAL-individual cradle head stabilization
-SINGLECOPTER-VTOL single axis
-BICOPTER-BICOPTER Avatar
-Tricopter
-FLYING WING
-VTAIL
-Fixed-wing airplane
-4-Axis(QUADX,QUADP,Y4)
-cradle/gimbal head stabilization
-6-Axis(Y6,HEX6,HEX6X)

Options not included: (Stock will be coming soon)
-MX-FTDI programming stick tool
-OLED screen, can be mounted on MINI MWC flight control board directly
-IIC to UART converter board, It is for changing the UART signal of GPS to a IIC signal
-GPS module

Specs:
Size: 47.7X23.5X11mm
Weight: 7.8g
Working voltage: 5-8.4V

*Transmitter for MINI MWC flight control board needs to support DSM2 and 4CH or above (we recommend 6CH or above)

Note:
1) This is not a Spektrum DSM2 product, nor is it a copy of a Spektrum DSM2 product. 
The Spektrum and DSM2 brand is a trademark of Horizon Hobbies USA.
2) This is not an underground black market fake Spektrum product. MWC Flight Control Board quality is guaranteed.

Upload video

Only registered users can upload video. Please, log in or register

Topics
Sort by
Most Recent Topics
* Nickname:

* Your Reply:


Please, enter the text shown in the image into the field below
*Verification Code:
Cancel
Submit
Post a new Topic
* Nickname:

* Your Topic:


Please, enter the text shown in the image into the field below
*Verification Code:
Post Topic

Only registered users can write reviews. Please, sign in or sign up

Motoko | Verified Buyer

  • Overall
  • Quality
  • Value

Great Board but need some solid set docs

Jun 11, 2017

The board is great the only thing is sorting out all the setting I am use to Arduino for 3d printers but there is a lot of information on how to set up the firmware. this board is not one that you just plug and go it has a lot of setting that need to be made and not a lot of documentation. Be ready to do hours of research on the internet finding answers. All the answers or not easy to find and a lot of it is for the v1.2 board along with hit and miss. I am still trying to get the serial sum ppm sorted out and a issue of the heading being 180 degree out roll and pitch seem to have been sorted out. The binding to the orange orx DSM2/X module #9171000536-0 for the Trunigy X9 goes well. I still have a ways to go setting up this board before my 650mm hexa will be ready to fly.

EdAmps | Verified Buyer

  • Overall
  • Quality
  • Value

Customer Rated

May 19, 2015

This is a great little 250 racer controller. I had a heck of a time getting the channel order correct for my OrangeRX T6. I loaded it with MultiiWii 2.3
and modded the config.h file a lot. The channel order is odd being PITCH,YAW,THROTTLE,ROLL in the ppm_sum setting. Also, I was able to get the buzzer and VBAT working great. I will try to post my config.h file and hardware mods to the files section.

Kontraptionist | Verified Buyer

  • Overall
  • Quality
  • Value

Customer Rated

Dec 20, 2014

This is actually a lovely little board, it's just that it's NOT a plug and play kind of thing. If you're good with microcontrollers and electronics, then you're gonna do just fine. You need to get the little JST connectors and hook it up to an FTDI board and at the very least re-program it with the latest MultiWii software. Since the board lacks a DTR pin to automatically reset the CPU (for activating the bootloader) it's imperative that once you click "UPLOAD" on Arduino that you time it such that you power up the board (by plugging the serial adapter in to the board) such that it comes to live a second or so before the code starts to push out of the FTDI. Obviously, you can't do this by plugging the USB in to and out of the computer, as Arduino would have to re-enumerate the ports, etc etc, so make and break the connection between the FTDI and flight controller. You also have to upload the right setup of firmware. See (and set up) the config.h file in the Arduino firmware. Download it directly from Multiwii. The how-to and particulars of the code are out of scope of what I feel like talking about right now. Sorry. You're smart, you can figure it out. I will say this... It likes to fly backwards, so keep that in mind.

But yeah, all the nay-sayers, give it another chance. This board is fine, you just don't know what you're doing.

noobmatic2000 | Verified Buyer

  • Overall
  • Quality
  • Value

Customer Rated

Oct 27, 2014

This board is absolute garbage. I have spent months researching and tuning this board to perfection....there is NO vibrations, even used the low pass filter. ESC's calibrated 20 times, eprom's wiped, etc. ,etc... after a minute, it will just DROP from the sky. There is nothing I can do to fix it. I have read EVERY thred, EVERY post, and EVERY review. (yes leocopter too) And this board WILL NOT fly reliably. At some point during flight it will just DROP to the left and crash. GARBAGE!!! Multiwii is also a dieing trend. Sure it has a lot of features (that no one seems to ever get working right) operating systems like open pilot, and other easy to use interfaces. So put it like this, you can buy a small toy quad (hubsan) for about the same $, and it flies AWESOMELY!! You put this board in anything, you are looking at LONG hours becoming a computer programmer just to never get it to work right. I know many other boards have great reviews...but NOT this one!! GARBAGE!

Leocopter | Verified Buyer

  • Overall
  • Quality
  • Value

Customer Rated

Oct 20, 2013

This is a very good FC. Not easy to set up, but well worth the effort if you want the ultimate tiny MultiWii board !
This is how I set up my Mini MWC boards (after a lot of tinkering ...):
1- Building an interface between your FTDI usb board and the flight controler is quite simple : solder the 4 leeds of the 'mini micro 4 pin 1.25 T-1 JST connector' cable (the same one used on the Neo 6-M GPS module - SKU: 387000004) to a 6 pin header (GND, 5V, Rx, Tx). Solder an extra wire to GND. On the other end of the wire, solder a probe (I my case a 1 pin header with heatshrink tubing). You will need this probe to put the 328P in programming mode. Make sure Rx goes to TX and vice versa.
2- Plug you new interface cable to the board (or power the board via the output headers - D3 to D11) while pushing the bind button (the one on the top circuit board where the antenna is soldered). The red LED will blink rapidly. You are now in binding mode. Turn on your DSM2 compatible transmitter while pressing on its bind button (if you have a ORX orange DSM2 module). The LED on the Mini MWC will stop blinking then will stay on. It is now binded to your Tx.
3- In Arduino load the MultiWii shetch and select the HK_MultiWii_SE_V2 board. Its is fully compatible with the Mini MWC (you get the correct sensor orientation). Also make sure you uncomment #define SERIAL_SUM_PPM. If you plan to use an OLED display

Customer files
No File Name Download [2082]
No File Name Download [1597]
Initial config - simple and detailed Download [2096]
No File Name Download [2546]
instructions and updating Download [1446]
What is This ? Download [906]
No File Name Download [58]
EdAmps Hardware Mods Download [134]
LeoCopter's Guide Download [1464]
No File Name Download [1727]
  1. 1
  2. 2
Upload your file

Only registered users can upload files.
Please log in or register to start helping your fellow hobbyists today!

Accessories