Conviértase en proveedor Blog Nuevos objetos
Registrarse

Precio total

0,00 €

Carrito de compras 0 Carrito de compras 0 Loading...

Kingduino Teclado LCD Escudo

Generating Links

Kingduino Teclado LCD Escudo

Precio:

Now save ahorra 0,00 € 0,00 €

1,92 €
Ya comprado Discontinued Product

Please continue searching for a similar product.
SKU:
009000008
¿Envío gratis? ¡Haga clic aquí! aprender más!

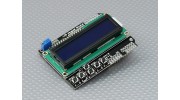
Este teclado LCD Shield (pin conector macho) para Arduino se compone de un 6 pulsadores momentáneos 16x2 azul pantalla LCD y, de izquierda a derecha, SELECT, izquierda, arriba, abajo, derecha y RESET. El escudo puede ser conectado directamente a una placa Arduino Duemilanove, por lo que la soldadura o volar-cableado para la conexión innecesaria. Botones 5, 6, 7, 8 y 9 se utilizan como la interfaz para la pantalla LCD.

caracteristicas:
• Fácil de leer 16x2 pantalla de cristal líquido azul
• Contraste ajustable
• El diseño laminado y fácil de ampliar
• Uso de la interfaz LCD4Bit modificado

Interfaz LCD4Bit modificación:
Con el fin de preservar el puerto SPI para uso futuro, los pines IO Digital DB7-10 y pin11 y 12 pines usados ​​en la biblioteca LCD4Bit original se han trasladado a DB4-7 y el pin 8 y 9 pines respectivamente.

teclado:
El teclado consta de 5 pulsadores - SELECT, izquierda, arriba, abajo ya la derecha, más un botón RESET. Para guardar el recurso pin IO digital, la interfaz de teclado sólo utiliza un canal ADC. El valor de la clave se lee a través de un divisor de tensión de la resistencia de 5 etapas. Cuando se pulsa una tecla, el ADC lee el valor de la tensión a través del divisor de tensión; entonces el valor de la tensión se compara con el valor umbral de la tensión almacenada en una matriz para identificar qué tecla se ha pulsado.

Especificaciones:
Tensión de funcionamiento: 5 V CC
Dimensiones: 80 x 58 x 22 mm
Peso: 52g

* Nota: Este no es un producto original de marca Arduino.

Subir video

Regístrese para subir videos, por favor Iniciar Sesión o registrarse

Temas
Ordenar por
Temas más recientes
* Apodo:

* Tu respuesta:


Ingrese el texto que se muestra en la imagen en el campo de abajo
*Código de verificación:
Cancelar
Enviar
Publica un tema nuevo
* Apodo:

* Tu tema:


Ingrese el texto que se muestra en la imagen en el campo de abajo
*Código de verificación:
Publicar tema

Regístrese para escribir reseñas, por favor Iniciar Sesión o registrarse

Andraz | Comprador verificado

  • Overall
  • Quality
  • Value

Certified Buyer Rated

Dec 03, 2013

The pin out for this dispay shield is as folows (display-arduino): D4-4, D5-5, D6-6, D7-7, RS-8, E-9.

Buttons have a nice click to them and are all (except reset) readable from pin A0 (schematic for how they are conected would be nice HK)

When pluged in to an arduino it interferes a bit with the power jack but not a whole lot, the board itself sticks about 1cm over the left edge of arduino.

I've tested this with arduino due which is 3,3V, the display works prfectly, the same cant be said for the buttons as they are powerd from 5V, some hardware hackong will be required.

Other than that it feels like a decent quality product, the soldering is ok, I'd like to see more solder in a couple of places, but over all good for the price.

| Comprador verificado

  • Overall
  • Quality
  • Value

Certified Buyer Rated

Sep 18, 2013

Excelente producto con buena calidad

flash242424 | Comprador verificado

  • Overall
  • Quality
  • Value

Certified Buyer Rated

Jul 20, 2013

The Arduino LCD screen is a backlit LCD screen with headers. You can draw text, images, and shapes to the screen with the LCD library. There is an onboard micro-SD card slot on the back of the screen that can, among other things, store bitmap images for the screen to display.

Peter | Comprador verificado

  • Overall
  • Quality
  • Value

Customer Rated

May 11, 2013

Works well, is very easy to use... just plug in shield, and you're good to go! Hobbykings documentation could have been a bit better though.

Use LiquidCrystal lcd(8, 9, 4,5, 6, 7); in order to control the LCD, IO pin 10 to control the backlight (recommend you use pinMode(10,INPUT) to turn on, and pinMode(10,OUTPUT) to turn it off).

Only uses one analog pin (A0) for the five control buttons - you just need to work out the different voltages that you'll read when you press each button - which will vary slightly depending if powering Arduino from external power or USB. 6th button is linked to reset line.

Minkey | Comprador verificado

  • Overall
  • Quality
  • Value

Customer Rated

Jan 20, 2013

This is a cool little shield. Good price. I personally haven't found much use for it, but it was cool when I first got it up and running. I did a more in depth review at the address below.

aeronauticsroboticsandhotglue * blogspot * com/

Toton | Comprador verificado

  • Overall
  • Quality
  • Value

Certified Buyer Rated

Jan 04, 2013

Very good component, the example software is downloadable in the files section. Very easy to use good contrast very cheap if compared with performances

SadSack | Comprador verificado

  • Overall
  • Quality
  • Value

Certified Buyer Rated

Nov 10, 2012

For the money you can't buy this and make it yourself. I'd put this on your must have list.

OlliW BLHeliBox over on Helifreaks

| Comprador verificado

  • Overall
  • Quality
  • Value

Certified Buyer Rated

Oct 20, 2012

Very good product , compatible with arduino LCD library

No_Hazmats | Comprador verificado

  • Overall
  • Quality
  • Value

Customer Rated

Oct 08, 2012

Mine works as advertised. If you do a google search on 'LCD keypad shield', the top returns are the pages for this device from therobotshop_dot_com. There are schematics and excellent code examples.

I have a couple of possible uses for mine - hopefully I can port the code from the 3DRobotics ground station. I also tested it with a 4 x 20 display that I have and it works too.

Very nice device at an extremely good price.

GustPilot | Comprador verificado

  • Overall
  • Quality
  • Value

Certified Buyer Rated

Sep 07, 2012

nice LCD pad shield, like other users have brought out, if you think it is broken, it aint, just change the contrast

  1. 1
  2. 2
Archivos de clientes
dimmer_for_backlight_by_pushing_select_b Download [1]
LiquidCrystal_Adjust_Contrast Download [0]
LCD and button usage sample code Download [1]
LCD and button test code Download [11]
Subir archivo

Regístrese para subir archivos.
Por favor registrarse o registrarse para empezar a ayudar a los aficionados ahora!