Devenez fournisseur Blog Nouveaux articles
S'inscrire

Prix total

0,00 €

Panier 0 Panier 0 Loading...

Kingduino clavier LCD Shield

Generating Links

Kingduino clavier LCD Shield

Prix:

Now save économisez 0,00 € 0,00 €

1,92 €
Déjà acheté Discontinued Product

Please continue searching for a similar product.
SKU:
009000008
Livraison gratuite? Cliquez ici pour apprendre plus!

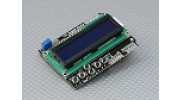
Ce clavier LCD Shield (connecteur à broches mâle) pour Arduino se compose d'un écran LCD bleu 16x2 et 6 boutons poussoirs momentanés, de gauche à droite, SELECT, GAUCHE, HAUT, BAS, DROITE et RESET. Le bouclier peut être directement branché sur une carte Arduino Duemilanove, ce qui rend la soudure ou fly-câblage pour le raccordement inutile. Goupilles 5, 6, 7, 8 et 9 sont utilisés comme interface avec l'écran LCD.

Caractéristiques:
• Facile à lire 16x2 écran LCD bleu
• Contraste réglable
• Conception laminé et facile à étendre
• Utilisation de l'interface LCD4Bit modifiée

Modifié Interface LCD4Bit:
Afin de préserver le port SPI pour une utilisation future, les broches IO numérique DB7-10 et pin11 & broches 12 utilisées dans la bibliothèque de LCD4Bit d'origine ont été déplacés vers DB4-7 et la broche 8 et la broche 9 respectivement.

Clavier:
Le clavier se compose de 5 boutons-poussoirs - SELECT, GAUCHE, HAUT, BAS et DROITE plus un bouton RESET. Pour enregistrer la ressource broches IO numérique, l'interface clavier utilise un seul canal ADC. La valeur de la clé est lue par une tension de résistance diviseur 5 étapes. Quand une touche est enfoncée, l'ADC lit la valeur de tension à travers le diviseur de tension; puis la valeur de tension est comparée à la valeur seuil de la tension mémorisée dans un tableau pour déterminer quelle touche a été enfoncée.

Spécifications:
Tension de fonctionnement: 5VDC
Dimensions: 80 x 58 x 22mm
Poids: 52g

* Note: Ce ne sont pas un produit original de marque Arduino.

Télécharger une video

Inscrivez-vous pour télécharger des vidéos, s'il vous plaît se connecter ou s'inscrire

Sujets
Trier par
Sujets les plus récents
* Surnom:

* Votre réponse:


Veuillez saisir le texte affiché dans l'image dans le champ ci-dessous
*Code de vérification:
Annuler
Soumettre
Publier un nouveau sujet
* Surnom:

* Votre sujet:


Veuillez saisir le texte affiché dans l'image dans le champ ci-dessous
*Code de vérification:
Sujet du message

Inscrivez-vous pour écrire des critiques, s'il vous plaît se connecter ou s'inscrire

Andraz | Acheteur vérifié

  • Overall
  • Quality
  • Value

Certified Buyer Rated

Dec 03, 2013

The pin out for this dispay shield is as folows (display-arduino): D4-4, D5-5, D6-6, D7-7, RS-8, E-9.

Buttons have a nice click to them and are all (except reset) readable from pin A0 (schematic for how they are conected would be nice HK)

When pluged in to an arduino it interferes a bit with the power jack but not a whole lot, the board itself sticks about 1cm over the left edge of arduino.

I've tested this with arduino due which is 3,3V, the display works prfectly, the same cant be said for the buttons as they are powerd from 5V, some hardware hackong will be required.

Other than that it feels like a decent quality product, the soldering is ok, I'd like to see more solder in a couple of places, but over all good for the price.

| Acheteur vérifié

  • Overall
  • Quality
  • Value

Certified Buyer Rated

Sep 18, 2013

Excelente producto con buena calidad

flash242424 | Acheteur vérifié

  • Overall
  • Quality
  • Value

Certified Buyer Rated

Jul 20, 2013

The Arduino LCD screen is a backlit LCD screen with headers. You can draw text, images, and shapes to the screen with the LCD library. There is an onboard micro-SD card slot on the back of the screen that can, among other things, store bitmap images for the screen to display.

Peter | Acheteur vérifié

  • Overall
  • Quality
  • Value

Customer Rated

May 11, 2013

Works well, is very easy to use... just plug in shield, and you're good to go! Hobbykings documentation could have been a bit better though.

Use LiquidCrystal lcd(8, 9, 4,5, 6, 7); in order to control the LCD, IO pin 10 to control the backlight (recommend you use pinMode(10,INPUT) to turn on, and pinMode(10,OUTPUT) to turn it off).

Only uses one analog pin (A0) for the five control buttons - you just need to work out the different voltages that you'll read when you press each button - which will vary slightly depending if powering Arduino from external power or USB. 6th button is linked to reset line.

Minkey | Acheteur vérifié

  • Overall
  • Quality
  • Value

Customer Rated

Jan 20, 2013

This is a cool little shield. Good price. I personally haven't found much use for it, but it was cool when I first got it up and running. I did a more in depth review at the address below.

aeronauticsroboticsandhotglue * blogspot * com/

Toton | Acheteur vérifié

  • Overall
  • Quality
  • Value

Certified Buyer Rated

Jan 04, 2013

Very good component, the example software is downloadable in the files section. Very easy to use good contrast very cheap if compared with performances

SadSack | Acheteur vérifié

  • Overall
  • Quality
  • Value

Certified Buyer Rated

Nov 10, 2012

For the money you can't buy this and make it yourself. I'd put this on your must have list.

OlliW BLHeliBox over on Helifreaks

| Acheteur vérifié

  • Overall
  • Quality
  • Value

Certified Buyer Rated

Oct 20, 2012

Very good product , compatible with arduino LCD library

No_Hazmats | Acheteur vérifié

  • Overall
  • Quality
  • Value

Customer Rated

Oct 08, 2012

Mine works as advertised. If you do a google search on 'LCD keypad shield', the top returns are the pages for this device from therobotshop_dot_com. There are schematics and excellent code examples.

I have a couple of possible uses for mine - hopefully I can port the code from the 3DRobotics ground station. I also tested it with a 4 x 20 display that I have and it works too.

Very nice device at an extremely good price.

GustPilot | Acheteur vérifié

  • Overall
  • Quality
  • Value

Certified Buyer Rated

Sep 07, 2012

nice LCD pad shield, like other users have brought out, if you think it is broken, it aint, just change the contrast

  1. 1
  2. 2
Fichiers clients
dimmer_for_backlight_by_pushing_select_b Download [1]
LiquidCrystal_Adjust_Contrast Download [0]
LCD and button usage sample code Download [1]
LCD and button test code Download [11]
Téléverser un fichier

Inscrivez-vous pour télécharger des fichiers.
S'il vous plaît se connecter ou s'inscrire pour commencer à aider les amateurs maintenant!