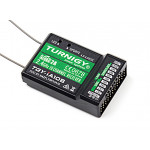
Commission de contrôle de vol MINI MWC et DSM2 Compatible Récepteur ACC / GYRO / BARO / MAG

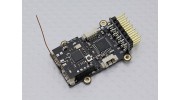
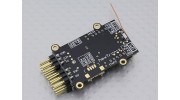


Commission de contrôle de vol MINI MWC et DSM2 Compatible Récepteur ACC / GYRO / BARO / MAG


Le Nouveau Mini MWC carte de contrôle de vol est jalon dans le progrès et l'ingéniosité de la plate-forme MWC. La combinaison de la puissance de l'ATmega328P avec Accéléromètre, Gyro, un baromètre et une boussole numérique avec un récepteur compatible à bord 7 canaux DSM2 (avec un bouton de liaison à bord!). Tous emballés sur un PCB de cuivre double qualité avec des connexions et de l'empreinte pas beaucoup plus grande qu'une grande pièce revêtue d'or! Le monde de la Mini Multi-rotors simplement pris à leur grand frère.
La plate-forme MWC propose une liste de blanchisserie de fonctions et disposent comme; stabiliser Auto, le maintien d'altitude, le mode simple et beaucoup plus, et avec l'option GPS disponible même flâne dans une position de jeu et revenir à des options à la maison! Vous pouvez même opter pour fixer un écran OLED en option pour la programmation facile et commentaires!
Caractéristiques:
• 7CH DSM2 Récepteur Compatible (PPM SUM)
• Vérification auto-tension
• FTD1 protection
• ATMEGA328P Microcontroller
• MPU6050 Accéléromètre et Gyro
• BMP085 capteur barométrique numérique
• HMC5883L Manomètre numérique / Compass
• C8051F330 MCU
• CYRF69103 Radio
• Ports double IIC
• UART
• Port GPS (GPS non inclus)
• Port d'écran OLED (OLED non inclus)
Les fonctions suivantes peuvent être réalisées grâce à la carte de commande de vol MINI MWC:
stabilisation -Auto
-Stabilize L'altitude
-Correction Rubrique cours
-Hovering À une position identifiée (besoins 12C-GPS carte convertisseur et supports par GPS)
vol -Retour automatiquement (besoins 12C-GPS carte convertisseur et supports par GPS)
-Et plus
MINI MWC vol carte pris en charge les modes:
-GIMBAL-Individuelle stabilisation de la tête du berceau
-SINGLECOPTER-VTOL seul axe
-BICOPTER-BICOPTER Avatar
-Tricopter
WING -FLYING
-VTAIL
avion -Correction aile
-4-Axis (QuadX, QUADP, Y4)
stabilisation de la tête -cradle / Cardan
-6-Axis (Y6, HEX6, HEX6X)
Options non inclus: (Stock sera bientôt)
-MX-FTDI outil clé de programmation
écran -OLED, peut être monté sur MINI MWC carte de contrôle de vol directement
-IIC À carte convertisseur UART, Il est pour changer le signal UART du GPS à un signal IIC
Module -GPS
Spécifications:
Taille: 47.7X23.5X11mm
Poids: 7.8g
Tension de travail: 5-8.4V
* Transmetteur pour MINI MWC carte de contrôle de vol doit soutenir DSM2 et 4CH ou au- dessus (nous recommandons 6CH ou au- dessus)
Inscrivez-vous pour télécharger des vidéos, s'il vous plaît se connecter ou s'inscrire

Inscrivez-vous pour écrire des critiques, s'il vous plaît se connecter ou s'inscrire
Motoko | Acheteur vérifié
-
Overall
-
Quality
-
Value
Great Board but need some solid set docs
Jun 11, 2017
EdAmps | Acheteur vérifié
-
Overall
-
Quality
-
Value
Customer Rated
May 19, 2015
Kontraptionist | Acheteur vérifié
-
Overall
-
Quality
-
Value
Customer Rated
Dec 20, 2014
noobmatic2000 | Acheteur vérifié
-
Overall
-
Quality
-
Value
Customer Rated
Oct 27, 2014
Leocopter | Acheteur vérifié
-
Overall
-
Quality
-
Value
Customer Rated
Oct 20, 2013
| No File Name | Download [2082] |
| No File Name | Download [1597] |
| Initial config - simple and detailed | Download [2096] |
| No File Name | Download [2546] |
| instructions and updating | Download [1446] |
| What is This ? | Download [906] |
| No File Name | Download [58] |
| EdAmps Hardware Mods | Download [134] |
| LeoCopter's Guide | Download [1464] |
| No File Name | Download [1727] |
Inscrivez-vous pour télécharger des fichiers.
S'il vous plaît se connecter ou s'inscrire pour commencer à aider les amateurs maintenant!
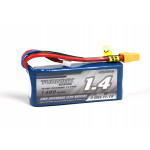
Accessoires

Special Price 1,93 €
You save 7,19 €
Prix normal 9,12 €
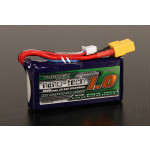
Produits Apparentés
-
USB FTDI flash Stick Micro et Mini MWC Contrôleur de vol avec des câbles (Multi Wii)SKU: 9154000008-0

Special Price 1,93 €
You save 7,19 €
Prix normal 9,12 €