Fokker E.III Eindecker WW1 Fighter Laser Cut Balsa Kit 1520mm (60")
")


Fokker E.III Eindecker WW1 Fighter Laser Cut Balsa Kit 1520mm (60")
アクセサリー


Special Price $13.41
You save $1.49
Was $14.90

Special Price $7.97
You save $0.89
Was $8.86


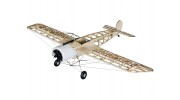
The Fokker scourge was extremely feared during the early days of world war one and the Fokker E.III was the legend behind the terror.
With its single machine gun firing through the propeller arc, it was the first-ever airplane to have this ingenious mechanically synchronized weapon of warfare. Praying on the unarmed and slower spotter aircraft of the British armed forces and using its agile maneuverability and newly designed gun the Eindekker scored many kills over the western front. As the war years went on and aircraft technology developed and advanced the Fokker E.III Eindekker become obsolete and the Fokker scourge was no more.
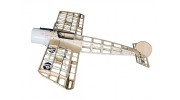
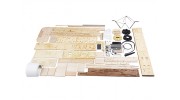
Our model captures the true spirit of the early WW1 Fokker Eindekker, It has an open framework structure built from quality balsa and hardwoods, a fiberglass cowl and plastic engine covers, a dummy rotary engine, and of course the machine gun. For ease of construction, all the parts are beautifully laser cut and are extremely accurate which will allow you to build the perfect model. To complete the contents of this superb kit are a pair of vintage aircraft wheels, pre-bent and drilled aluminum wing struts and U/C legs, carbon tube wing spars, and joiners plus a comprehensive hardware pack that includes rigging wire, nuts, and bolts, servo horns, rods, and connectors, etc.
The Fokker E.III has been designed to use either a 35 or 42mm brushless outrunner motor producing 500~600 watts on a 5~6 cell Lipo battery with a 40~60A electronic speed controller. Swinging a 12~14 inch propeller and standard size servos are adequate for all the control surfaces.
Overall this is a fantastic kit and due to its ease of construction, it is perfect for seasoned builders or those with limited building experience. Once finished in an authentic textured covering such as antique Solartex and the addition of scale accessories such as a pilot and weathering this bad little Fokker will really look the part and will turn many heads attacking the British and her allies at your local flying field or RC flying club.
Features:
• Laser cut parts for accuracy and ease of construction
• Carbon spars and wing tubes
• Glass fiber radial cowl
• Plastic molded engine covers
• Authentic rigging wires
• Comprehensive hardware pack
Specs:
Wingspan: 1520mm
Fuselage Length: 1170mm
Flying Weight: 2700~3000g
Motor: 3530~4250 or gas/nitro equivalent
ESC: 40~60A suitable for up to 6S
Propeller: 12~15 inch
Battery: 2600~3000mah 5~6S
Required:
1 x 3530~4250 Brushless outrunner motor or gas/nitro equivalent
1 x 40~60A 6S electronic speed controller
4 x 17~40g servos (5 required if using gas/nitro engine)
1 x 12 or 15-inch propeller
1 x 2600~3000mah 5~6S LiPo battery
Textured covering material
Assorted glues
Assorted hand tools
See under the "Files" tab for a copy of the manual.
-
IC / 2 :エレック Electric
-
翼幅(ミリメートル) 1520.00
-
 Construction Documentation
 -
") HobbyKing Fokker E.III Eindecker WW1 Fighter Laser Cut Balsa Kit 1520mm (60")
HobbyKing Fokker E.III Eindecker WW1 Fighter Laser Cut Balsa Kit 1520mm (60") -
 Fokker E III Eindecker WW1 Fighter Laser Cut Balsa Kit 1520mm HobbyKing
 -
Fokker E III Eindecker WW1 Fighter Laser Cut Balsa Kit 1520mm HobbyKing
-
Fokker E.III
-
Fokker E.III Eindecker WW1 Fighter Laser Cut Balsa Kit 1520mm (60")
-
 Construction Docu - Part 1
 -
 Construction Docu - Part 2
 -
 Construction Docu - Part 3
 -
 - Flying.") HobbyKing Fokker E.III Eindecker WW1 Fighter Laser Cut Balsa Kit 1520mm (60") - Flying.
HobbyKing Fokker E.III Eindecker WW1 Fighter Laser Cut Balsa Kit 1520mm (60") - Flying. -
HobbyKing Fokker E.III Eindecker WW1 Fighter Laser Cut Balsa Kit 1520mm (60") - Flying.
-
 My Fokker E.III - See photo and description in "Rate & Review" e "Upload Files" tabs
 -
My Fokker E.III

FredFrog | 確認済みの購入者
-
Overall
-
Quality
-
Value
Good quality and detail but poor instructions.
Nov 08, 2022
Dave | 確認済みの購入者
-
Overall
-
Quality
-
Value
Great kit, horrible instructions!
Sep 19, 2022
Tomáš | 確認済みの購入者
-
Overall
-
Quality
-
Value
Výchylky
Apr 17, 2022
woody | 確認済みの購入者
-
Overall
-
Quality
-
Value
ok
Aug 01, 2021
Werner | 確認済みの購入者
-
Overall
-
Quality
-
Value
Buy recommendation
Apr 17, 2021
Robin | 確認済みの購入者
-
Overall
-
Quality
-
Value
It’s a great scale model spoiled by the lack of decent instructions, not for a beginner.
Apr 01, 2021
Graham | 確認済みの購入者
-
Overall
-
Quality
-
Value
Nearly there
Mar 23, 2021
Graham | 確認済みの購入者
-
Overall
-
Quality
-
Value
Second Impressions
Feb 23, 2021
Graham | 確認済みの購入者
-
Overall
-
Quality
-
Value
First Impressions
Jan 13, 2021
Paul | 確認済みの購入者
-
Overall
-
Quality
-
Value
Recommendable
Apr 05, 2020
| Fokker E111 Manual | Download [6] |
| WhatsApp Image 2018-08-18 at 22.58.27(2).jpeg | Download [99] |
| WhatsApp Image 2018-08-18 at 22.58.24(1).jpeg | Download [113] |
| WhatsApp Image 2018-08-18 at 22.58.24.jpeg | Download [97] |
| WhatsApp Image 2018-08-18 at 22.58.25(1).jpeg | Download [76] |
| WhatsApp Image 2018-08-18 at 22.58.25(2).jpeg | Download [108] |
| WhatsApp Image 2018-08-18 at 22.58.25(3).jpeg | Download [106] |
| WhatsApp Image 2018-08-18 at 22.58.25.jpeg | Download [100] |
| WhatsApp Image 2018-08-18 at 22.58.26(1).jpeg | Download [112] |
| WhatsApp Image 2018-08-18 at 22.58.26(2).jpeg | Download [116] |