Kingduino FIO ATmega328Pマイクロコントローラ

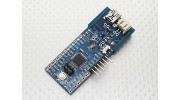


Kingduino FIO ATmega328Pマイクロコントローラ
SKU:
381000054
シェア :


ArduinoのFIOはATmega328Pに基づいて、マイコンボードは3.3Vおよび8 MHzで動作されます。これは、(6 PWM出力として使用することができるの)8つのアナログ入力、オンボード共振器、リセットボタン、及び取付ピンヘッダーのための穴を14デジタル入力/出力ピンを有します。これは、リチウムポリマーバッテリーの接続を持っており、USB経由充電回路を含みます。 XBeeソケットは、ボードの下部に提供されています。
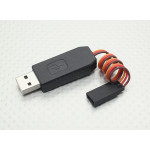
ArduinoのFIOは、ワイヤレス・アプリケーションを対象としています。ユーザーは、FTDIケーブルまたはブレイクアウトボードにスケッチをアップロードすることができます。さらに、このようなのXBeeエクスプローラUSBのように変更のUSB-のXBeeアダプタを使用することにより、ユーザーがワイヤレスでスケッチをアップロードすることができます。ボードは、コネクタまたはワイヤを直接はんだ付けの様々な種類の使用を可能にする、予め取り付けられたヘッダなしで来ます。
仕様:
マイクロコントローラ:ATmega328P
動作電圧:3.3V
入力電圧:3.35〜12V
充電用入力電圧:3.7〜7V
デジタルI / Oピン(PWM出力を提供する6の)14
アナログ入力端子:8
I / OピンあたりのDC電流:40ミリアンペア
フラッシュメモリ:(ブートローダーによって使用されるの2キロバイト)32キロバイト
SRAM:2キロバイト
EEPROM:1キロバイト
クロック速度:8MHzの
外形寸法:65x28x12mm
重量:8.2グラム
*注:これはオリジナルのArduinoのブランドの製品ではありません。
トピック
並び替え
最新のトピック

顧客ファイル
| Arduino Fio Schematic | Download [51] |