サプライヤーになる ブログ 新しいアイテム
新規登録

合計金額

¥0.00

ショッピングカート 0 ショッピングカート 0 Loading...

マイクロP-51Dムスタングワット/ NAVライト550ミリメートル(PNF)

Generating Links

マイクロP-51Dムスタングワット/ NAVライト550ミリメートル(PNF)

価格:

Now save 節約 ¥0.00 ¥0.00

¥10,495.37
出荷先:
  • USA
  • Global
購入済み Discontinued Product

Please continue searching for a similar product.
SKU:
HK-F002C
送料無料したい? クリックする こちらへ 詳細情報を参照する

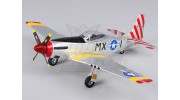
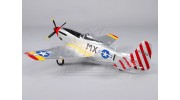
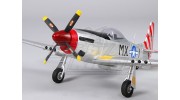
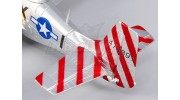
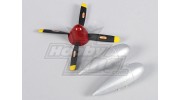
この見事に詳細なマイクロP-51Dムスタングは、それが小さな寸法の厳しいEPOフォームから作られており、非常にスケールが与えられています。

ビーイングプラグアンドフライは、このマスタングは数分で組み立てることができ、モータは、ESC&サーボのは、すべてのプリインストールされ、アンダーキャリッジとプロップテール羽、NAVライト、非常に規模も事前取り付け、事前に適用されたデカールされています、ちょうど翼を取り付けるためにあなたを残して、希望する場合は、オプションの増槽を追加し、あなたのテキサス州にダイヤルし、飛んで行きます!

コントロールがフル4チャネルであり、精密な制御のための各コントロールサーフェス用のサーボがある、非常にスケール4ブレードプロペラ&スピナーを揺動させるブラシレスアウトランナーモーターからの動力をたっぷりもあります。これは驚くほど小さなマスタングが地面に、空気中の両方の偉大な外観とあなたのウォーバードコレクションのための絶対必要であるスケール!

仕様:
翼幅:550ミリメートル
長さ:480ミリメートル
ウィングエリア:45dm2
フライング重量:190グラム〜200グラム
モーター:2450kvブラシレスアウトランナー
ESC:12A BEC /ワット
サーボ:2.5gx 4

含まれています:
説明書
スペアプロペラ
増槽でプラグイン

必要なもの:
独自の4チャンネルTX / RX
450mAh 2S Lipolyバッテリー

動画をアップロードする

動画をアップロードするには登録してください サインイン または 新規登録

トピック
並び替え
最新のトピック
* ニックネーム:

* あなたの返信:


下のフィールドに画像に表示されているテキストを入力してください
*検証コード:
キャンセル
提出する
新しいトピックを投稿する
* ニックネーム:

* あなたのトピック:


下のフィールドに画像に表示されているテキストを入力してください
*検証コード:
投稿トピック

レビューを書くために登録してください サインイン または 新規登録

John | 確認済みの購入者

  • Overall
  • Quality
  • Value

Customer Rated

Dec 24, 2012

Just assembled, motor is not balanced - prop shaft points right and prop vibrates real bad at low revs. No way it'll take off. This one's going to need attention before flight.

Emily | 確認済みの購入者

  • Overall
  • Quality
  • Value

Customer Rated

Jul 14, 2012

Got this plane and flew it and crashed right away. Not very windy during flight and broke both props and the tail. Not very strong wheels broke to. so mad I spent money and I'm angry.

Aonghais | 確認済みの購入者

  • Overall
  • Quality
  • Value

Customer Rated

Jan 09, 2012

Wow! What a POS! Just got mine in the mail today, well packaged and completely undamaged. The plane has a very nice scale appearance. Here's what I found:


1) Cold solder joints to ESC for battery cable. Had to resolder, looked good.

2) Red LEDs for both left and right wing tip. (not a big deal)

3) Model seems very heavy for its size. The landing gear has solid rubber wheels. Ma need to remove them.

4) Drop away tanks are loose on their mount. One of the tanks was missing a ball connector and is unusable as supplied unless I glue it permanently. ( I figure they would too much drag anyway)

5) Ran motor at full throttle for 30 seconds to check for excessive heat from ESC. The ESC was fairly cool, but the motor housing was red hot and melted the plastic motor mount.

6) Prop attachment screw is stripped and cannot be turned with a screwdriver.

7) It appears the motor was attached to the firewall with wood screws instead of machine screws.


Unfortunately, I may never get to fly this model. Its sad because its really nice to look at, but mostly because I just lost $76 just for the privilege of watching a motor melt off an airplane and fall on the floor...

EAikau | 確認済みの購入者

  • Overall
  • Quality
  • Value

Customer Rated

Jan 08, 2012

I'm really starting to love this little bird. I have upgraded the motor, ESC and propeller. I have also decreased the throw for the elevator, put a steerable tail wheel on the rudder and made metal landing gear. Now it's flying nice and fast. On a 3S battery it's a rocket. I'm using both 2S and 3S batteries. 2S-1000MAh and a 3S-500MAh fit nicely. CG I'm using is 34/35mm. I use the trailing edge of the small circles on the wing. I've located the ESC and RX just infront of the servos for the rudder and elevator. You'll need to cut some foam for a nice fit.

Motor: ADH300S 2400Kv outrunner
ESC: TowerPro W18A ESC
Propeller: 6x4 APC prop with 3mm eflite adapter

EAikau | 確認済みの購入者

  • Overall
  • Quality
  • Value

Customer Rated

Dec 03, 2011

***MUST READ FLIGHT***

The cross member for the elevators is made of flexible plastic. This is causing the left elevator to be delayed maybe even move less than the right side. I noticed this during hard full up elevator. The plane was acting like it was also using right Aileron.

***Things to upgrade before flight**.
1. You "MUST" make a metal cross brace for the elevator. If you do not you will crash.
2. Make metal landing gear. Stock gear is cheap plastic with a wire core. This will break with the first hard landing.
3. Make a steerable tail wheel. You can just put on on the rudder or you can rig on up in the original position, but you'll need to do some foam cutting.
4. Order lots of propellers or put on an after market prop. The stock prop blades do not extent all the way to the shaft. They are only attached to the outer housing of the spinner. This is a very fragile design.
5. Buy the 500mAh 3S batteries. You'll need to widen the battery compartment, but it's worth it.

My Review:
For $60 this plane is good if you know what you're getting into. She flies fast and aerobatic once you fix the elevator issue.

castaway93 | 確認済みの購入者

  • Overall
  • Quality
  • Value

Customer Rated

Sep 24, 2011

Weight reduction continued:

5) Use lighter batteries. I used Rihno 360mAH batteries. Didn't get much flying time but she was flying!

The instruction manual is 2 pages long, 1 entire page was the specs for the stock ESC. Even worse, it says CG is at 160mm from main wing's LE. Uhh.. that's 1/2 distance of aircraft total leigth. Correct CG is more like 16mm from main wing's LE. I had to add 1/4oz lead to the nose to get her balanced. Good luck

castaway93 | 確認済みの購入者

  • Overall
  • Quality
  • Value

Customer Rated

Sep 24, 2011

I've bought this plane from Banana.com a month ago.It's pretty looking but not very air-worthy. 2 other guys in the field had same problem and eventually shelved theirs for good.

After a dozen crashes and twice the amount of repairs and mods, I've finally figured out the tricks and got mine flying. EXTREME weight reduction! Trim all the fats and dead weights to make her light as possible. IncludingL

1) Remove frront and tail landing gears (cover wheel wells with tape) 2) Remove plastic vent aft of fuse 3) Cut off cockpit interior, leaving only the magnetic section to keep hatch secured. Paint inside of canopy for asthetic look 4) Hollow out the fuse' interior foam. There is so much fat inside her belly that could've blocked ventilation for the esc.

ファイルをアップロードする

ファイルをアップロードするには登録してください.
お願いします サインイン または 新規登録 今すぐ愛好家を助け始めましょう!

アクセサリー