MINI MWCフライト・コントロール・ボードとDSM2対応受信機ACC /ジャイロ/ BARO / MAG

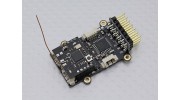
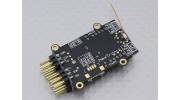


MINI MWCフライト・コントロール・ボードとDSM2対応受信機ACC /ジャイロ/ BARO / MAG


新しいミニMWC飛行制御ボードは、MWCプラットフォームの進捗状況と創意工夫でマイルストーンです。オンボードの7チャンネルDSM2対応受信機と加速度計、ジャイロ、気圧計とデジタルコンパスとATMEGA328pのパワーを組み合わせる(オンボードのバインドボタン付き!)。すべてのゴールドコーティングされた接続およびフットプリントの大きなコインよりもはるかに大きいではないと品質の二重銅PCBに実装!ミニマルチローターの世界は、ちょうど彼らの兄貴のに追いつきました。
MWCプラットフォームは、機能の洗濯物のリストを提供していますなど備えています。オートは、高度ホールド、簡易モードとはるかに安定化し、利用可能なGPSオプションであってもセットポジションでぶらつくとホームオプションに戻ります!あなたも簡単にプログラミングとフィードバックのためのオプションのOLED画面を添付することを選ぶことができます!
特徴:
•7CH DSM2対応受信機(PPM SUM)
•セルフ電圧チェック
•FTD1保護
•ATMEGA328Pマイクロコントローラ
•MPU6050加速度計とジャイロ
•BMP085デジタル大気圧センサー
•HMC5883Lデジタル圧力計/コンパス
•C8051F330 MCU
•CYRF69103ラジオ
•デュアルIICポート
•UART
•GPSポート(GPSは含まれません)
•有機EL画面ポート(OLEDは含まれません)
以下の機能は、MINI MWC飛行制御ボードを介して実現することができます:
安定-auto
高度を-Stabilize
-fixed見出しコース
識別された位置に-Hovering(12C-GPS変換基板を必要とし、GPSによってサポートしています)
自動的に-return飛行(12C-GPS変換基板を必要とし、GPSによってサポートしています)
-もっと
MINI MWCのフライトボードはモードをサポート:
-GIMBAL-個々のクレードルヘッドの安定化
-SINGLECOPTER-VTOL単軸
-BICOPTER-BICOPTERアバター
-Tricopter
-FLYING WING
-VTAIL
-fixed翼航空機
-4軸(QUADX、QUADP、Y4)
-cradle /ジンバルヘッドの安定化
-6軸(Y6、HEX6、HEX6X)
オプションは含まれません:(株価は近日公開されます)
-MX-FTDIプログラミングスティックツール
-OLED画面は、直接MINI MWC飛行制御基板に実装することができます
UART変換基板に-IIC、それはIIC信号にGPSのUART信号を変更するためのものです
-GPSモジュール
仕様:
サイズ:47.7X23.5X11mm
重量:7.8グラム
動作電圧:5-8.4V
* MINI MWC飛行制御ボードがDSM2と4CH以上をサポートする必要があるためトランスミッタ(我々は6CHをお勧めします以上)

Motoko | 確認済みの購入者
-
Overall
-
Quality
-
Value
Great Board but need some solid set docs
Jun 11, 2017
EdAmps | 確認済みの購入者
-
Overall
-
Quality
-
Value
Customer Rated
May 19, 2015
Kontraptionist | 確認済みの購入者
-
Overall
-
Quality
-
Value
Customer Rated
Dec 20, 2014
noobmatic2000 | 確認済みの購入者
-
Overall
-
Quality
-
Value
Customer Rated
Oct 27, 2014
Leocopter | 確認済みの購入者
-
Overall
-
Quality
-
Value
Customer Rated
Oct 20, 2013
| No File Name | Download [2082] |
| No File Name | Download [1597] |
| Initial config - simple and detailed | Download [2096] |
| No File Name | Download [2546] |
| instructions and updating | Download [1446] |
| What is This ? | Download [906] |
| No File Name | Download [58] |
| EdAmps Hardware Mods | Download [134] |
| LeoCopter's Guide | Download [1464] |
| No File Name | Download [1727] |
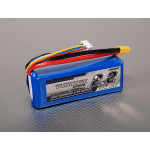
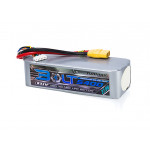
アクセサリー

関連製品
-
マイクロ・ケーブルミニMWCフライトコントローラ(マルチWiiの)用のUSB FTDIフラッシュスティックSKU: 9154000008-0
 ¥1,502.36