Leverancier worden Blog Nieuwe items
Registreren

Totale prijs

€ 0,00

Winkelmand 0 Winkelmand 0 Loading...

Kingduino LCD Keypad Shield

Generating Links

Kingduino LCD Keypad Shield

Prijs:

Now save bespaar € 0,00 € 0,00

€ 1,93
Al gekocht Discontinued Product

Please continue searching for a similar product.
SKU:
009000008
Geen verzendkosten? Klik hier meer leren!

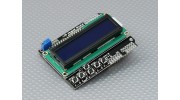
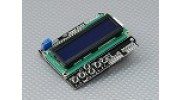
Deze LCD Keypad Shield (male pin connector) voor Arduino bestaat uit een 16x2 blauwe LCD-scherm en 6 momentane drukknoppen, van links naar rechts, SELECT, Links, Boven, Onder, Rechts en RESET. Het schild kan direct worden aangesloten op een Arduino Duemilanove board, waardoor solderen of fly-bekabeling voor aansluiting overbodig. Pennen 5, 6, 7, 8 en 9 worden gebruikt als interface met de LCD.

Kenmerken:
• Eenvoudig te 16x2 blauwe LCD scherm te lezen
• Instelbare contrast
• Gelaagd ontwerp en gemakkelijk uit te breiden
• Met behulp van gemodificeerde LCD4Bit Interface

Gewijzigd LCD4Bit Interface:
Om de SPI-poort voor toekomstig gebruik te bewaren, hebben de digitale IO pinnen DB7-10 en pin11 & pen 12 gebruikt in de originele LCD4Bit bibliotheek verplaatst naar DB4-7 en pin 8 & pin 9, respectievelijk.

toetsenbord:
Het toetsenbord bestaat uit 5 drukknoppen - SELECT, links, omhoog, omlaag en naar rechts, plus een RESET-knop. Om de digitale IO pin resource opslaan, het toetsenbord-interface gebruikt slechts één ADC-kanaal. De sleutel waarde wordt gelezen door middel van een 5 stadium weerstand spanning divider. Wanneer een toets wordt ingedrukt, de ADC leest de spanning door de spanning divider; dan de spanningswaarde vergeleken met de spanningswaarde drempel opgeslagen in een array te bepalen welke toets is ingedrukt.

specs:
Operating Voltage: 5VDC
Afmetingen: 80 x 58 x 22mm
Gewicht: 52g

* Let op: Dit is geen originele Arduino merkproduct.

Upload video

Registreer u om video's te uploaden aanmelden of registreren

Onderwerpen
Sorteer op
Meest recente onderwerpen
* Bijnaam:

* Uw antwoord:


Voer de tekst in de afbeelding in het onderstaande veld in
*Verificatie code:
annuleer
Bevestig
Plaats een nieuw onderwerp
* Bijnaam:

* Uw onderwerp:


Voer de tekst in de afbeelding in het onderstaande veld in
*Verificatie code:
Onderwerp plaatsen

Registreer u om beoordelingen te schrijven aanmelden of registreren

Andraz | Geverifieerde koper

  • Overall
  • Quality
  • Value

Certified Buyer Rated

Dec 03, 2013

The pin out for this dispay shield is as folows (display-arduino): D4-4, D5-5, D6-6, D7-7, RS-8, E-9.

Buttons have a nice click to them and are all (except reset) readable from pin A0 (schematic for how they are conected would be nice HK)

When pluged in to an arduino it interferes a bit with the power jack but not a whole lot, the board itself sticks about 1cm over the left edge of arduino.

I've tested this with arduino due which is 3,3V, the display works prfectly, the same cant be said for the buttons as they are powerd from 5V, some hardware hackong will be required.

Other than that it feels like a decent quality product, the soldering is ok, I'd like to see more solder in a couple of places, but over all good for the price.

| Geverifieerde koper

  • Overall
  • Quality
  • Value

Certified Buyer Rated

Sep 18, 2013

Excelente producto con buena calidad

flash242424 | Geverifieerde koper

  • Overall
  • Quality
  • Value

Certified Buyer Rated

Jul 20, 2013

The Arduino LCD screen is a backlit LCD screen with headers. You can draw text, images, and shapes to the screen with the LCD library. There is an onboard micro-SD card slot on the back of the screen that can, among other things, store bitmap images for the screen to display.

Peter | Geverifieerde koper

  • Overall
  • Quality
  • Value

Customer Rated

May 11, 2013

Works well, is very easy to use... just plug in shield, and you're good to go! Hobbykings documentation could have been a bit better though.

Use LiquidCrystal lcd(8, 9, 4,5, 6, 7); in order to control the LCD, IO pin 10 to control the backlight (recommend you use pinMode(10,INPUT) to turn on, and pinMode(10,OUTPUT) to turn it off).

Only uses one analog pin (A0) for the five control buttons - you just need to work out the different voltages that you'll read when you press each button - which will vary slightly depending if powering Arduino from external power or USB. 6th button is linked to reset line.

Minkey | Geverifieerde koper

  • Overall
  • Quality
  • Value

Customer Rated

Jan 20, 2013

This is a cool little shield. Good price. I personally haven't found much use for it, but it was cool when I first got it up and running. I did a more in depth review at the address below.

aeronauticsroboticsandhotglue * blogspot * com/

Toton | Geverifieerde koper

  • Overall
  • Quality
  • Value

Certified Buyer Rated

Jan 04, 2013

Very good component, the example software is downloadable in the files section. Very easy to use good contrast very cheap if compared with performances

SadSack | Geverifieerde koper

  • Overall
  • Quality
  • Value

Certified Buyer Rated

Nov 10, 2012

For the money you can't buy this and make it yourself. I'd put this on your must have list.

OlliW BLHeliBox over on Helifreaks

| Geverifieerde koper

  • Overall
  • Quality
  • Value

Certified Buyer Rated

Oct 20, 2012

Very good product , compatible with arduino LCD library

No_Hazmats | Geverifieerde koper

  • Overall
  • Quality
  • Value

Customer Rated

Oct 08, 2012

Mine works as advertised. If you do a google search on 'LCD keypad shield', the top returns are the pages for this device from therobotshop_dot_com. There are schematics and excellent code examples.

I have a couple of possible uses for mine - hopefully I can port the code from the 3DRobotics ground station. I also tested it with a 4 x 20 display that I have and it works too.

Very nice device at an extremely good price.

GustPilot | Geverifieerde koper

  • Overall
  • Quality
  • Value

Certified Buyer Rated

Sep 07, 2012

nice LCD pad shield, like other users have brought out, if you think it is broken, it aint, just change the contrast

  1. 1
  2. 2
Klantbestanden
dimmer_for_backlight_by_pushing_select_b Download [1]
LiquidCrystal_Adjust_Contrast Download [0]
LCD and button usage sample code Download [1]
LCD and button test code Download [11]
Upload bestand

Registreer om bestanden te uploaden.
Alstublieft aanmelden of registreren om nu hobbyisten te helpen!