Torne-se um fornecedor Blog Novos itens
Registar

Preço total

0,00 €

Carrinho de compras 0 Carrinho de compras 0 Loading...

Kingduino Escudo teclado LCD

Generating Links

Kingduino Escudo teclado LCD

Preço:

Now save economize 0,00 € 0,00 €

1,91 €
Já comprado Discontinued Product

Please continue searching for a similar product.
SKU:
009000008
Envio Grátis? Clique aqui aprender mais!

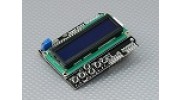
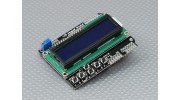
Este LCD protetor de teclado (pinos macho) para o Arduino é composto por um display LCD azul 16x2 e 6 botões momentâneos, da esquerda para a direita, selecione, esquerda, cima, baixo, direita e RESET. O escudo pode ser diretamente ligado a uma placa Arduino Duemilanove, fazendo solda ou fly-fiação para ligação desnecessária. Os pinos 5, 6, 7, 8 e 9 são usados ​​como a interface para o LCD.

Características:
• Fácil de ler 16x2 ecrã LCD azul
• contraste ajustável
• projeto laminado e fácil de expandir
• Usando interface LCD4Bit modificado

Modificada interface LCD4Bit:
A fim de preservar a porta SPI para uso futuro, os pinos IO Digital DB7-10 e pin11 & pinos 12 utilizados na biblioteca LCD4Bit originais foram transferidos para DB4-7 e pino 8 e 9 pinos, respectivamente.

teclado:
O teclado é composto por 5 botões de pressão - SELECT, esquerda, cima, baixo e à direita, mais um botão de RESET. Para salvar o recurso pino digital IO, a interface do teclado utiliza apenas um canal de ADC. O valor da chave é lida através de um 5 fase divisor de tensão resistor. Quando uma tecla é pressionada, o ADC lê o valor da tensão através do divisor de tensão; em seguida, o valor da tensão é comparada com o limiar de valor da tensão armazenada em uma matriz para identificar qual tecla foi pressionada.

especificações:
Tensão de funcionamento: 5VDC
Dimensões: 80 x 58 x 22 milímetros
Peso: 52 g

* Nota: Este não é um produto de marca original Arduino.

Envio vídeo

Registre-se para enviar vídeos, por favor assinar em ou registar

Tópicos
Ordenar por
Tópicos Mais Recentes
* Nome de utilizador:

* Sua resposta:


Por favor, insira o texto mostrado na imagem no campo abaixo
*Código de verificação:
Cancelar
Submeter
Poste um Novo Tópico
* Nome de utilizador:

* Seu Tópico:


Por favor, insira o texto mostrado na imagem no campo abaixo
*Código de verificação:
Postar Tópico

Registre-se para escrever comentários, por favor assinar em ou registar

Andraz | Comprador Verificado

  • Overall
  • Quality
  • Value

Certified Buyer Rated

Dec 03, 2013

The pin out for this dispay shield is as folows (display-arduino): D4-4, D5-5, D6-6, D7-7, RS-8, E-9.

Buttons have a nice click to them and are all (except reset) readable from pin A0 (schematic for how they are conected would be nice HK)

When pluged in to an arduino it interferes a bit with the power jack but not a whole lot, the board itself sticks about 1cm over the left edge of arduino.

I've tested this with arduino due which is 3,3V, the display works prfectly, the same cant be said for the buttons as they are powerd from 5V, some hardware hackong will be required.

Other than that it feels like a decent quality product, the soldering is ok, I'd like to see more solder in a couple of places, but over all good for the price.

| Comprador Verificado

  • Overall
  • Quality
  • Value

Certified Buyer Rated

Sep 18, 2013

Excelente producto con buena calidad

flash242424 | Comprador Verificado

  • Overall
  • Quality
  • Value

Certified Buyer Rated

Jul 20, 2013

The Arduino LCD screen is a backlit LCD screen with headers. You can draw text, images, and shapes to the screen with the LCD library. There is an onboard micro-SD card slot on the back of the screen that can, among other things, store bitmap images for the screen to display.

Peter | Comprador Verificado

  • Overall
  • Quality
  • Value

Customer Rated

May 11, 2013

Works well, is very easy to use... just plug in shield, and you're good to go! Hobbykings documentation could have been a bit better though.

Use LiquidCrystal lcd(8, 9, 4,5, 6, 7); in order to control the LCD, IO pin 10 to control the backlight (recommend you use pinMode(10,INPUT) to turn on, and pinMode(10,OUTPUT) to turn it off).

Only uses one analog pin (A0) for the five control buttons - you just need to work out the different voltages that you'll read when you press each button - which will vary slightly depending if powering Arduino from external power or USB. 6th button is linked to reset line.

Minkey | Comprador Verificado

  • Overall
  • Quality
  • Value

Customer Rated

Jan 20, 2013

This is a cool little shield. Good price. I personally haven't found much use for it, but it was cool when I first got it up and running. I did a more in depth review at the address below.

aeronauticsroboticsandhotglue * blogspot * com/

Toton | Comprador Verificado

  • Overall
  • Quality
  • Value

Certified Buyer Rated

Jan 04, 2013

Very good component, the example software is downloadable in the files section. Very easy to use good contrast very cheap if compared with performances

SadSack | Comprador Verificado

  • Overall
  • Quality
  • Value

Certified Buyer Rated

Nov 10, 2012

For the money you can't buy this and make it yourself. I'd put this on your must have list.

OlliW BLHeliBox over on Helifreaks

| Comprador Verificado

  • Overall
  • Quality
  • Value

Certified Buyer Rated

Oct 20, 2012

Very good product , compatible with arduino LCD library

No_Hazmats | Comprador Verificado

  • Overall
  • Quality
  • Value

Customer Rated

Oct 08, 2012

Mine works as advertised. If you do a google search on 'LCD keypad shield', the top returns are the pages for this device from therobotshop_dot_com. There are schematics and excellent code examples.

I have a couple of possible uses for mine - hopefully I can port the code from the 3DRobotics ground station. I also tested it with a 4 x 20 display that I have and it works too.

Very nice device at an extremely good price.

GustPilot | Comprador Verificado

  • Overall
  • Quality
  • Value

Certified Buyer Rated

Sep 07, 2012

nice LCD pad shield, like other users have brought out, if you think it is broken, it aint, just change the contrast

  1. 1
  2. 2
Arquivos de clientes
dimmer_for_backlight_by_pushing_select_b Download [1]
LiquidCrystal_Adjust_Contrast Download [0]
LCD and button usage sample code Download [1]
LCD and button test code Download [11]
Subir arquivo

Registre-se para fazer upload de arquivos.
Por favor assinar em ou registar para começar a ajudar amadores agora!