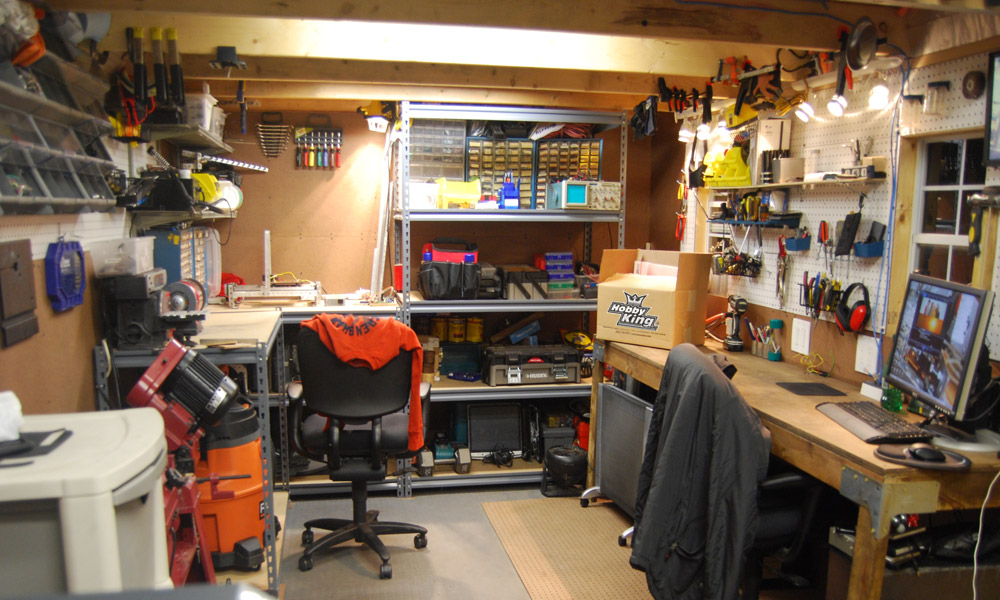
Here are some useful tips to always remember to use in your workshop.
Grub Screws
We’ve all experienced a grub screw coming loose in flight or on the track and it’s something we seek to avoid. Many of us have used glue to stop grub screws from coming loose, however, if you need to loosen the grub screw off to remove them it can be next to impossible. In the past, I’ve damaged the keyway and been left with a screw that I simply could no longer remove. You cannot easily drill out the grub screw as it hardened and the drill bit wants to move. You could use an end mill if you have access to a milling machine however not everyone has access to that type of hardware.
There is an easy way to free up glued grub screws and the best part is it’s dirt cheap and it works. The glue will fail once it gets warm enough so if we heat the grub screw we can cause the glue to fail. Araldite fails at around 100C and super glue is around 190c and so once the working range has been exceeded the adhesion to the surfaces fails and we can loosen the grub screw. To exploit this weakness for the heat we need to heat up just the grub screw but no the surrounding area. I’ve found you can heat up a sacrificial Allen key to the point it is red hot and places it into the grub screw. Allow the heat to transfer and repeat a few times. Don’t use a new Allen screw but rather one of the free ones that come with a kit etc.
Once the glue is destroyed you can use a decent quality Allen key to remove the grub screw. There is one last resort to get a grub screw out if the grub screw is not too deep. Using a Dremel cut-off wheel you can grind a channel into the grub screw allowing you to insert a flat head screwdriver. This will give you a better purchase on the screw allowing you to remove it a little easier.
Painting an RC Model
Painting a model can be expensive if you're using those little Tamiya pots, however, depending on the finished required there is another way. Most hardware stores can color match paint so don’t be afraid they don’t judge, much. I’ve taken a whole model (in pieces) to my local hardware store and asked for a color match. They have water-based acrylics sample posts and will be only too happy to make that up for you. If you happen to know Pantone they can do this for you too. I use a little airbrush to apply the paint and it required just a little watering down to apply smoothly.
Recycling Plastic Packing
I’m always on the lookout for bits and pieces that I can give a second lease on life. Many packaging plastics are highly flexible yet very strong and make for excellent landing gear mounts or servo trays. Humans make an awful lot of waste and there is nothing wrong with giving everything a second lease on life. Pallets are an excellent source of plywood and plastic brackets etc. Old computers have power supplies that are perfect for high-end chargers. If you drop past your IT department at work I bet if you ask for a server power supply you could snare one for nothing. There are lots of things chucked away that we can reuse.
Locknuts
Locknuts are the forgotten friend of RC enthusiasts. Our little planes, multirotors, or cars vibrate like crazy which can loosen nuts and bolts. With little or no notice it all goes to hell in a handbasket and you’re picking up the pieces. If you can, fit lock nuts because there is very little chance that it’s coming undone. Don’t forget to add a little bit of Loctite to screws and nuts because you don’t want to lose an aircraft from maintenance issues. If you get caught short, some nail polish or super glue works wonders too. Remember, you can remove glue easily by using a little heat.
Storing Nitro Engines
Nitro Engines will cease up if not in use so it’s important that they are lubricated before being put away. Over time the castor oil gums up and ceases the engine and making it almost impossible to get going again. Simply add some transmission oil into the carby and ensure that it makes its way around the internals of the engine. This provides a great protective lubricant for long-term storage. Every 12 months or so add a little more transmission oil and turn the motor over for a while so that the internals receive another coat.
Cleaning Nitro Engines
Glow engines get covered in a very thick a crusty layer of oil, muck, baked-on grime, and lacquer that just won’t budge. We have all tried in vain to remove it and no matter how hard you scrub you just can’t get it all and it’s way too much work. Not only is a dirty engine is unsightly I personally feel they perform poorly and never quite run right. I have no supporting evidence for my claim but I’d like your thoughts, so leave some comments below.
Cleaning Bath
To remove varnish and carbon deposits, you’ll need to disassemble your engine. Glow engines can be disassembled without too much trouble using simple tools. If you’ve been in RC for any length of time you’ve most likely got everything you need. Most of us have an assortment of screwdrivers, spanners, pliers, and general tools that may or may not be suited to the task. Before you start, make sure that you have the right tools to correctly perform the required tasks. You may need to buy new screwdrivers, nut drivers, and miniature wrenches that are suitable for our little engines. Screwdrivers are a good example: if you try to remove cylinder-head machine screws with a flat-blade screwdriver that’s too wide, it can break or damage the surrounding cooling fins. If you substitute needle-nose pliers for an open-end wrench or nut driver of the exact size needed to remove the carburetor’s retainer nut, you’ll end up with ugly, rounded corners.
Required
- 1 x Crock-Pot Slow Cooker as small as possible (Preferably used as it can never be used for food again)
- 1 x Automotive Anti-freeze containing Ethelene Glycol.
- 1 x Funnel
- 1 x cup big enough for the motor to fit in
- 1 x liter of methanol or isopropyl alcohol (whichever is cheaper)
Preparing the Engine
- Remove the muffler, carburetor, glow plug, propeller nut, and washer
- Remove the rear cover and set aside the screws in a tin so that they are not misplaced.
- Remove the cylinder head.
- Remove any o-rings or other gaskets
- Rotate the motor so that the piston is at the lowest possible position in the piston combustion chamber.
- Transfer the parts to the crockpot and fill the crockpot with the anti-freeze.
- Set to low heat and leave overnight.
- Remove from the anti-freeze and turn off the crockpot
- Wash the glow engine thoroughly in warm water.
- Drain and dry
- Wash in isopropyl alcohol. This will draw any residual water from the engine case.
- Reassemble the motor and you’re good to go.
- No scrubbing, no elbow grease, no screaming, no excuses. Now, you really need to get those engines cleaned and preened for this season.
Happy Landings.
Main Image by Riley Porter