Durafly is known for making stunning looking scale RC aircraft as well as some of the best flying sports planes around.
I feel they always go to the next level and are never afraid to add extra detail or push boundaries when it comes to new color schemes. Their recent Seafire was a bold choice given many hold the spitfire in sacred regard. In fact, it's clear why many in the industry are keen to follow in the footsteps of Durafly. One of the biggest mistakes Durafly had made in the past was to leak a scheme too early with some in the industry moving quickly to make similar aircraft and so I'm sure they have learned from those early mistakes.
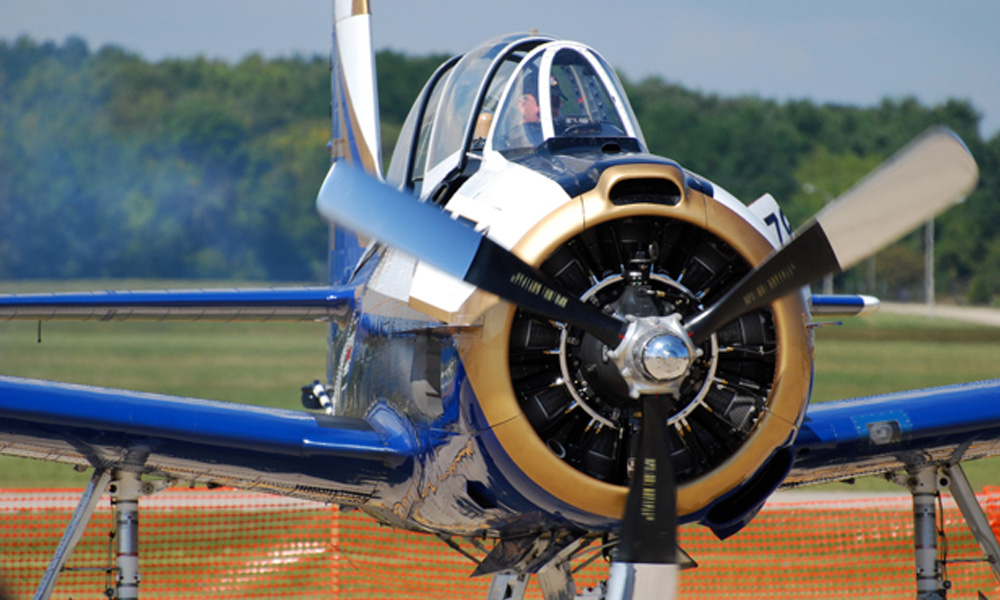
The Durafly T-28 is already a well-known favorite within the RC community. It's flown by thousands of hobbyists the world over and is known for stability and slow speed flying. The T-28 was designed not only for scale pilots but also for FPV pilots. The cockpit, a first for a warbird, has a dedicated space for a pan and tilt camera or if you please a scale pilot. The choice is yours.

Durafly has again gone with something new that has never been seen on a production model. Whilst most of the industry sticks with schemes akin to the missionary position, Durafly hits out with unique planes that are pleasing to the eye. The Centenary of aviation scheme is simply stunning on the ground and in the air. Let's face it. When we head to the field to go for a fly we spend most of it kicking around talking rubbish and admiring models. The flying comes second to all this. So what is the appeal? Simply put, it's stunning! For an aviation nut like me, I was surprised to first read about it wondering if someone had heard wrong. It's not an easy scheme to pull off. Once I spoke to Durafly I was informed that it was indeed the case. I was sold and could not wait to fly one.
Over the years we have been spoilt for choice but I'm really glad to see Durafly get its mojo back with its recent lineup. I'm glad to see the community embracing creativity and supporting Durafly to do something new. I personally was not that in love with the yellow t-28 but this is the next level. Durafly was kind enough to send me one to fly and review. Assembly was a breeze and took no more than 30 minutes. There is not much work to do on these, like most Durafly models. The longest part is programming on the radio.
First Impressions
The finish is second to none. Durafly has to lead the way when it comes to the finish of models. I love opening the box and inspecting the finish. I might even enjoy that more than flying. Durafly has not spoken about pricing yet and was not willing to give me that information for the article. I expect this to be well priced with a similar price structure as the previous T-28 on which this is based. The build is very straightforward and the manual could be condensed into a few very straightforward steps. I used a 2200mah 4S 75C Turnigy Graphene battery and got around 7-minute flights. I was a little aggressive on the throttle; however, I was still able to land at 3.70v. You could go with a larger capacity battery if you like as the model has a really light wing loading. I performed a dead stick with ease and found the glide ration to be acceptable. It's an intermediate model and perfect for someone entering the warbirds scene.
The full-size T-28 is a trainer and this model handles very well. The stall is predictable and the model simply noses forward. I think it's the best fit for this aircraft considering performance, wing loading, and landing gear. The Naval Aviation Centennial Edition is a head-turner. Personally, I love the look and I love the way it flies. It's not a rocket ship but still quick and pleasure to fly. Hopefully, HobbyKing begins to bring out all their models like this. It just makes for nicer flying and there is no doubt about that.
Setup
I set the center of gravity at 55mm from the leading edge of the wing cord. I used around 40% expo on the ailerons and elevator. Full flaps were set to 25deg which is a good starting point. Aileron travel is 10mm up and down with the Elevator at 15mm up and down travel.
Takeoff

Take off was reasonably simple. Unlike a tail dragger, the tricycle undercarriage is easier to get off the ground. I was prepared to add a little rudder input however it was not necessary. The day I flew the model there was a slight crosswind and this had no effect on the aircraft. I pushed forward slowly, increasing throttle and begun to build up speed. Feed-in up elevator until the model rotates and maintains an appropriate angle of ascent.
Once you have reached a safe altitude begin trimming the model out. Roll the aircraft over and check if its nose heavy. If the nose dips down and requires anything more than a slight movement of the down elevator you should move the CG so that the model is slightly more tail heavy. Remember little adjustments at a time. Fly the aircraft away from you and check that the aircraft is tracking straight. If yawing left or right. Adjust your rudder trim to suit. After you land take note of the rudder position, center the trim so that the nose wheel is tracking straight, and manually adjust the rudder through the control horn. Repeat flight and adjust rudder again if necessary.
The Flight
Go up high, cut the elevator, and try to put it into a stall. Watch how the model behaves. Keep the nose up and wait for the model to stall. The model will dip its nose and you can apply a little throttle and recover the aircraft. Do this several times and become very comfortable with stalling the aircraft. You will get a feel for just how well it flies. The flaps are very effective and I suggest you start with just a little input and keep adding it until you're happy. I went with 25deg and it was very effective. The model will pitch up with flaps and as you slow down the nose will drop. Go up high and get a really good feel for how it flies. You will want to stall the aircraft and get a feel for just how slow it will fly before stalling. It is a pussycat. Once you've covered the basics throw it around. Loops, rolls, inverted perhaps a hammerhead. The model is not a rocket ship but it's quick enough to be very enjoyable.
Landing
Reduce speed and deploy the landing gear. Once deployed you can drop the flaps. Continue to reduce speed and allow the model to gently descend. Throttle controls decent so if you're descending too quickly then feed in a little throttle. Once your wheels are just above the strip you can reduce throttle and begin flaring by gently pulling back on the elevator to hold the wheels off the strip. The plane will eventually stall on to the mains and gently land on the strip. Practice makes perfect and if you're not happy with the approach you can always go around.
Flight-Report
The model required only a few clicks of trim once in the air and it tracks very well. The color scheme is stunning. Landing is no great issue and for a warbird is just like landing a Cessna. Don't forget that after your first flight you should check all surfaces after the flight and make any required adjustment. This is generally where you will find issues that need to be attended to. You need to check all surfaces for loose fittings or screws/grub screws that might have worked loose in flight. This is normal and you should get into the habit of doing it if you're not already. Also, be sure to check ESC and motor temps. Just make sure the ESC is getting sufficient cooling along with the motor. It's easy for models to be damaged in transit so it's something that you need to do every time to the field and start preparing for the days flying anyhow. By the 10th flight, I was really throwing the T-28 around with rolls, loops, inverted flight, and the odd snap roll. The aircraft is responsive.
In Summary
It's a great flying model that you will immensely enjoy flying. It has no horrible tendencies and flies great on a 4s 2200mah pack. Not only does it fly well it also lands well. Best of luck and happy landings!