Introduction:
A few days ago we shared the first article in a short series about the challenges and considerations when building larger multi-rotors for taking videos or photos.
I had the opportunity to spend a few days with Ben Wilkinson of 3DXR, who is of the experts on this subject whom I met at a commercial pilot training course. Ben is one of the owners of the business, a professional pilot, and reseller of the equipment needed to build such a model. I asked Ben how they go about picking the components and building the multirotors for customers. 'There isn't an off the shelf solution if you want something bigger than a DJI Phantom but less than the huge models that weigh over 7kg' he explained, 'if you can build a model that weighs less than 7Kg, including the batteries, then the permission and process needed to fly commercially are a little easier.' Last time we looked at what you needed to consider when building a large multirotor for video or camera work. This time we continue to pick the brains of Ben from 3DXR on the other elements that need consideration.
The Flight Controller
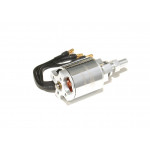
There is a lot of choice for the flight controller for a larger model too. Rarely will you find a larger model not running a flight controller without advanced GPS ability? The extra weight and expense mean that these larger models need to be treated with even more care.
There are a few popular choices for pilots building their own large multirotor model. All of the flight controllers we will look at below offer smooth flying, great redundancy, mission planning, and autonomous flight as well as key features like Geo-fencing (where you can set limits to the range and height of the model that stop it from accidentally flinging too far or high). Making sure that you pick a system with excellent failsafe detection and handling. Making sure that the model will handle a problem safely is key when looking at building a larger model. All of the choices below have some form of GPS 'return to home' feature that will try and fly the model back to the launch point in the event of a problem and handle issues with radio connection problems, power issues, and low battery.
PixHawk
The PixHawk is a very common choice for pilots with larger models. I've looked at this a few months ago in an article but the latest version of the PixHawk, called the 2.1 or 'Cube', is the latest generation of the technology. The PixHawk supports multi-rotors, planes, cars, boats, and even submarines. To sum up the detail in that article – the latest PixHawk called the PixHawk 2.1 also called the 'Cube' is the most fault-tolerant advanced PixHawk yet. It has three of most and at least one of each the key sensors (excluding the GPS), you can use redundant power systems, and the main sensor IMU array along with the main flight controller is enclosed in a temperature managed sealed unit mounted on shock absorbers. The PixHawk has fantastic GPS modes, a huge community, and very active development of the supporting software. Applications like Mission Planner, APM: Planner, and QGroundControl are easy to use and with the PixHawk they make for easy setup and super smooth flight. Be careful using come of the clone PixHawk flight controllers, not all of them have had the same attention to detail and testing.
DJI N3
Flight controllers like the N3 and others from DJI are good choices too. They are designed for these applications, support all of the DJI technology, and have great GPS and failsafe as well. The N3 has dual IMU, improved algorithms for stability and reducing magnetic interference, and links easily with other DJI products like their gimbals, intelligent speed controllers, Lightbridge 2, and DJI Smart LIPO Batteries. Primarily designed around multi-rotors they offer a wide range of supported frame types, a 16 point ground station for iPad and PC (with the optional 2.4Ghz Bluetooth datalink connection), take-off and landing assistance, intelligent orientation control to help if you get in trouble with your orientation and motor failure protection. Other versions like the premium DJI A3 is also a good choice for large models. It's used on many filming rigs and lots of redundancy with multiple sensors redundancies and GPS add-ons and can support RTK options as well. There are some tricky problems getting the DJI flight controllers to talk to a PC as the drivers you need don't install easily but once they are installed and working setup and configuration isn't too hard.
EagleTree Vector
Another option for those that will be using FPV to fly the model more often is the EagleTree Vector. This is a little different from the other two options we've already touched on as it's designed from the bottom up to be integrated into an FPV system. It still offers mission-based planning, autonomous flight, great fail-safes, easy setup, and configuration supports both planes and multi-rotors and is silky smooth to fly. The big difference from the other two systems is that the OSD and setup are vector-based and use color, making flying with Goggles a breeze. The entire setup can be done through the OSD itself so no need for an app for configuration at the field. Excellent failsafe (especially when using S-Bus) and GPS modes, along with an array of mission planning tools make this one with a look for those FPV pilots out there that intend to fly a lot of their flight with FPV and want all of the critical data around the edge of the screen.
And the others?
Normally this is the part of an article where I talk about technology like iNavflight. iNav and other open-source technology are excellent and provide a lot of the same features as the flight control systems above for about 10-20% of the cost. For me, if you're going to be putting a large multirotor in the air and carrying heavy expensive camera equipment then trying to use a less proven, all open-source technology could be a choice you may regret. I've been using iNavflight on wings and multirotors here with great success but would I trust a £400 SLR on an £800 multirotor to it? Not at the moment.
Batteries
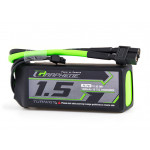
Standard LIPO battery packs can be used on the larger models as the efficiency of the motors and props mean that you don't need huge currents to fly these larger models. As we already looked at in part one last month, the motors and ESC you choose will decide on the voltage of the pack you need. 6s and larger are common on much larger multi-rotors as they can deliver the same wattage the motor needs using lower currents for that longer flight time. Connecting the packs in parallel will increase the flight time and allow you to mount the batteries in the spaces available in the frame and retain a good center of gravity with all the other equipment on the model. Remember that doubling the capacity of the batteries on the model doesn't equal double the flight time. The extra weight of the second pack will use some of that extra power. Ben uses the packs from Tattu in many of the larger models he makes for customers. He says 'They perform well, are designed to give the longest flight-times with larger mAh rating and the lower C ratings these models need. They also feature some cool touches like the capacity meter on the end too'.
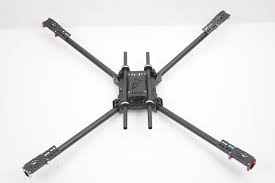
The Frame and Landing Gear
Now we are getting into the meat of the setup and one of the trickiest parts of a build – choosing the frame and landing gear. Sadly there are not a lot of frames on the larger class above 500mm until you get into the huge multi-rotors that will weigh over 7Kg. There are options but you will need to spend time looking at them and making sure that it will support the amount you're interested in and have enough room to support the size of props that you need. Ben talked about a few of the other things to look at when choosing your frame. 'I've used Tarot frames for models weighing 3-4Kg here, but the main considerations will always be the weight and stiffness of the frame. The key factor is strength. Good quality carbon fiber tubes and alloy parts are usually good choices but you will need to look at the options for the landing gear and arms.
'Where possible choose a frame with folding arms, it'll make transportation easier. Think about the landing gear too, if you're only using a 2D gimbal then you can probably use fixed landing gear, if you want to use a 3D gimbal that can rotate then you need to look at retractable landing gear'. Ben showed me how they have used DJI retracts on a few models where the customer wanted to be able to have a 360-degree unobstructed view from the camera.
The Radio (if you don't have one)
This is one of the few areas where you don't have to use any specialized kit. 'We tend to recommend the Futaba 14SG or the FrSky Taranis radio for the larger models. There is also a beautiful system from Jetti.' explained Ben. There are a couple of things to consider when looking for a radio for your large Multirotor; you need to have enough channels to fly the model, select the modes you want, control any gimbal you're using and control the camera too. For normal flying, a flight controller will need the five basic channels – throttle, aileron, elevator, and rudder plus at least one channel for the flight mode. Then you'll need two channels for a 2D gimbal and three channels if it's a 3D gimbal. Then you'll need a few more for the landing gear and camera control too. 'It's common for larger models used in filing to have two radios working side by side' Ben explained 'one for the pilot flying line of sight and another for the 'camera operator' to use to control the camera and compose the shots'. Care should be taken when installing the receiver to make sure that the antennas for the receiver are routed well for maximum reception. If possible install the antennas at 90 degrees to one another. 'Make sure that your failsafe on the receiver is set up and configured with the flight controller you're using' Ben explained, 'test it thoroughly to make sure that the model will fail-safe'. Wise words indeed, not just for the larger models.
The Video Kit
There are lots of options for the FPV equipment on a model like this but most often they are flown using the line of sight by the pilot. With the excellent GPS modes using the flight controllers we looked at earlier, you can 'park' the model in 3D space using the GPS and altimeter and then concentrate on the gimbal and camera. Analog FPV systems are inexpensive but provide relatively low-resolution images back to the ground station or goggles. The benefit with analog is that you can easily add more than one camera (and even multiple transmitters) to the model and switch between the two. You can have one 'forward-facing camera' for orientation and another mounted alongside the main camera in the gimbal to be able to 'see' the direction and framing of the photo or video. If you're using a smaller camera like a GoPro then most of those action cameras do provide a 'video out' connection that can be plugged into the FPV transmitter. Also available is the ability to use HD FPV systems from manufacturers like Connex. The one available for hobbyists is the Prosight system but they also provide much more expensive HD transmission systems for the professional. The Connex Prosight runs at 720P60FPS and provides an excellent way to view the image from the model in real-time. Sadly there isn't an HD DVR as part of the system but by using one of the many HDMI records on the marker you can easily add one to record the footage.
Telemetry and Status Updates While Flying
Another useful element to look at is the support for the telemetry that your radio uses. Flight controllers like the PixHawk 2.1 and Vector have a telemetry cable that connects to the SmartPort plug on a FrSky receiver and allows all of the key data to be shown on the screen of the radio, attitude, battery health, distance, height, and other key metrics can all be read easily and alarms set up on the radio to let you know if you're about to have a problem. Using something like the EagleTree Vector allows you to 'see' all of the critical data on the FPV screen so you know exactly what's going on. Consider how you want to fly and what devices you expect to have with you when you fly. Will it just be an iPhone? Will you take a tablet PC, iPad, or Android device to the field? What applications exist for you to manage setup, program, and monitor the model as it flies? Often to monitor the model as it's flying relies on a radio connection. Connections using Bluetooth are short-range, Wi-Fi only slightly better. Systems that use frequencies like 433 MHz in the EU and 915 MHz in places like the USA are excellent for maintaining a solid radio connection for the telemetry. Consider a telemetry radio setup for the model you're making and some kind of ground station too, it'll allow you to see exactly what's going on as you fly.
Summary
The problems facing a builder of a 250 class quadcopter pail into comparison when looking at building a 2kg model with all of the above. As we've looked at these two articles there is a lot to consider. Builders and pilots tend to get familiar with one set of technology and use that to the exclusion of all others. As we've already seen, not all of the technology is good in the same areas. One flight controller may be amazing when used with OSD systems, another has excellent telemetry and simple mission planning. There are excellent multiple choices for every part of a large multirotor build now but being clear on what you want the model to do for you will help you make the right choices. We need to go back to where we started, and those first principles we looked at. Form follows function so the time you spend at the start will set the course and the decisions you make as you build. Don't forget that there are experts like Ben. If in doubt use these resources and patronize these businesses as you may need them after the sale if you get stuck too! Hopefully, you now have an idea of the areas of consideration when looking to build a much larger model. As always - Happy flying!
Written by Painless360