Written by Painless360
Introduction
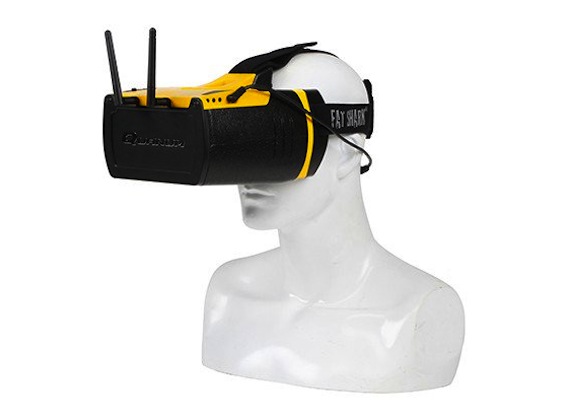
Back in May 2016, HobbyKing created a product page for a new set of goggles – the Quanum Genesis.
The image showed them with diversity antennas and what looked like an HDMI port and, very interestingly, a FatShark logo on the headband. The forums were quickly awash with speculation and claims about what it would actually be, what this new collaboration would bring to the product and how these would differ from the other FPV goggles on sale (Full video review below). 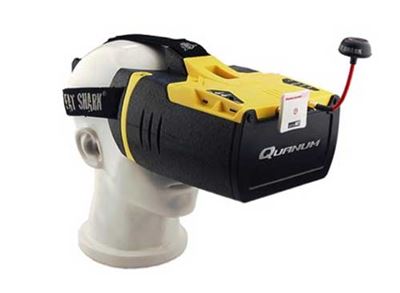 The evolution of these clamshell-style goggles has been fantastic for the hobby over the last 12 months. It’s not that long ago that you either had to buy a modular system like the Quanum V1 and V2 goggles and then work to attach the receiver, batteries, and other elements needed to fly or invest in a set of something like FatShark goggles. Now we have FPV goggles like the Quanum Genesis that provide that same ‘ready to fly’ benefit without the huge price tag. I do need to confess, I am a FatShark fan. My first set of goggles was a set of FatShark Predator V2s and my main day to day goggles are a set of Dominator V3s with Diversity. I’ve flown with all of the Quanum clamshell-style goggles from Quanum (and a lot of the others too) so I’m very interested to see if the Quanum Genesis addresses some of the problems we’ve had with other manufacturers HD goggles. I was lucky enough to get my hands on one of the first production sets so I’ve been able to try them out in the last week. I’ve put them through their initial paces and seeing how they stack up - so what features do they have, how are they to use, and what’s new?
First impressions taking them out of the box:
The first thing you notice is that they are exactly the same as the image we all saw back in May - black expanded foam clamshell with a yellow panel for the electronics on the top that also helps hold in the 720p panel at the front, and two extra yellow plastic pieces are the back of the goggles (near your face). The plastics are better quality than a lot we’ve seen and not flimsy so provide a nice feel. A few of my flying buddies commented on the black and yellow and agree that while it may not be to everyone’s taste you can’t see them when you’re using them! And they do feel rigid. Build quality is good with the weight at a surprisingly light 428g with antennas. The battery adds a little more but that is held on the back of the head strap, almost identically to the Quanum Cyclops. The head strap is very comfortable and adjustable with Velcro adjustment areas. The fit of the goggles onto the face is easily the best of any of these style goggles we’ve tried. The shape of the curve fits the face well, the nose cut-out is deep enough and the thick foam padding is held on with light Velcro for easy removal and cleaning – essential when you are wearing these things for hours in the hot sun, that foam can get unpleasant. Another clever touch.
The Lens:
One of the first big differences we noticed on the Genesis is the lens. You tend to get one of two lenses in goggles of these types – Fresnel lenses that are very flat and sacrifice the quality of the image or full plastic lenses that give you a better image but are a lot heavier. These lenses are not Fresnel and you can clearly see the two separate side by side lenses that give the needed 2.5x magnification for the screen.  The Genesis moves away from the traditional flat Fresnel lens, which is not a bad thing. These lenses are not adjustable in any way but do work well and give the image you want without the weight. I am very slightly longsighted but can focus on the screen fine, other pilots who’ve tried them who are short-sighted can see the screen with no problems at all but pilots who need stronger spectacles for reading may struggle with the focal length. The close-fitting opening also means that unlike the Quanum V2 goggles wearing glasses at the same time as using the goggles isn’t an option.
Video Modes:
The 5.5-inch panel at the back of the goggles is very nice looking it’s a 1280 x 720-pixel screen that can run at 720p. By using the little joystick on top of the goggles the image brightness and contrast are adjustable too. The field of view when viewing at 4:3 is documented at 39 degrees and 48 degrees at a 16:9 ratio. I’ve tried goggles with much larger 7” screens and felt like I was sat too far forward in an IMAX movie theatre. For me, having too much screen means that it’s immersive but causes problems with on-screen displays – making these larger screens great for FPV in fixed-wing at altitude, less useful for those of us that fly with OSD systems regularly. The FPV image here appears nice and large without feeling like I’m roaming around the screen looking for information or looking at a postage stamp.
The aspect ratio is selectable too (hurray!). Most of my cameras I use for FPV are 4:3 aspect ratio so having the choice is a great feature.
Use the widescreen when you want it for widescreen cameras and use with simulators, a 4:3 image is displayed in the middle of the panel with black bars at either side. PAL and NTSC modes are selected automatically so that makes it easier to get flying too. One thing to remember is that the viewing mode is only selectable in the first 10 seconds after power on. If you decide to change the mode or aspect ratio you’ll need to start up the goggles again. I understand that’s to stop accidentally changing the mode when flying but as both of my hands are normally pretty busy when I’m flying I’d like to have had the option to switch the FPV video aspect ratio outside of the first 10 seconds.
Diversity and Band/Channels
Originally the goggles were advertised as having 40channel receivers – Bands A, B, E, F, and RaceBand. The actual goggles don’t have a ‘B’ band. While Band B is one of the less commonly used bands it means that has made it tricky for a few of the models here that only have the ‘B’ band on them. This isn’t just on these as other recent FatShark technology I’ve bought also doesn’t have Band B (FSV2445V2). The bands and channels are selected using the up and down arrows on the top of the goggles. They step through the Bands and channels in order and going too far just takes you back to the start -pressing the button for the other direction takes you back one. I’m a big fan of the Auto-scan button on the Cyclops goggles, they help newer pilots (and lazy ones like me) to quickly tune into the model in their hands and get flying, with these Goggles you can use the buttons to scroll up and down the band, you’re using to get into the exact same frequency of the model. Most pilots tend to use only one band, for me it’s BAND F (default Immersion/FatShark Band), or RaceBand so only needing a handful of clicks to find the channel isn’t too tricky. There are two SMA connections at the front of the goggles, once called ‘Primary’ and on ‘Secondary’. If you were using the goggles in diversity mode you install the directional antennas on ‘Primary’ and the omnidirectional antenna on the ‘Secondary’ SMA connector. You can use it with a single antenna too by popping it onto the ‘primary’ connection. From the testing here the diversity signal on the goggles comes from what appears to be more of a blend of the signals from the two antennas than traditional ‘switching’ from one to the other based on RSSI strength. Irrespective of the method, the reception is strong, and having the ability to use my favorite cloverleaf and patch antennas for range and safety is great. There have been a few questions on lag (as there always are for goggles), I’ve not tried flying with an HD signal yet but the SD resolution, traditional FPV is great and the connection to the model feels solid.
Port and connections:
All of the connections for the Genesis are on the sides of the goggles at the top and here’s what they all do (see the manual for more detail).
USB:
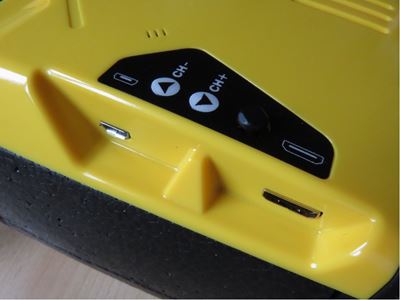 USB and HDMI 'mini' port on the Genesis. This is one of the other great innovations on these goggles. The ability to connect to them and update the firmware! This is such a great idea for a device like this where improvements and features can be added by pilots after they receive the goggles that I’m surprised this isn’t more common.
HDMI:
This is an HDMI ‘mini’ port. We’ve tested it with PC applications and simulators and it works great running at 720P resolutions. These goggles make great companions for those of us using PC simulators to help refine our FPV skills. No cable for it in the box so order one alongside if you want to try it out. Also, fun for movies too!
AV IN/OUT:
Nice to see ports for SD video in and out. Great for ride-along with another pilot or spectator and useful to connect the goggles to a ground station audio out too. Again there are cables in the box for these ports.
Audio Out:
No internal speaker, very similar to other Fatshark goggles. Personally, I like it this way so the weight of a speaker I’m not using isn’t adding to the overall weight of the goggles.
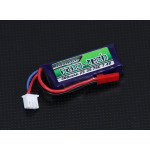
DC In:
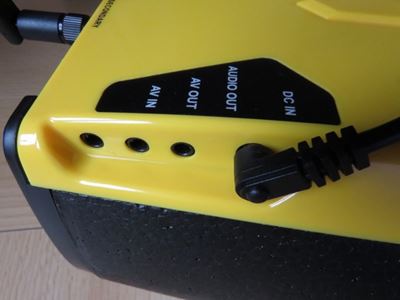 In and Out ports on the Genesis, there are many! The connection for the power in from the battery. The battery supplied is a 1000mAh 7.4v pack and connects using the 5mm barrel connector common on many other FatShark products and also Goggles like the Quanum Cyclops too. I’d get yourself another battery, having two will let you keep flying out that that field!
And Finally
Be aware that there isn’t any ventilation around the lens so that any condensation or moisture from your face or eyes can start to settle out of the lenses. This can be a problem with flying in hotter weather or when the lens is very cold. Just as with any goggles with enclosed lens arrays – let them warm up and try and stay cool on hotter days. There isn’t a DVR in the goggles and there is sadly no USB/POWER OUT for an external DVR. Capturing the video out using the AV out port is easy but you’ll need to think about how to get the 12v or 5v power for the DVR. There are no SMA adapters and AV or HDMI cables in the box so think about ones you’ll need to order alongside, it would have been nice to have a few of them supplied with it. I’d also recommend getting some SMA adapter or two (90 degrees and 45 degrees) or a short, stiff SMA extension lead to help align your longer-range antenna in a more useful, slightly up position for flying.
Summary:
We pilots want a lot from the technology today and the explosion in the FPV market has provided us with a huge wealth of options but little innovation. The addition of the new lens style and USB connection are touches of genius. The goggles themselves work well and provide hours of comfort and easy days flying (with an extra battery). From the testing and flying, we have done so far the diversity and sensitivity of the receiver in these is very good and provides a nice clear signal. The HDMI input also means that these can be driven from anything with an HDMI output and a 720P mode. We’re looking forward to putting these through their paces with the new Connect HD FPV system. It’s great to have a set of goggles that covers the basics well and provides this future support too. These are not meant to be the modular ‘solder and crimp’ style of goggles like the Quanum V2 Pros so adding the DVRs’ power isn’t easy. But for those who looked at other HD goggles and had reservations, we can say only this –
These are the best diversity HD capable goggles we’ve tried to date.
Happy flying! They are available NOW and only from hobbyking.com.
Hear it First: Join our Mailing List
Sign up to receive new product updates, exclusive discounts, news, and more!