Impresora 3D Mini Fabrikator Por Tiny Boy - 110V los EEUU - Naranja

Impresora 3D Mini Fabrikator Por Tiny Boy - 110V los EEUU - Naranja
Awesome!
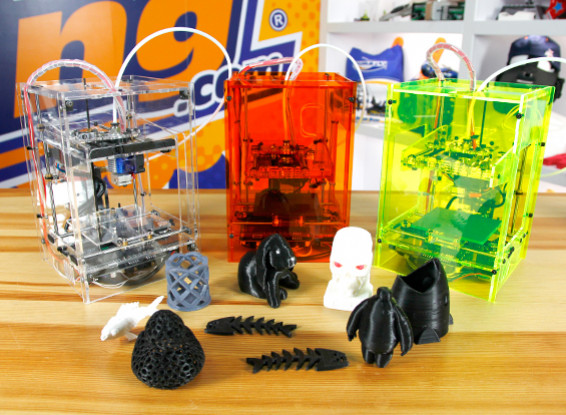
Mini Fabrikator impresora 3D por Boy Tiny te dejarán boquiabierto con la calidad de impresión de una pequeña máquina puede producir, es comparable a las grandes máquinas de muchas, muchas veces el precio. Nuestro objetivo con esta impresora traer al mercado era ofrecer a nuestros clientes una manera rentable para probar la impresión en 3D con una huella que puede acomodar los primeros proyectos de la mayoría de aficionados. Debido al pequeño tamaño total de esta impresora va a encajar incluso en el más restringido de los espacios de trabajo y puede ser recogido y almacenado fácilmente, por lo que es ideal para escuelas y estudiantes.
La impresora TinyBoy original fue diseñada Parker Leung alrededor de un concepto que para 2016 todos los estudiantes deben tener la oportunidad de tener una impresora 3D en su escritorio; la juventud es nuestro futuro y esto es parte de la razón por la que tenemos detrás de él. La otra razón era debido a la increíble calidad de impresión se puede lograr en esta impresora para un costo tan bajo.
Al igual que cualquier hardware del equipo del Mini Fabrikator necesita un software para ejecutarlo, se recomienda utilizar Repetier-Host como el software de impresión, ya que es un simple de configurar y de usar que la mayoría de los clientes tendrán en funcionamiento en unos 15 minutos. Aparte de esto la impresora está lista para ir.
También hemos partenered con Boy Tiny lo que son capaces de utilizar su comunidad para hablar de su Mini Fabrikator con otros usuarios, compartir ideas y mostrar sus proyectos de impresión últimas. También encontrará otros consejos útiles y trucos, ajustes Repetier-Host, copia del manual y mantenerse al día con las últimas noticias del equipo de Boy Tiny. Haga clic aquí para obtener más información.
Boy Tiny fue diseñado originalmente como una actividad de aprendizaje donde los estudiantes de la escuela construirían la impresora a sí mismos, esto significa que la impresora es muy fácil de mantener y dar servicio a sí mismo e incluso actualizar con cosas como las luces LED, la refrigeración directa, pantalla LCD y ranura para tarjetas SD o incluso una cama de impresión térmico.
Para más información ver estos videos:
vídeo diaria
Guia de preparacion
Guía de impresión
Mini Fabrikator por Boy Tiny, la impresión 3D para todo el mundo.
caracteristicas:
• Amplia zona de impresión para su tamaño global
• Open Source diseñada y apoyada
• Compatible con muchas aplicaciones populares y software
• Portátil y fácil de configurar
• Preparado para el futuro con modificaciones fáciles impulsados por la comunidad de bricolaje
• hardware basado Marlin con la capacidad de expansión
• Diversión para todas las edades
Especificaciones:
Tamaño: 15 cm (W) x 15 cm (D) x 22cm (H) (excl titular de filamento.)
Tamaño de impresión: 80mm x 80mm x 80mm
Filamento: 1.75mm PLA
Tablero: ramps1.4 Mega2560 con stepstick 4 A4988
Fuente de alimentación: Externa 12V 6A Transformador
Software: Repetier-Host
TinyBoy es una impresora 3D de diseño abierto y se puede obtener los detalles aquí cuenta de Github (http://github.com/HKCOTA/TinyBoy) que está bajo licencia de Creative Commons Reconocimiento-Compartir Igual 4.0 Licencia Internacional CC-BY-SA
-
 Mini Fabrikator 3D Printer By Tiny Boy - Orange - US 110V
Regístrese para subir videos, por favor Iniciar Sesión o registrarse
Regístrese para escribir reseñas, por favor Iniciar Sesión o registrarse
entomophile | Comprador verificado
-
Overall
-
Quality
-
Value
Customer Rated
Oct 15, 2015
| Comprador verificado
-
Overall
-
Quality
-
Value
Certified Buyer Rated
Sep 08, 2015
Regístrese para subir archivos.
Por favor registrarse o registrarse para empezar a ayudar a los aficionados ahora!


