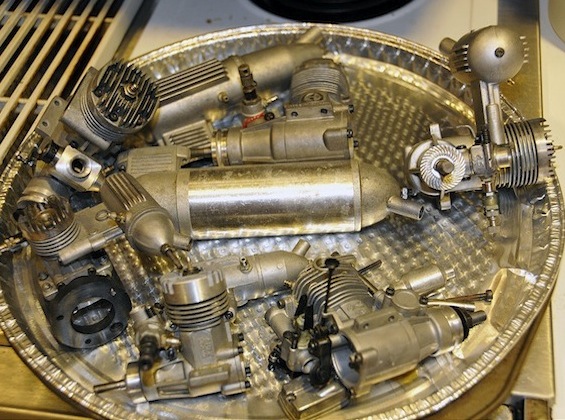
Glow engines get covered in a very thick a crusty layer of oil, muck, baked-on grime, and lacquer that just won’t budge. We have all tried in vain to remove it, and no matter how hard you scrub you just can’t get it all and it’s way too much work. Not only is a dirty engine unsightly, I personally feel they perform poorly and never quite run right.
I have no supporting evidence for my claim but I’d like to know your thoughts, so leave some comments below. Getting it clean is not a big chore and it’s easy, if you know to do it. If you’re like me you may even do a few at a time. I subscribe to the work smarter not a harder school of thought and with that in mind, we’ll get right to it. 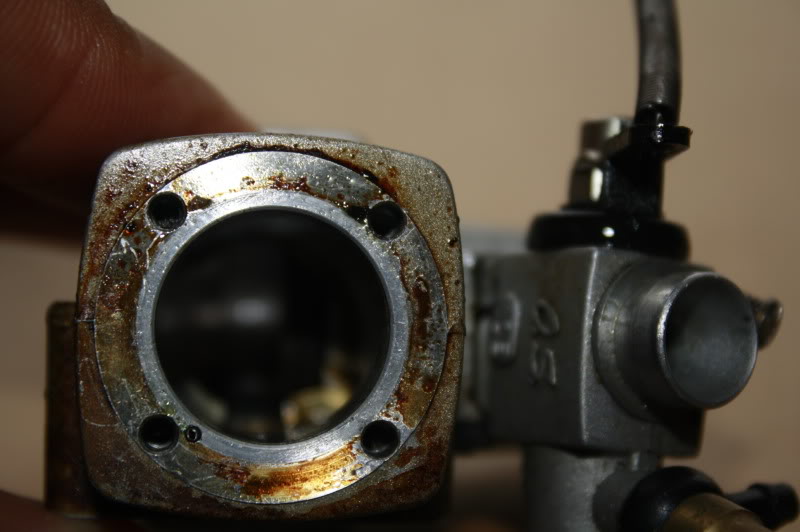
Safety Warning
Be very careful and use common sense. The methods and chemicals discussed in this article are toxic to all life forms and may cause death or serious injury. Exercise great caution; be sure to do cleaning outside in a well-ventilated area. Be sure to wear gloves, avoid vapors, and keep heavy lids on everything. Children should be kept well clear of any chemicals and everything should be out of reach.
Myths.
People love to give advice even if it’s wrong. I’ve been told several times to dunk a glow motor in gas/petrol to remove the grime because it’s common to clean a carby or other such item this way. I cannot vouch that it can clean an automotive carby but I know that it cannot clean a glow engine. The only thing it does is waste 24 hours. Another one is oven cleaner and whilst it can remove some stains it will pit and tarnish the most. The sodium hydroxide in the oven cleaner reacts with the aluminum and turning the motor a dull grey color. Sandblasting is also touted as a great way to clean the surface of baked-on grime. Not only do most people not have access to a sandblasting gun but there are still much better options to use instead.
Cleaning Engines the Easy Way
If it sounds too good to be true, then it probably is, right??? Well not in this case, as we’re going to use a tested method of cleaning engines in anti-freeze. Yes, the common automotive antifreeze that is added to cooling systems in cars.
Cleaning Bath
To remove varnish and carbon deposits, you’ll need to disassemble your engine. Glow engines can be disassembled without too much trouble using simple tools. If you’ve been in RC for any length of time you’ve most likely got everything you need. Most of us have an assortment of screwdrivers, spanners, pliers, and general tools that may or may not be suited to the task. Before you start, make sure that you have the right tools to correctly perform the required tasks. You may need to buy new screwdrivers, nut drivers, and miniature wrenches that are suitable for out little engines. Screwdrivers are a good example, if you try to remove cylinder-head machine screws with a flat-blade screwdriver that’s too wide, it can break or damage the surrounding cooling fins. If you substitute needle-nose pliers for an open-end wrench or nut driver of the exact size needed to remove the carburetor’s retainer nut, you’ll end up with ugly, rounded corners.
Required
- 1 x Crock-Pot Slow Cooker as small as possible (Preferably used as it can never be used for food again)
- 1 x Automotive Anti-freeze containing Ethelene Glycol.
- 1 x Funnel
- 1 x cup big enough for the motor to fit in
- 1 x liter of methanol or isopropyl alcohol (whichever is cheaper)
Preparing the Engine
- Remove the muffler, carburetor, glow plug, propeller nut, and washer
- Remove the rear cover and set aside the screws in a tin so that they are not misplaced.
- Remove the cylinder head.
- Remove any o-rings or other gaskets
- Rotate the motor so that the piston is in the lowest possible position in the piston combustion chamber.
- Transfer the parts to the crockpot and fill the crock pot with the anti-freeze.
- Set to low heat and leave overnight.
- Remove from the anti-freeze and turn off the crock pot
- Wash the glow engine thoroughly in warm water.
- Drain and dry
- wash in isopropyl alcohol. This will draw any residual water from the engine case.
- Reassemble the motor and you’re good to go.

No scrubbing, no elbow grease, no screaming either. No excuses now, you really need to get those engines cleaned and preened for next season. Happy Landings Written by gozerian
Hear it First: Join our Mailing List
Sign up to receive new product updates, exclusive discounts, news, and more!