サプライヤーになる ブログ 新しいアイテム
新規登録

合計金額

¥0.00

ショッピングカート 0 ショッピングカート 0 Loading...

タイニーボーイによりミニFabrikator 3Dプリンタ - オレンジ - 米国110V

Generating Links

タイニーボーイによりミニFabrikator 3Dプリンタ - オレンジ - 米国110V

価格:

Now save 節約 ¥0.00 ¥0.00

¥31,905.90
購入済み Discontinued Product

Please continue searching for a similar product.
SKU:
9171000772-3
送料無料したい? クリックする こちらへ 詳細情報を参照する

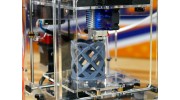
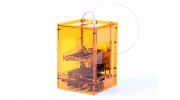
タイニーボーイによるミニFabrikator 3Dプリンタは少しマシンが生成することができ、印刷の品質であなたを吹き飛ばすだろう、それは多くの、多くの倍の価格に大きなマシンに匹敵します。市場にこのプリンタを持って来ると私たちの目的は、当社の顧客最も愛好家の初期のプロジェクトを収容することができ、フットプリントと3Dプリントを試してみるためのコスト効果の高い方法を提供することでした。このため、プリンタの小型の全体的な大きさのそれは学校や学生のために理想的です、でも、ほとんどのワークスペースの制限とピックアップして簡単に保存することができるのでフィットします。

元TinyBoyプリンタは2016年までにすべての学生が自分の机の上に3Dプリンタを持ってする機会を持つべきであることをコンセプトにパーカー・レオンを設計しました。若者は、私たちの未来であり、これは、我々はその背後になった理由の一部です。他の理由は、あなたがこのような低コストのために、このプリンタで達成することができます信じられないほどの印刷品質でした。

ミニFabrikatorはそれを実行するためのソフトウェアを必要とするすべてのコンピュータのハードウェアと同様に、我々はセットアップされ、ほとんどの顧客は約15分で稼働している必要がありますプログラムを使用するのは簡単であるとして印刷ソフトとしてRepetier-ホストを使用することをお勧めします。これ以外のプリンタは行く準備ができています。

我々はまたしてparteneredいるタイニーボーイあなたは、他のユーザーとミニFabrikatorを議論アイデアを共有し、あなたの最新の印刷プロジェクトを披露する彼らのコミュニティを使用することができますように。あなたはまた、他の有用なヒントやトリック、Repetier -ホストの設定、マニュアルのコピーを見つけ、タイニーボーイチームからの最新ニュースを最新に保つ。ますは、ここをクリックして詳細を確認します。

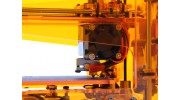
タイニーボーイは、もともと学校の生徒はプリンタ自体を建設する学習活動として設計された、このプリンタは維持し、サービスを自分であってもLEDが点灯し、直接冷却、液晶画面とSDカードスロットのようなもので、あるいはアップグレードすることが信じられないほど簡単であることを意味します加熱されたプリントベッド。

詳細については、これらのビデオを見ます:
デーリー・ビデオ
セットアップガイド
印刷ガイド

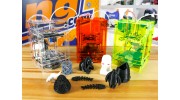
タイニーボーイによるミニFabrikator、皆のための3Dプリント。

特徴:

その全体的なサイズのための•大印刷エリア
•オープンソースは、設計およびサポート
•多くの一般的なアプリケーションやソフトウェアとの互換性
•ポータブルと設定が容易
•簡単にコミュニティ駆動DIYの修正と将来性
拡張のための能力を持つ•マーリンベースのハードウェア
•すべての年齢のための楽しいです

仕様:
サイズ:15センチメートル(W)X 15センチメートル(D)のx 22センチメートル(H)(除くフィラメントホルダー。)
プリントサイズ:80ミリメートルX 80ミリメートルX 80ミリメートル
フィラメント:1.75ミリメートルPLA
ボード:   4 A4988 stepstickとmega2560のramps1.4
電源: 外部12V 6Aトランスフォーマー
ソフトウェア: Repetier-ホスト

TinyBoyはオープン設計の3Dプリンタであり、あなたがここに詳細を取得することができます GitHubのアカウント(http://github.com/HKCOTA/TinyBoy) クリエイティブ・コモンズ表示-継承4.0国際ライセンスCC-BY-SAの下でライセンスされています

  • Mini Fabrikator 3D Printer By Tiny Boy - Orange - US 110V
動画をアップロードする

動画をアップロードするには登録してください サインイン または 新規登録

トピック
並び替え
最新のトピック
* ニックネーム:

* あなたの返信:


下のフィールドに画像に表示されているテキストを入力してください
*検証コード:
キャンセル
提出する
新しいトピックを投稿する
* ニックネーム:

* あなたのトピック:


下のフィールドに画像に表示されているテキストを入力してください
*検証コード:
投稿トピック

レビューを書くために登録してください サインイン または 新規登録

entomophile | 確認済みの購入者

  • Overall
  • Quality
  • Value

Customer Rated

Oct 15, 2015

Great little printer! Shipping was very fast from Hong Kong; only 4 days to US. I have an Ultimaker 2 so I was a bit skeptical about the Fabrikator Mini. It arrived fully assembled and very well packed; no damage. I went through the setup in the manual. Only issue was the heated bed kept defaulting to "ON" and the print wouldn't start even though I was printing with a filament setting that sets the heated bed to zero. So I just changed the default filament settings and deleted my custom filament setting and everything worked fine. Printed some feet to raise the base for better air flow. First one printed fine. Then I got a terrible jam. I could not remove the filament. After disassembling the hot end I realized there was a burr in the heatsink preventing the bowden tube from being inserted fully. I cleaned up the burr by hand with a drill bit, reassembled everything, and it worked perfectly. Printed the rest of the feet and an octopus from Thingiverse. Print quality was very good with the default settings. The build volume is small but for the price it is the perfect for your first 3D printer.

| 確認済みの購入者

  • Overall
  • Quality
  • Value

Certified Buyer Rated

Sep 08, 2015

I've had 8 days to play with mine so far. Only took 2 days to get here from HK. It's built pretty well but the tolerances on some parts could be better like the rail supports as they have a little slack. The screw for the y axis limit switch needs to lose the nut and possibly moved away from the switch by a mil to safely get the full 80mm. The X axis needs to be either set to 85mm instead of 80mm in the firmware to use the whole table and have it centered properly or set to 83 and move the switch closer to the outside of the machine a mil so its centered but not running the extruder right to the edge of the table on the other side. The z axis needs a notch on the top of the carriage corner so the wires for the limit switches don't get pinched on the last 2 mm of travel up top. The current limiters need to be set under the motor limits so people stop getting fried motors, mine were set a lot higher then the motors were rated for, and now work fine turned down although still hot. The extruder fan blows hot air all over the Y axis motor which explains why a lot of people lose y axis precision in the middle of long prints from it overheating so a better fan setup and/or y axis carriage arrangement is needed. The bottom of the machine needs to be vented with a fan and alot more passive vents to keep the 2 motors and board cool, i just printed the corner feet that are going around to have a big air gap on all sides and put a old pci slot fan underneath with the inlet facing up to b

ファイルをアップロードする

ファイルをアップロードするには登録してください.
お願いします サインイン または 新規登録 今すぐ愛好家を助け始めましょう!