サプライヤーになる ブログ 新しいアイテム
新規登録

合計金額

¥0.00

ショッピングカート 0 ショッピングカート 0 Loading...

Turnigy Fabrikator 3Dプリンター(英国プラグ)

Generating Links

Turnigy Fabrikator 3Dプリンター(英国プラグ)

価格:

Now save 節約 ¥0.00 ¥0.00

¥65,142.39
購入済み Discontinued Product

Please continue searching for a similar product.
SKU:
9171000679-2
送料無料したい? クリックする こちらへ 詳細情報を参照する

Turnigy Fabrikator、私たちの最悪の秘密はここにあります。私たちが漏れていなかったことは、それがどのように良かったです。これは、3倍の価格のプリンタの機能と品質で市場にお金のプリンタのための最高の値です。

もはやそれは今のコンピュータと一緒にフラットパックの家具を配置する能力を持つ誰もがアクセスできる、ハードコアハイテク好きと工業デザイナーの排他的な領域の3D印刷技術ではありません。あなたが飛行機、マルチローター、車、ボート、ヘリコプター、ロボット、電車、あるいはアニメの置物にしているかどうかFabrikatorはすぐにあなたの最も汎用性の高いツールとなるでしょう。古いモデルまたはあなたのために稀な部分は、単に既存の部分を変更することを見つけることができませんか?今、あなたはあなたがそれをするとき、あなたが欲しいものを印刷することができます。

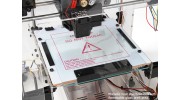
Turnigy Fabrikatorは、お近くのHobbyKingの倉庫からすでに利用可能なABSとPLAフィラメントを使用することができ、150ミリメートル/秒で達成可能な高品質の仕上げを印刷することができます。ゴーンは、寝る前にプリンタを設定し、あなたが立ち上がったときに、ジョブが完了することを望んの日です。 3Dプリンタは、ちょうどプリプロダクションモデルや設計のための概念実証のためでしたが、今はデザイン、印刷、アプリケーションのすべての種類に一部を使用することができます。

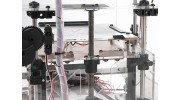
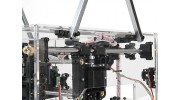
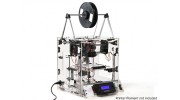
堅実なフレームをフィーチャーしたこの非常によく設計されたプリンタは、超安定したクワッド・レールは、あなたがすることなく、再び精度の高い作品の時間と時間を印刷することが可能であることを意味プリント板、高品質NEMAクラスモーター、取り外し可能なガラス印刷プラットフォームとツインベルトY軸ドライブをサポート一定の機械的な調整の必要性。

これは単に素晴らしいマシン、我々はさらに一歩それをとっていると、あなたはステップバイステップで構築するための指針となる一連のビデオを作成している、ユニークなライブダイナミックで更新可能なトラブルシューティングガイドと一緒にあなたのプリンタを設定していないこと以下のファイル]タブの下で利用可能ですが、Fabrikatorを使用するように簡単ですので、あなたは多くの助けを必要とされることはありません。

あなたのためにできる限り利用しやすいFabrikatorを作るために私たちは一緒にあなたがビデオシリーズと一緒に優れたマニュアルに従うならば、あなたはそれが数時間に組み込まれていますフラットパックキットを、置くために簡単なように設計しています。それは私たちが一緒に1を入れて、私たち以上の技術スタッフを持って、彼はそれが6時間未満で起こっていたので簡単です。

特徴:
•ボールベアリングライナーロッド
•アンチバックラッシュ・ドライブで圧延リードスクリュー
•フェノール熱安定化ベッドW /取り外し可能なガラスの印刷領域
•温水プリントベッド
•NEMA 23と17のモータ
高速印刷のための•4ロッドサポートするプリント板
•6は、高精度のための完全なプリンタのサポートを両面
•SDカードケーブルを無料印刷|
•PLAとABSフィラメントの互換性
•トップフィード抗バインドスプールフィード
•ツイン印刷冷却ファン
アクティブ冷却しながら•2Aヒートシンクステッパドライバ
•220〜110V A / C互換
•ホーミングとリミットスイッチ
•フライチューニング上との完全な液晶GUI
•大150x150x100mmの印刷領域
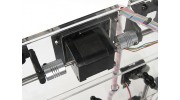
•デュアルベアリングツインベルトY軸ドライブをサポート
•ヘビーデューティー12Volt 29Ampパワーサプライ
•オープンソース制御アーキテクチャとサポート
•フルパーツサポートや将来の拡張プラットフォーム

仕様:
全体のサイズ:360x400x600mm
プリントサイズ:150x150x100mm
ノズル径:0.4ミリメートル
フィラメントの直径:1.75ミリメートル
印字速度: 最大300ミリメートル/秒
印刷プラットフォーム: 取り外し可能なガラス印刷プラットフォームとフェノール熱安定化ベッド
フィラメントタイプ:ABSとPLA

必須:
お好みのフィラメント

***マニュアルへのリンク***

  • Turnigy Fabrikator 3D Printer
動画をアップロードする

動画をアップロードするには登録してください サインイン または 新規登録

トピック
並び替え
最新のトピック
* ニックネーム:

* あなたの返信:


下のフィールドに画像に表示されているテキストを入力してください
*検証コード:
キャンセル
提出する
新しいトピックを投稿する
* ニックネーム:

* あなたのトピック:


下のフィールドに画像に表示されているテキストを入力してください
*検証コード:
投稿トピック

レビューを書くために登録してください サインイン または 新規登録

jeremy | 確認済みの購入者

  • Overall
  • Quality
  • Value

Customer Rated

Oct 22, 2015

I've been running having good, consistent results with this printer. I've had absolutely amazing results with Taulman 910 (nylon) filament with a nozzle temp of 245, bed temp of 65 and a very thin coat of pva/water 4:1 on the bed, no brim required. With ABS, the best results were nozzle 255, bed 110 with the side apertures closed with cardboard to minimise uneven cooling. pva/water 4:1. Using a brim ensured adequate initial adhesion and prevented curling of the printed body. I've been printing shells 1.2mm and layers 0.1, 0.2 and 0.3. I've run this printer via USB and via SD and I now use it mostly in standalone mode with an SD card. Be careful when using the manual axis feed as the software tends not to ramp up and the stepper motors miss steps and appear to ignore the axis end sensors. After manual axis/extruder manipulation, I always reboot. Print area could be greater for my use and dual feed for PVA support structure printing would be brilliant.

Hadtstec | 確認済みの購入者

  • Overall
  • Quality
  • Value

Certified Buyer Rated

Aug 13, 2015

this is my first 3D Printer and I am very happy with it. The YouTube videos and the manual made it real easy to put everything together and get started :-)

harlequin2 | 確認済みの購入者

  • Overall
  • Quality
  • Value

Customer Rated

Jun 26, 2015

The assembly is not all that simple, the difficult bits are the wiring and running it all in the right places. The photos are quite obscure. I ended up with some wires too short to reach the control panel and others way too long. And they don't supply enough cable ties!
There is no mention of the "front fan" in the instructions and it turns out to be held on by a magnet....
The top cover on mine didn't fit being about 2 mm too long and none of the mounting holes line up.

It seems not bad value, but the freight cost was a real killer.

I'll comment further when I actually get it going which might be some time yet. I have to go out and buy more cable ties!

Harry | 確認済みの購入者

  • Overall
  • Quality
  • Value

Customer Rated

May 28, 2015

I had this printer, after i built it, it worked but was going out of alignment on the y axis, after adjusting the belt tension to no avail the arduno board popped with a puff of smoke and the screen went blank.and that was it. I disassembled is and sent it back and just over a week later received a replacement printer. I have not yet built this printer as i no longer feel confident in the product. The overall quality of the unit seemed very good, it was easy to build and everything fitted correctly. but I think it needs some more work and a bigger print bed to be a good, reliable product. I now have a BQ Hephestos Prusa i3 and have had no problems with this printer. it is a little more money but i feel it is worth the extra.

John | 確認済みの購入者

  • Overall
  • Quality
  • Value

Customer Rated

May 18, 2015

Mine arrived last week postal service and packaging was first class easy to follow instructions took about 4.5 hours to build then 1 hour to setup properly lots of guides on YouTube and some mixed comments on this product when using cura software very easy to follow just follow hk YouTube and your sorted head alignment I have set to two layers of paper and not a business card space is to much nossile size is 4mm if anyone wants to know not 5mm which it says in cura software
Found masking tape better for PLA on the bed instead of pva or hairspray as it didn't work for me
Just trying to sort fine tuning out / also just ordered abs filament let you know how it goes

Rustydiver | 確認済みの購入者

  • Overall
  • Quality
  • Value

Customer Rated

May 12, 2015

Its my first ever 3D printer.
Amazed how well packaged it was when it turned up to me, it came in one big box and in that box lots of separate boxes inside that with most off the parts packed inside foam.
Build was straight forward takes about 6 hours recommend watching the videos too. It comes with a printed set off instructions.
All set up and running, print quality is very good and easy too use.

Rod | 確認済みの購入者

  • Overall
  • Quality
  • Value

Customer Rated

Apr 27, 2015

would of been 5 stars for all...but i had major problems to start with, also had to get the firmware updated, as the Z axis bottom end stop sensor simply does not work, the firmware is on the US warehouse files...also one of the motor drivers was faulty resulting in stalling Z Axis, overall this is great value for money but not enough support, the web address for the forum listed in the back of the manual is non existent...have done some prints, which are not too bad, not tried fine stuff yet...make sure you get some kapton tape, as nothing seems to stick well, blue masking tape works good for PLA but leaves the blue residue, i have the extruder set with the gap of 2 pieces of paper thickness, seems ok some people have it touching the bed, oh & don't use Cura V15 only 14.12 as this seems to work still having issues with USB but put on an SD card this seems ok

Simon | 確認済みの購入者

  • Overall
  • Quality
  • Value

Customer Rated

Apr 26, 2015

Absolutely fantastic value. This is without a doubt the best printer I've used for 300, and I've built a lot. Here's a video of it printing, second print ever, zero tuning after initial setup. https://www.youtube.com/watch?v=uZWCexKvF9M

ausi1972 | 確認済みの購入者

  • Overall
  • Quality
  • Value

Customer Rated

Apr 26, 2015

OK So now had the printer running for a week and found you need to replace the 20AWG heated bed cable for some thicker 14AWG then your heated bed will get up to temp much quicker and remains stable.
For getting good adhesion to the bed just put a thin layer of pritt stick (glue stick) on the bed and wipe over with a damp cloth to leave a thin film of PVA glue. Then you parts will stick very well. Make sure the fans are set to come on whilst printing with ABS so the parts cool quickly and prevent any curling or warping.
All working very well now. Will try some PLA in it next week and let you know if any settings need changing for it.
But for ABS just go with the defaults of 220 deg for extruder and 110 for bed. Printing at 0.3mm layer height & 50mm/s seems fine for quick jobs but 0.1mm layer height and 20mm/s seems to produce amazingly smooth results.
Just make sure you set the auto home so that the bed is just touching the extruder.

Phil | 確認済みの購入者

  • Overall
  • Quality
  • Value

Customer Rated

Apr 24, 2015

I've had this printer for nearly a week, faulty huco, odd screws that aren't 2mm whatever they say, incorrect positioning of the vertical limit sensor caused initial bed crash, and then once all assembled sd card detected but the GUI says 'no card'. Support appears to be completely missing, forum also missing as is the troubleshooting guide. Online chat really slow and only suggested RMA. So I have a large heavy paperweight that I spent my good money for. As anyone can tell I'm not bitter just really disappointed.

  1. 1
  2. 2
顧客ファイル
No File Name Download [446]
turnigy 3d with pla filament Download [651]
Fabrikator Q&A Download [228]
ファイルをアップロードする

ファイルをアップロードするには登録してください.
お願いします サインイン または 新規登録 今すぐ愛好家を助け始めましょう!