Leverancier worden Blog Nieuwe items
Registreren

Totale prijs

US$ 0,00

Winkelmand 0 Winkelmand 0 Loading...

MINI MWC Flight Control Board en DSM2 compatibele ontvanger ACC / GYRO / BARO / MAG

Generating Links

MINI MWC Flight Control Board en DSM2 compatibele ontvanger ACC / GYRO / BARO / MAG

Prijs:

Now save bespaar US$ 0,00 US$ 0,00

US$ 35,98
Al gekocht Discontinued Product

Please continue searching for a similar product.
SKU:
9154000006-0
Geen verzendkosten? Klik hier meer leren!

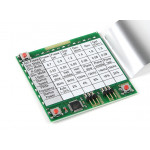
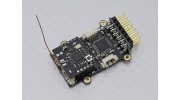
De nieuwe Mini MWC flight control board is mijlpaal in de vooruitgang en de vindingrijkheid van de MWC platform. Het combineren van de kracht van de ATmega328P met een accelerometer, gyroscoop, barometer en digitale kompas met een on-board 7-kanaals DSM2 compatibele ontvanger (met een onboard bind knop!). Alle verpakt op een kwaliteit dubbele koperen PCB met gouden coating verbindingen en footprint niet veel groter dan een grote munt! De wereld van Mini Multi-rotoren net gevangen tot hun grotere broer.

De MWC platform biedt een waslijst aan functies en beschikken over dergelijke; Auto te stabiliseren, hoogte hold, eenvoudige modus en nog veel meer, en met de beschikbare GPS optie zelfs rondhangen in een ingestelde positie en terug te keren naar huis opties! U kunt zelfs kiezen voor een optionele OLED-scherm hechten voor eenvoudig programmeren en feedback!

Kenmerken:
• 7CH DSM2 compatibele ontvanger (PPM SUM)
• Self-voltage controle
• FTD1 bescherming
• ATMEGA328P Microcontroller
• MPU6050 Accelerometer en Gyro
• BMP085 Digital barometersensor
• HMC5883L Digitale manometer / Compass
• C8051F330 MCU
• CYRF69103 Radio
• Dual IIC Ports
• UART
• GPS-Port (GPS niet inbegrepen)
• OLED-scherm Port (OLED niet inbegrepen)

De volgende functies kunnen worden gerealiseerd door de MINI MWC flight control board:
-auto stabilisatie
Stabiliseren de hoogte
-Vaste Rubriek cursus
-Hovering Op een geïdentificeerde positie (moet 12C-GPS converter board en ondersteunt door GPS)
automatisch -Return vlucht (moet 12C-GPS converter board en ondersteunt door GPS)
-En meer

MINI MWC vlucht raad ondersteunde modi:
-GIMBAL-Individuele cradle head stabilisatie
-SINGLECOPTER-VTOL enkele as
-BICOPTER-BICOPTER Avatar
-Tricopter
-Flying WING
-VTAIL
-Vaste-Wing vliegtuig
-4-As (QUADX, QUADP, Y4)
-cradle / gimbal head stabilisatie
-6-Axis (Y6, HEX6, HEX6X)

Opties niet inbegrepen: (Stock zal spoedig komen)
-MX-FTDI programmeerstick hulpmiddel
-OLED Scherm, kan op MINI MWC vlucht besturingskaart direct worden gemonteerd
-IIC Te UART converter board, Het is voor het veranderen van de UART signaal van GPS om een ​​IIC signaal
-GPS module

specs:
Grootte: 47.7X23.5X11mm
Gewicht: 7,8 g
Werken spanning: 5-8.4V

* Zender voor MINI MWC flight control board moet DSM2 en 4CH of hoger (wij raden 6CH of hoger) ondersteunen

Upload video

Registreer u om video's te uploaden aanmelden of registreren

Onderwerpen
Sorteer op
Meest recente onderwerpen
* Bijnaam:

* Uw antwoord:


Voer de tekst in de afbeelding in het onderstaande veld in
*Verificatie code:
annuleer
Bevestig
Plaats een nieuw onderwerp
* Bijnaam:

* Uw onderwerp:


Voer de tekst in de afbeelding in het onderstaande veld in
*Verificatie code:
Onderwerp plaatsen

Registreer u om beoordelingen te schrijven aanmelden of registreren

Motoko | Geverifieerde koper

  • Overall
  • Quality
  • Value

Great Board but need some solid set docs

Jun 11, 2017

The board is great the only thing is sorting out all the setting I am use to Arduino for 3d printers but there is a lot of information on how to set up the firmware. this board is not one that you just plug and go it has a lot of setting that need to be made and not a lot of documentation. Be ready to do hours of research on the internet finding answers. All the answers or not easy to find and a lot of it is for the v1.2 board along with hit and miss. I am still trying to get the serial sum ppm sorted out and a issue of the heading being 180 degree out roll and pitch seem to have been sorted out. The binding to the orange orx DSM2/X module #9171000536-0 for the Trunigy X9 goes well. I still have a ways to go setting up this board before my 650mm hexa will be ready to fly.

EdAmps | Geverifieerde koper

  • Overall
  • Quality
  • Value

Customer Rated

May 19, 2015

This is a great little 250 racer controller. I had a heck of a time getting the channel order correct for my OrangeRX T6. I loaded it with MultiiWii 2.3
and modded the config.h file a lot. The channel order is odd being PITCH,YAW,THROTTLE,ROLL in the ppm_sum setting. Also, I was able to get the buzzer and VBAT working great. I will try to post my config.h file and hardware mods to the files section.

Kontraptionist | Geverifieerde koper

  • Overall
  • Quality
  • Value

Customer Rated

Dec 20, 2014

This is actually a lovely little board, it's just that it's NOT a plug and play kind of thing. If you're good with microcontrollers and electronics, then you're gonna do just fine. You need to get the little JST connectors and hook it up to an FTDI board and at the very least re-program it with the latest MultiWii software. Since the board lacks a DTR pin to automatically reset the CPU (for activating the bootloader) it's imperative that once you click "UPLOAD" on Arduino that you time it such that you power up the board (by plugging the serial adapter in to the board) such that it comes to live a second or so before the code starts to push out of the FTDI. Obviously, you can't do this by plugging the USB in to and out of the computer, as Arduino would have to re-enumerate the ports, etc etc, so make and break the connection between the FTDI and flight controller. You also have to upload the right setup of firmware. See (and set up) the config.h file in the Arduino firmware. Download it directly from Multiwii. The how-to and particulars of the code are out of scope of what I feel like talking about right now. Sorry. You're smart, you can figure it out. I will say this... It likes to fly backwards, so keep that in mind.

But yeah, all the nay-sayers, give it another chance. This board is fine, you just don't know what you're doing.

noobmatic2000 | Geverifieerde koper

  • Overall
  • Quality
  • Value

Customer Rated

Oct 27, 2014

This board is absolute garbage. I have spent months researching and tuning this board to perfection....there is NO vibrations, even used the low pass filter. ESC's calibrated 20 times, eprom's wiped, etc. ,etc... after a minute, it will just DROP from the sky. There is nothing I can do to fix it. I have read EVERY thred, EVERY post, and EVERY review. (yes leocopter too) And this board WILL NOT fly reliably. At some point during flight it will just DROP to the left and crash. GARBAGE!!! Multiwii is also a dieing trend. Sure it has a lot of features (that no one seems to ever get working right) operating systems like open pilot, and other easy to use interfaces. So put it like this, you can buy a small toy quad (hubsan) for about the same $, and it flies AWESOMELY!! You put this board in anything, you are looking at LONG hours becoming a computer programmer just to never get it to work right. I know many other boards have great reviews...but NOT this one!! GARBAGE!

Leocopter | Geverifieerde koper

  • Overall
  • Quality
  • Value

Customer Rated

Oct 20, 2013

This is a very good FC. Not easy to set up, but well worth the effort if you want the ultimate tiny MultiWii board !
This is how I set up my Mini MWC boards (after a lot of tinkering ...):
1- Building an interface between your FTDI usb board and the flight controler is quite simple : solder the 4 leeds of the 'mini micro 4 pin 1.25 T-1 JST connector' cable (the same one used on the Neo 6-M GPS module - SKU: 387000004) to a 6 pin header (GND, 5V, Rx, Tx). Solder an extra wire to GND. On the other end of the wire, solder a probe (I my case a 1 pin header with heatshrink tubing). You will need this probe to put the 328P in programming mode. Make sure Rx goes to TX and vice versa.
2- Plug you new interface cable to the board (or power the board via the output headers - D3 to D11) while pushing the bind button (the one on the top circuit board where the antenna is soldered). The red LED will blink rapidly. You are now in binding mode. Turn on your DSM2 compatible transmitter while pressing on its bind button (if you have a ORX orange DSM2 module). The LED on the Mini MWC will stop blinking then will stay on. It is now binded to your Tx.
3- In Arduino load the MultiWii shetch and select the HK_MultiWii_SE_V2 board. Its is fully compatible with the Mini MWC (you get the correct sensor orientation). Also make sure you uncomment #define SERIAL_SUM_PPM. If you plan to use an OLED display

Klantbestanden
No File Name Download [2082]
No File Name Download [1597]
Initial config - simple and detailed Download [2096]
No File Name Download [2546]
instructions and updating Download [1446]
What is This ? Download [906]
No File Name Download [58]
EdAmps Hardware Mods Download [134]
LeoCopter's Guide Download [1464]
No File Name Download [1727]
  1. 1
  2. 2
Upload bestand

Registreer om bestanden te uploaden.
Alstublieft aanmelden of registreren om nu hobbyisten te helpen!

Accessoires