Стать поставщиком Блог Новинки
Зарегистрируйтесь

Итоговая цена

0,00 A$

Корзина 0 Корзина 0 Loading...

Kingduino ЖК-клавиатура Щит

Generating Links

Kingduino ЖК-клавиатура Щит

Цена:

Now save сохранить 0,00 A$ 0,00 A$

3,16 A$
Уже купили Discontinued Product

Please continue searching for a similar product.
Артикул:
009000008
Хотите бесплатную доставку? кликните сюда Узнать больше!

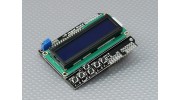
Этот ЖК-клавиатура Щит (мужской контактный разъем) для Arduino состоит из 16x2 голубой ЖК-дисплеем и 6 моментальных кнопок, слева направо, выберите, влево, вверх, вниз, вправо и RESET. Экран может быть непосредственно подключен на плате Arduino Duemilanove, что делает пайку или FLY-проводку для подключения ненужной. Штыри 5, 6, 7, 8 и 9 используются в качестве интерфейса к ЖК.

Особенности:
• Легко читать 16x2 синий ЖК-экран
• Регулируемая контрастность
• Ламинированные дизайн и легко расширить
• Использование модифицированного LCD4Bit интерфейса

Модифицированный LCD4Bit Интерфейс:
Для того, чтобы сохранить порт SPI для будущего использования, цифровой IO булавки DB7-10 и pin11 и пин 12, используемые в оригинальной библиотеке LCD4Bit были перемещены в DB4-7 и пин-код 8-контактный разъем 9 соответственно.

Клавиатура:
Клавиатура состоит из 5 кнопок - выбор, влево, вверх, вниз и вправо плюс кнопки RESET. Для сохранения цифрового ввода-вывода пин-ресурс, интерфейс клавиатуры используется только один канал АЦП. Ключевое значение считывается через 5 ступени делителя напряжения резистора. При нажатии клавиши, АЦП считывает значение напряжения через делитель напряжения; то значение напряжения сравнивается с пороговым значением напряжения сохраняются в массиве, чтобы определить, какая клавиша была нажата.

Технические характеристики:
Рабочее напряжение: 5 В постоянного тока
Размеры: 80 х 58 х 22мм
Вес: 52g

* Примечание: Это не оригинальный Arduino продукт бренда.

Загрузить видео

Для загрузки видео необходима регистрация войти в систему или Зарегистрируйтесь

Темы
Сортировать по
Самые последние темы
* Псевдоним пользователя:

* Ваш ответ:


Пожалуйста, введите текст, показанный на картинке, в поле ниже
*Код верификации:
Отменить
Отправить
Опубликовать новую тему
* Псевдоним пользователя:

* Ваша тема:


Пожалуйста, введите текст, показанный на картинке, в поле ниже
*Код верификации:
Опубликовать тему

Для того, чтобы оставлять отзывы, необходимо зарегистрироваться войти в систему или Зарегистрируйтесь

Andraz | Проверенный покупатель

  • Overall
  • Quality
  • Value

Certified Buyer Rated

Dec 03, 2013

The pin out for this dispay shield is as folows (display-arduino): D4-4, D5-5, D6-6, D7-7, RS-8, E-9.

Buttons have a nice click to them and are all (except reset) readable from pin A0 (schematic for how they are conected would be nice HK)

When pluged in to an arduino it interferes a bit with the power jack but not a whole lot, the board itself sticks about 1cm over the left edge of arduino.

I've tested this with arduino due which is 3,3V, the display works prfectly, the same cant be said for the buttons as they are powerd from 5V, some hardware hackong will be required.

Other than that it feels like a decent quality product, the soldering is ok, I'd like to see more solder in a couple of places, but over all good for the price.

| Проверенный покупатель

  • Overall
  • Quality
  • Value

Certified Buyer Rated

Sep 18, 2013

Excelente producto con buena calidad

flash242424 | Проверенный покупатель

  • Overall
  • Quality
  • Value

Certified Buyer Rated

Jul 20, 2013

The Arduino LCD screen is a backlit LCD screen with headers. You can draw text, images, and shapes to the screen with the LCD library. There is an onboard micro-SD card slot on the back of the screen that can, among other things, store bitmap images for the screen to display.

Peter | Проверенный покупатель

  • Overall
  • Quality
  • Value

Customer Rated

May 11, 2013

Works well, is very easy to use... just plug in shield, and you're good to go! Hobbykings documentation could have been a bit better though.

Use LiquidCrystal lcd(8, 9, 4,5, 6, 7); in order to control the LCD, IO pin 10 to control the backlight (recommend you use pinMode(10,INPUT) to turn on, and pinMode(10,OUTPUT) to turn it off).

Only uses one analog pin (A0) for the five control buttons - you just need to work out the different voltages that you'll read when you press each button - which will vary slightly depending if powering Arduino from external power or USB. 6th button is linked to reset line.

Minkey | Проверенный покупатель

  • Overall
  • Quality
  • Value

Customer Rated

Jan 20, 2013

This is a cool little shield. Good price. I personally haven't found much use for it, but it was cool when I first got it up and running. I did a more in depth review at the address below.

aeronauticsroboticsandhotglue * blogspot * com/

Toton | Проверенный покупатель

  • Overall
  • Quality
  • Value

Certified Buyer Rated

Jan 04, 2013

Very good component, the example software is downloadable in the files section. Very easy to use good contrast very cheap if compared with performances

SadSack | Проверенный покупатель

  • Overall
  • Quality
  • Value

Certified Buyer Rated

Nov 10, 2012

For the money you can't buy this and make it yourself. I'd put this on your must have list.

OlliW BLHeliBox over on Helifreaks

| Проверенный покупатель

  • Overall
  • Quality
  • Value

Certified Buyer Rated

Oct 20, 2012

Very good product , compatible with arduino LCD library

No_Hazmats | Проверенный покупатель

  • Overall
  • Quality
  • Value

Customer Rated

Oct 08, 2012

Mine works as advertised. If you do a google search on 'LCD keypad shield', the top returns are the pages for this device from therobotshop_dot_com. There are schematics and excellent code examples.

I have a couple of possible uses for mine - hopefully I can port the code from the 3DRobotics ground station. I also tested it with a 4 x 20 display that I have and it works too.

Very nice device at an extremely good price.

GustPilot | Проверенный покупатель

  • Overall
  • Quality
  • Value

Certified Buyer Rated

Sep 07, 2012

nice LCD pad shield, like other users have brought out, if you think it is broken, it aint, just change the contrast

  1. 1
  2. 2
Файлы клиентов
dimmer_for_backlight_by_pushing_select_b Download [1]
LiquidCrystal_Adjust_Contrast Download [0]
LCD and button usage sample code Download [1]
LCD and button test code Download [11]
Загрузить файл

Зарегистрируйтесь, чтобы загружать файлы.
пожалуйста войти в систему или Зарегистрируйтесь Начните помогать коллегам по хобби!