Стать поставщиком Блог Новинки
Зарегистрируйтесь

Итоговая цена

0,00 A$

Корзина 0 Корзина 0 Loading...

MINI MWC совет управления полетами и DSM2 совместимый приемник ACC / гироскоп / BARO / MAG

Generating Links

MINI MWC совет управления полетами и DSM2 совместимый приемник ACC / гироскоп / BARO / MAG

Цена:

Now save сохранить 0,00 A$ 0,00 A$

56,87 A$
Уже купили Discontinued Product

Please continue searching for a similar product.
Артикул:
9154000006-0
Хотите бесплатную доставку? кликните сюда Узнать больше!

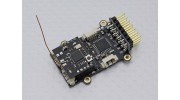
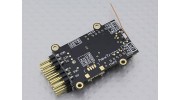
Новый Mini MWC плата управления полетом является важной вехой в развитии и изобретательности платформы MWC. Объединяя мощь ATmega328P с Акселерометр, гироскоп, барометр и цифровой компас с 7 на канале DSM2 совместимым приемником на борту (с кнопкой бортового связывания!). Все упаковано на качество двойной медной печатной платы с элементами золота с покрытием соединений и занимаемой площади не намного больше, чем большая монета! Мир Mini Multi-роторы просто догнал их больше брата.

MWC платформа предлагает длинный список функций и функции, как; Авто стабилизации высоты захват, Простой режим и многое другое, а также с имеющейся опцией GPS даже задерживаться в заданном положении и вернуться к дому варианты! Вы даже можете выбрать, чтобы прикрепить дополнительный OLED-экран для удобного программирования и обратной связи!

Особенности:
• 7CH DSM2 совместимый приемник (PPM SUM)
• самодиагностикой напряжения
• FTD1 защита
• ATmega328P Микроконтроллер
• MPU6050 Акселерометр и гироскоп
• BMP085 Цифровой датчик барометрического
• HMC5883L Манометры цифровые / Компас
• C8051F330 MCU
• CYRF69103 Радио
• Dual IIC Порты
• УАПП
• Порт GPS (GPS не входит в комплект)
• Порт OLED-экран (OLED не входит в комплект)

Следующие функции могут быть реализованы через плату управления полетом MINI MWC:
-Auto стабилизация
-Stabilize Высоту
Неподвижная курс заголовок
-Hovering В идентифицированной положении (нуждается в 12С-GPS плата преобразователя и поддерживает с помощью GPS)
-Возвращение Полета автоматически (необходим 12C-GPS плата преобразователя и поддерживает с помощью GPS)
-И более

MINI MWC полета плата поддерживает режимы:
-GIMBAL -индивидуумом Стабилизации колыбели головы
-SINGLECOPTER-VTOL одноосный
-BICOPTER-BICOPTER Аватар
-Tricopter
-FLYING КРЫЛО
-VTAIL
Неподвижная крылом самолета
-4-Axis (QUADX, QUADP, Y4)
-cradle / стабилизация карданная головка
-6-Axis (Y6, HEX6, HEX6X)

Параметры не входит: (Фото будет в ближайшее время)
-MX-FTDI инструмент программирования палки
-OLED Экран, может быть установлен на MINI MWC плате управления полетом напрямую
-IIC К УАПП плате преобразователя, Это для изменения УАПП сигнала GPS на сигнал IIC
-GPS модуль

Технические характеристики:
Размер: 47.7X23.5X11mm
Вес: 7,8 г
Рабочее напряжение: 5-8.4V

* Передатчик для MINI MWC платы управления полетом должен поддерживать DSM2 и 4CH или выше (мы рекомендуем 6CH или выше)

Загрузить видео

Для загрузки видео необходима регистрация войти в систему или Зарегистрируйтесь

Темы
Сортировать по
Самые последние темы
* Псевдоним пользователя:

* Ваш ответ:


Пожалуйста, введите текст, показанный на картинке, в поле ниже
*Код верификации:
Отменить
Отправить
Опубликовать новую тему
* Псевдоним пользователя:

* Ваша тема:


Пожалуйста, введите текст, показанный на картинке, в поле ниже
*Код верификации:
Опубликовать тему

Для того, чтобы оставлять отзывы, необходимо зарегистрироваться войти в систему или Зарегистрируйтесь

Motoko | Проверенный покупатель

  • Overall
  • Quality
  • Value

Great Board but need some solid set docs

Jun 11, 2017

The board is great the only thing is sorting out all the setting I am use to Arduino for 3d printers but there is a lot of information on how to set up the firmware. this board is not one that you just plug and go it has a lot of setting that need to be made and not a lot of documentation. Be ready to do hours of research on the internet finding answers. All the answers or not easy to find and a lot of it is for the v1.2 board along with hit and miss. I am still trying to get the serial sum ppm sorted out and a issue of the heading being 180 degree out roll and pitch seem to have been sorted out. The binding to the orange orx DSM2/X module #9171000536-0 for the Trunigy X9 goes well. I still have a ways to go setting up this board before my 650mm hexa will be ready to fly.

EdAmps | Проверенный покупатель

  • Overall
  • Quality
  • Value

Customer Rated

May 19, 2015

This is a great little 250 racer controller. I had a heck of a time getting the channel order correct for my OrangeRX T6. I loaded it with MultiiWii 2.3
and modded the config.h file a lot. The channel order is odd being PITCH,YAW,THROTTLE,ROLL in the ppm_sum setting. Also, I was able to get the buzzer and VBAT working great. I will try to post my config.h file and hardware mods to the files section.

Kontraptionist | Проверенный покупатель

  • Overall
  • Quality
  • Value

Customer Rated

Dec 20, 2014

This is actually a lovely little board, it's just that it's NOT a plug and play kind of thing. If you're good with microcontrollers and electronics, then you're gonna do just fine. You need to get the little JST connectors and hook it up to an FTDI board and at the very least re-program it with the latest MultiWii software. Since the board lacks a DTR pin to automatically reset the CPU (for activating the bootloader) it's imperative that once you click "UPLOAD" on Arduino that you time it such that you power up the board (by plugging the serial adapter in to the board) such that it comes to live a second or so before the code starts to push out of the FTDI. Obviously, you can't do this by plugging the USB in to and out of the computer, as Arduino would have to re-enumerate the ports, etc etc, so make and break the connection between the FTDI and flight controller. You also have to upload the right setup of firmware. See (and set up) the config.h file in the Arduino firmware. Download it directly from Multiwii. The how-to and particulars of the code are out of scope of what I feel like talking about right now. Sorry. You're smart, you can figure it out. I will say this... It likes to fly backwards, so keep that in mind.

But yeah, all the nay-sayers, give it another chance. This board is fine, you just don't know what you're doing.

noobmatic2000 | Проверенный покупатель

  • Overall
  • Quality
  • Value

Customer Rated

Oct 27, 2014

This board is absolute garbage. I have spent months researching and tuning this board to perfection....there is NO vibrations, even used the low pass filter. ESC's calibrated 20 times, eprom's wiped, etc. ,etc... after a minute, it will just DROP from the sky. There is nothing I can do to fix it. I have read EVERY thred, EVERY post, and EVERY review. (yes leocopter too) And this board WILL NOT fly reliably. At some point during flight it will just DROP to the left and crash. GARBAGE!!! Multiwii is also a dieing trend. Sure it has a lot of features (that no one seems to ever get working right) operating systems like open pilot, and other easy to use interfaces. So put it like this, you can buy a small toy quad (hubsan) for about the same $, and it flies AWESOMELY!! You put this board in anything, you are looking at LONG hours becoming a computer programmer just to never get it to work right. I know many other boards have great reviews...but NOT this one!! GARBAGE!

Leocopter | Проверенный покупатель

  • Overall
  • Quality
  • Value

Customer Rated

Oct 20, 2013

This is a very good FC. Not easy to set up, but well worth the effort if you want the ultimate tiny MultiWii board !
This is how I set up my Mini MWC boards (after a lot of tinkering ...):
1- Building an interface between your FTDI usb board and the flight controler is quite simple : solder the 4 leeds of the 'mini micro 4 pin 1.25 T-1 JST connector' cable (the same one used on the Neo 6-M GPS module - SKU: 387000004) to a 6 pin header (GND, 5V, Rx, Tx). Solder an extra wire to GND. On the other end of the wire, solder a probe (I my case a 1 pin header with heatshrink tubing). You will need this probe to put the 328P in programming mode. Make sure Rx goes to TX and vice versa.
2- Plug you new interface cable to the board (or power the board via the output headers - D3 to D11) while pushing the bind button (the one on the top circuit board where the antenna is soldered). The red LED will blink rapidly. You are now in binding mode. Turn on your DSM2 compatible transmitter while pressing on its bind button (if you have a ORX orange DSM2 module). The LED on the Mini MWC will stop blinking then will stay on. It is now binded to your Tx.
3- In Arduino load the MultiWii shetch and select the HK_MultiWii_SE_V2 board. Its is fully compatible with the Mini MWC (you get the correct sensor orientation). Also make sure you uncomment #define SERIAL_SUM_PPM. If you plan to use an OLED display

Файлы клиентов
No File Name Download [2082]
No File Name Download [1597]
Initial config - simple and detailed Download [2096]
No File Name Download [2546]
instructions and updating Download [1446]
What is This ? Download [906]
No File Name Download [58]
EdAmps Hardware Mods Download [134]
LeoCopter's Guide Download [1464]
No File Name Download [1727]
  1. 1
  2. 2
Загрузить файл

Зарегистрируйтесь, чтобы загружать файлы.
пожалуйста войти в систему или Зарегистрируйтесь Начните помогать коллегам по хобби!