Become a Supplier Blog New Items
Register

Total Price

$0.00

Cart 0 Cart 0 Loading...

Mini Fabrikator 3D Printer By Tiny Boy - Orange - US 110V

Generating Links

Mini Fabrikator 3D Printer By Tiny Boy - Orange - US 110V

Price:

Now save save $0.00 $0.00

$194.99
Already Purchased Discontinued Product

Please continue searching for a similar product.
SKU:
9171000772-3
want FREE shipping? Click here to find out more!

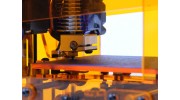
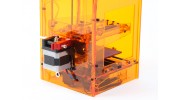
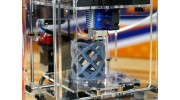
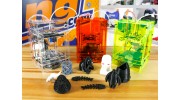
Mini Fabrikator 3D Printer by Tiny Boy will blow you away with the quality of print a little machine can produce, it is comparable to big machines many, many times the price. Our aim with bringing this printer to market was to offer our customers a cost effective way to try out 3D printing with a footprint that can accomodate most hobbyist's early projects. Because of the small overall size of this printer it will fit in even the most restricted of work spaces and can be picked up and easily stored, making it ideal for schools and students.

The original TinyBoy printer was designed Parker Leung around a concept that by 2016 every student should have the opportunity to have a 3D printer on their desk; the youth is our future and this is part of the reason why we got behind it. The other reason was because of the incredible print quality you can achieve in this printer for such a low cost.

Like any computer hardware the Mini Fabrikator needs software to run it, we recommend to use Repetier-Host as the printing software as it is a simple to set up and use program that most customers will have up and running in about 15 minutes. Other than this the printer is ready to go.

We have also partenered with Tiny Boy so you are able to use their community to discuss your Mini Fabrikator with other users, share ideas and show off your lastest print projects. You will also find other useful tips and tricks, Repetier-Host settings, copy of the manual and keep up to date with the latest news from the Tiny Boy team. Click here to find out more.

Tiny Boy was originally designed as a learning activity where school students would build the printer themselves, this means the printer is incredibly easy to maintain and service yourself and even upgrade with things like LED lights, direct cooling, LCD screen and SD card slot or even a heated print bed.

For further information watch these videos:
Daily Video
Set-up Guide
Printing Guide

Mini Fabrikator by Tiny Boy, 3D printing for everybody.

Features:

• Large Print area for its overall size
• Open Source designed and supported
• Compatible with many popular applications and software
• Portable and easy to set up
• Future proof with easy community driven DIY modifications
• Marlin based hardware with ability for expansion
• Fun for all ages

Specs:
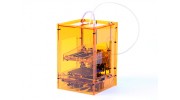
Size: 15cm(W) x 15cm(D) x 22cm(H) (excl. filament holder)
Print size: 80mm x 80mm x 80mm
Filament: 1.75mm PLA
Board: mega2560 ramps1.4 with 4 A4988 stepstick
Power supply: External 12V 6A Transformer
Software: Repetier-Host

TinyBoy is an open design 3D printer and you can get the details here Github account (http://github.com/HKCOTA/TinyBoy) which is licensed under a Creative Commons Attribution-ShareAlike 4.0 International License CC-BY-SA

  • Mini Fabrikator 3D Printer By Tiny Boy - Orange - US 110V
Upload video

Only registered users can upload video. Please, log in or register

Topics
Sort by
Most Recent Topics
* Nickname:

* Your Reply:


Please, enter the text shown in the image into the field below
*Verification Code:
Cancel
Submit
Post a new Topic
* Nickname:

* Your Topic:


Please, enter the text shown in the image into the field below
*Verification Code:
Post Topic

Only registered users can write reviews. Please, sign in or sign up

entomophile | Verified Buyer

  • Overall
  • Quality
  • Value

Customer Rated

Oct 15, 2015

Great little printer! Shipping was very fast from Hong Kong; only 4 days to US. I have an Ultimaker 2 so I was a bit skeptical about the Fabrikator Mini. It arrived fully assembled and very well packed; no damage. I went through the setup in the manual. Only issue was the heated bed kept defaulting to "ON" and the print wouldn't start even though I was printing with a filament setting that sets the heated bed to zero. So I just changed the default filament settings and deleted my custom filament setting and everything worked fine. Printed some feet to raise the base for better air flow. First one printed fine. Then I got a terrible jam. I could not remove the filament. After disassembling the hot end I realized there was a burr in the heatsink preventing the bowden tube from being inserted fully. I cleaned up the burr by hand with a drill bit, reassembled everything, and it worked perfectly. Printed the rest of the feet and an octopus from Thingiverse. Print quality was very good with the default settings. The build volume is small but for the price it is the perfect for your first 3D printer.

| Verified Buyer

  • Overall
  • Quality
  • Value

Certified Buyer Rated

Sep 08, 2015

I've had 8 days to play with mine so far. Only took 2 days to get here from HK. It's built pretty well but the tolerances on some parts could be better like the rail supports as they have a little slack. The screw for the y axis limit switch needs to lose the nut and possibly moved away from the switch by a mil to safely get the full 80mm. The X axis needs to be either set to 85mm instead of 80mm in the firmware to use the whole table and have it centered properly or set to 83 and move the switch closer to the outside of the machine a mil so its centered but not running the extruder right to the edge of the table on the other side. The z axis needs a notch on the top of the carriage corner so the wires for the limit switches don't get pinched on the last 2 mm of travel up top. The current limiters need to be set under the motor limits so people stop getting fried motors, mine were set a lot higher then the motors were rated for, and now work fine turned down although still hot. The extruder fan blows hot air all over the Y axis motor which explains why a lot of people lose y axis precision in the middle of long prints from it overheating so a better fan setup and/or y axis carriage arrangement is needed. The bottom of the machine needs to be vented with a fan and alot more passive vents to keep the 2 motors and board cool, i just printed the corner feet that are going around to have a big air gap on all sides and put a old pci slot fan underneath with the inlet facing up to b

Upload your file

Only registered users can upload files.
Please log in or register to start helping your fellow hobbyists today!